Fashion
Make Your Own DIY Shower Jellies & Feel Luxurious

Whether you’re struggling under a mountain of exams or have simply had a bad day at the office, a hot bath or shower is often the ultimate way to relax. Particularly if you incorporate some shower jellies or bath bombs into your routine. One of my personal favorites is the former.
With the rise in popularity of natural beauty brands like LUSH and other premium pampering outlets, having a relaxing five seconds in the tub is no longer just about running some water and splashing in a bit of bubble bath for good measure. Instead, there are heaps of other goodies to consider. Bath bombs? Bubble bars? Shower crèmes? That’s why I’ve decided to show you how to create your very own DIY luxury shower jelly by adapting JENerationDIY's YouTube tutorial.
You can even give these to a friend or family member as a gift. What better way to show them you understand their hectic schedule and need for "me" time? Alternatively, you can make a batch for yourself that's on-hand for your hours of need.
Whatever you choose, the recipe is easy to follow, can be customized to incorporate all your favorite frills and fancies, and, best of all, features ingredients that you probably have hiding around your house anyway. Hurrah. Shall we begin?
What You'll Need
To make DIY shower jelly, you'll need the following ingredients:
- Gelatin Powder
- Water
- Hand Soap
- Food Coloring
- A Mold
- Mixing Bowl
- Spoon
- Scented Fragrance (Optional)
- Glitter Or Eyeshadow Pigment (Optional)
1. Pour Gelatin Powder Into A Bowl
Knox Gelatin Powder, $10, Amazon
Start by pouring unflavored gelatin powder into a mixing bowl. Gelatin tends to be sold in small packets, which makes measuring out the recipe even easier. That said, if you are using a product out of a box, then a cup is always a good starting point.
You can then add more or less depending on how much jelly you want to make. It stores extremely well, so for this tutorial I made quite a lot of it.
2. Add Boiling Water
Next, add boiling water to the bowl. There’s no exact measurement for this. Instead, I reccomend using however much you see fit. Although I was taking my time with this in order to photograph it, it’s important that you add and mix all of the ingredients together before the water begins to cool down and set.
3. Mix Together
Once you’ve added both the gelatin and water, stir the mixture together until the gelatin has dissolved. You want to try to make the solution as smooth as possible; otherwise your jelly will be filled with lumps and bumps.
4. Add Hand Soap
Seventh Generation Soap, $3, Amazon
In order for the jelly to actually work — it's not just there to sit and look pretty, after all — you need to mix in hand soap. It doesn’t have to be fancy, though. Here I’m using the one from my bathroom. It’s slightly scented, which is a major plus, but feel free to go as crazy or as basic as you'd like. Neon soap, glitter soap, fragranced soap: The possibilities are endless.
5. Mix, Mix, Mix!
Again, mix the soap into the solution well. By now it should be beginning to look something like this. Sure, the color might not be too pleasing — I'll fix that in a minute — but the texture is even and the gelatin-water combo is still runny.
6. Pour In Food Coloring
Liqua-Gel Food Coloring, $13, Amazon
This is the fun part. Add a few drops of food coloring into the mixture to create whatever hue you desire. Here I’m using a fuchsia shade, although I also created some more jelly in bright blue, Barbie pink, and teal to show off more color options. Fret not: The food coloring won’t dye your skin. Resembling an Avatar isn’t the look we’re going for here.
7. Add Sparkles Or Glitter
Martha Stewart Crafts Iridescent Glitter, $13, Amazon
If you want to add any extras like glitter or sparkles, now’s your chance. Personally, I didn’t want to use craft glitter in my jelly. After all, we all know it’s a nightmare to get off your skin! Instead, I used loose eyeshadow pigment to create this marble, galaxy-like effect.
8. Pour The Mixture Into A Mold
Heart Shaped Tray Mold, $5, Amazon
As I mentioned at the beginning of this tutorial, you’re going to need a mold to put your jelly in. This can be anything from ice cube trays to baking sheets.
I had this heart ice tray lying around the house and, since it’s plastic, thought it would be perfect when it came to creating shaped jelly.
If you’re not fussed about what shape your jelly is, setting the mixture in a bowl or cup is just fine. I’d recommend using either plastic or paper since it’ll be easier to remove the jellies once they have set.
9. Pop It In The Fridge
When you pour the mixture into your mold, try to do this slowly. That way it won’t start to bubble up. Once it’s in, pop the molds in the fridge for two to three hours.
10. Remove The Mold
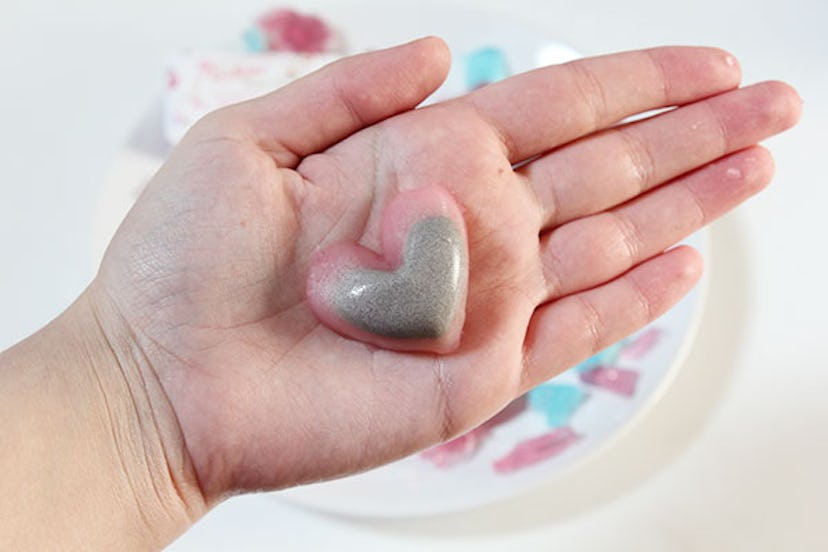
After your jellies have set, remove them from the fridge and take them out of their casing. Here, you can see I popped the heart jelly out of its mold quite easily. I added eyeshadow pigment to the initial mixture and it created this silver pattern in the center of the DIY, which looks pretty neat.
Alternatively, if you didn’t opt for shaped jelly and simply set the mixture in a bowl or cup, remove it and cut it into smaller chunks. This creates a crystal-like effect. These smaller pieces look great stored and displayed in mason jars.
11. Store In Bathroom

So there you have it! Your shower jelly is all done and ready to use. Alongside using it in the shower, it can also double up nicely as hand soap, so you might want to place a jar close to the tub and the sink.
Now all that’s left to do is run the warm tap. As Sylvia Plath once suggested, a bath can pretty much solve any problem.
Want more fashion and beauty tips? Check out the playlist below, and be sure to subscribe to Bustle's YouTube page for more hacks and tricks!
Images: Emma Matthews
