My experience with Fashion Week has usually been second-hand, with the occasional party-invite from a friend that works for a high-end fashion designer or having to plan parties around the week-long event because a large part of the population shuts down their social life for some runway action. For years I've tuned out stories about fashion week, eye-rolled my way through blocked-off streets during the NYFW parade of supermodels, and blocked out the whole to-do until it was over. This year, my tune was changed as I was serving a different purpose. I was surprised my debit card recognized some of the high end names for this 2015 Spring Collection: BCBG Max Azria, Kate Spade, and of course Rebecca Minkoff showed a long-awaited preview of new styles, color palettes, and my absolute fave: NAILS!
Let me be real, my excitement level increases by at least 25 percent when wearing 3D glasses, which all the models rocked on the Minkoff runway. Take a mediocre movie and put it in 3D and I'll swear it was the best movie I have ever seen. That being said, I knew to take my own opinions with a grain of salt as I moved through the crowd backstage at Rebecca Minkoff. When I saw some serious nail art going on, I had to know if it was for real.

Essie has been one of my go-to brands at drug stores, since the polishes have a decent price tag for their high quality. Minkoff's 3D inspired collection spiraled Essie to create a water color masterpiece, entirely freehand, to highlight the spring clothing line.

Even though I was still coming down from my childish excitement of 3D glasses on the runway, I knew this nail art was dope and definitely worthy of all funky nail-lovers. Fortunately for us DIY Nail Nerds, essie provided a helpful list of steps to achieve the look, so I didn't even wait a full 24 hours to test the "freehand watercolor nail art" on myself. Below, some helpful tips to recreate the look yourself.
The Watercolor Look

1. Apply a white coat of polish first to make colors seem brighter
First off, I completely ignored the white coat of polish bit. I am still very content with the shades. Look, it's not my first time at the DIY nail art rodeo — the more coats of polish you have on your nails the more likely you are going to be chipped tomorrow.
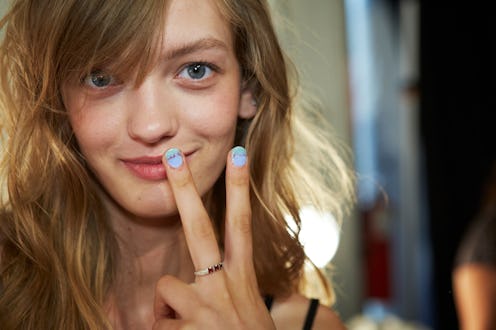
2. Apply one coat of your base color to about half the nail
I went ahead and applied my first color to the entire nail, only because I didn't read the directions closely. However, I do think that if you have a shaky hand, it's probably better to cover your nail completely.
3. Apply one coat of your second color to the other of the nail, making the two colors overlap
This is exactly why I was glad I did step 2 wrong — covering your nail free hand can be tricky if you are shaking like you just saw a ghost. This gave me the freedom to mess up a bit without having to worry that part of the nail wasn't covered.
4. Take a smaller brush to draw a thin line, where the two colors connect and immediately apply a top coat, the color will smudge because the polish is still wet.

I had Sinful colors nail art polish handy, which have brushes made for drawing, and I used this to draw a thin line across the center of the nail. You should absolutely put the top coat over immediately, make sure that line is thin enough to keep its shape slightly AND has enough polish on it to actually carry into the top layer of polish.

When you add your top coat remember these two things: Number 1, you are going to get whatever color you chose all up in your top coat's brush. That means you can't go back over the nail without having further smudge action on the bottom, the results of doing so range from kind of cool to nail-fiasco. Number 2, when you put the brush back in the bottle, you are going to be dying the top coat polish ever so slightly.
But it's all worth it, because how rad is this mani?
Images: Courtesy essie (2); Kristin Collins Jackson (3)
