Although I really did enjoy Lena Dunham's book Not That Kind of Girl , my favorite part of her book came right before I even turned the first page — I loved the interior cover design. The ultra intricate Rorschach-esque patterns look dainty and elegant from afar, yet upon further inspection I discovered they are formed by teeny tiny strips of bacon, tutus, French fries, horses, lollipops, and everything in between. Those whimsical little patterns were conceived by Brooklyn-based Flat Vernacular, a company that actually makes custom wallpaper with the same sticker-centric technique. Crazy, right? But at $1,500 for each 27" x 12' panel, it's a little steep.
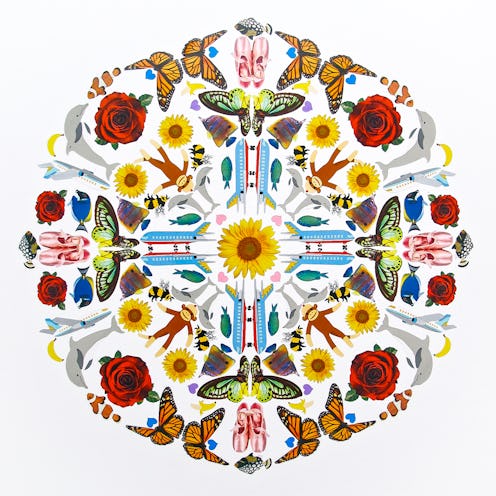
These sticker mandalas offer a bite-size version of that same whimsy, and with little to no actual artistic skill, you can make your own one-of-a-kind piece in less than an hour — without a voice of your generation budget. The best part is that the options here are literally endless. Whether your stickers are totally random or completely curated, you can't lose. These are great to theme for a gift (kid's rooms, your friend who's obsessed with cats, foodies, etc.). You can find stickers of pretty much anything. You could even up the ante with an all-butterfly arrangement à la Damien Hirst.
The Inspiration:

The inside jacket of Lena Dunham's Not That Kind Of Girl. I saw it, I loved it, and I had to try it myself. Now, it's your turn.
What You'll Need:

- Stickers — the more the better. The greater variety of shapes, colors, and sizes, the more you'll have to work with, and the more interesting your end result will be. Be sure you have at least four of each sticker, and eight of as many as you can (this way they can mirror each other in each quadrant).
- A large white art board or high-quality paper (make sure it's acid-free — you will likely want to keep this forever). The one I used is 16 x 20" but a square would work just as well. If you want to get the finished piece framed, that's something to consider as well.
- Plates of various sizes, plus one small bowl or cup
- Ruler or straight edge
- A pencil
- A good eraser — make sure it's clean and won't smudge or leave marks.
1. Trace Your Circles
Though you could go full mathematician and bring out those protractors and compasses you likely have lying around, I decided to go a simpler route.

First, place your largest plate in the center of your board or paper. Take your pencil and trace lightly around the the edge.

Place the next smaller plate in the middle of your first circle and trace the perimeter.

You get the idea. Keep going until you've traced all of your circles from the outside in.
2. Draw Your Grid

First make sure to mark the center of your smallest circle.

Then, draw a cross to divide your circle into quadrants. Draw a line to divide each of those quadrants in half, and then in half again.

Your finished grid should look something like this. You don't need to go totally crazy making the sections exact, but get it as close as possible — the more precise you are here, the easier the rest of the process will be, and the better your end result.
3. Stickers!
Start with a round or very symmetrical sticker to place at your center.

Then, start branching out along the grid. Make sure you're keeping things as aligned and mirrored as you can.

Keep extending from the center — you'll get the hang of it quickly.

If you find that your grid isn't as exact as it could have been, you can cheat the stickers a bit to keep everything in line.

I've found that it's easier to start with your larger stickers to get the overall shape going. You can fill in gaps later with the little guys.

Like that! Keep adding stickers until you're happy with the size and shape of your mandala.

Fill in the gaps as much as you want, but remember that some blank space looks nice and brightens up the piece as a whole.
4. Erase The Grid

This is where a super clean, sharp-cornered eraser is your friend. Get in all those little spots, and wipe away any pencil peaking through.
Et Voila! You are an artist. You are now ready to show your work off on Instagram, text your mom a pic to validate the many talents of her spawn, and display your work somewhere that will attract oohs and aahs from all who visit your four-floor walkup.
Images: Jenna Wexler (15)
