Life
Pin Your Travels With This Pretty DIY Map Project
If you're a world traveler, then this DIY map project was made for you. While digital photo albums, videos, and social media posts may all be friendly reminders of the amazing voyages you've made in recent years, why not actually have something tactile in your home to display exactly where you've been? Or maybe you're looking for inspiration on where to go next — here's a map to remind you of all the places you still have yet to explore.
This simple DIY project, created by lifestyle bloggers The Unprecedented and To Vogue Or Bust, is for the modern and stylish travel lover, creating a special decor piece with a beautiful print that captures all of your journeys. Trust me, this project is going to be the highlight of your mantel (or wherever you choose to hang it), and an amazing conversation piece for when you have visitors. (Can't you just hear it now, "Wait, you've been to Africa!?") Follow these 10 easy steps by these two lovely bloggers to bring your own travels together on a piece of artwork you can proudly showcase in your home. This project is downright beautiful, and best of all, an inspiration to keep on traveling.
What you need:

Step by step instructions:
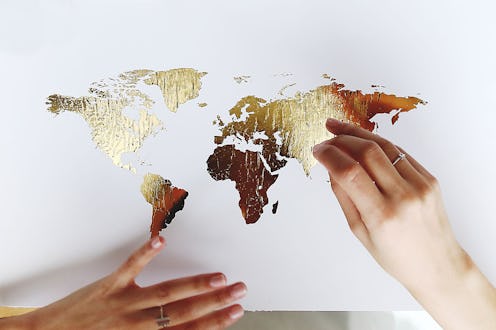
1. Purchase the gold foil world map print from I See Noise. (Or if you have another printed map that you love, feel free to use that as well!)

2. On a large piece of foam core board, place your world map print in the area you wish to cut.

3. Trace the rectangular outline of the world map print on the foam core board to create guidelines on where to cut.

4. Line up the edge of a large ruler with the lines you have drawn.
5. Cut the lines with a sharp X-Acto knife.

6. Once you have cut your foam core board to match the size of the world map print, layer the print on top of the board to ensure the size is accurate.
Pro tip: Using a nail file, sand down the edges of your core board to create smooth, fine lines.

7. Using a spray adhesive, lightly spray glue onto your foam core board. (This can be very sticky, so precision is key when layering your print!)

8. Line up one side of the world map print with the core board from corner to corner, and smooth with your palm along the way to place the entire print onto the core board.
Pro tip: Place your cardboard on top of the print and using the ruler, press it from the center out to ensure no air bubbles form between the print and foam core.


9. Let everything sit for about five minutes.
10. Start to pin! You can use any size or decorative pins you like. For a fun detail, use sewing thread to wrap around your home city and drag from each place you've traveled!


Check out the step by step DIY video as well!
Images: The Unprecedented, To Vogue Or Bust
