Life
14 Yoga Poses That Will Tone Your Whole Body

The days are longer, the weather is warmer, and you're 100 percent ready to beat the heat and throw on a bathing suit. While it's true that every single body is a bikini body, no matter what, sometimes a little exercise in the summer is just what you need to up your mood, energy, and confidence. And if you're looking to increase your strength and flexibility this summer, you don't necessarily have to clock countless hours in the gym in order to achieve your goals. Yes, you read that correctly, there is another way to get stronger that doesn't require a super-heavy set of dumbbells. One word for you, friends: Yoga.
"There is a dynamic process that occurs when a muscle is both stretched and strengthened during the same exercise," says Alanna Zabel, yoga instructor to the stars and founder of AZIAM. "The muscle fibers and connective tissue elongate, while the added resistance creates tension that increases collagen fibers to maintain a lean and toned appearance."
As a certified yoga instructor myself, I can confidently back Zabel up on these claims. Yoga, especially power yoga and vinyasa-based classes, is a fantastic way to tone the body, as it targets every major muscle group from the legs to the booty, all the way up to the abs and the arms. This ancient practice truly covers it all, while also calming the mind, releasing tension and eliminating stress (among many other things). Long story short, yoga is good for your mind, body, and soul — what's not to love?
"In these types of classes you are building internal heat, instead of simply sweating from external heat," Zabel says. "You will also move fluidly through a greater number of postures, which increases your odds for a full-body workout."
Whether power yoga, vinyasa, or just child's pose is your style, there are doable yoga moves for everyone that will leave your body feeling strong, powerful, and capable of anything this summer. And that's really the goal — isn't it?
1. Downward-Facing Dog
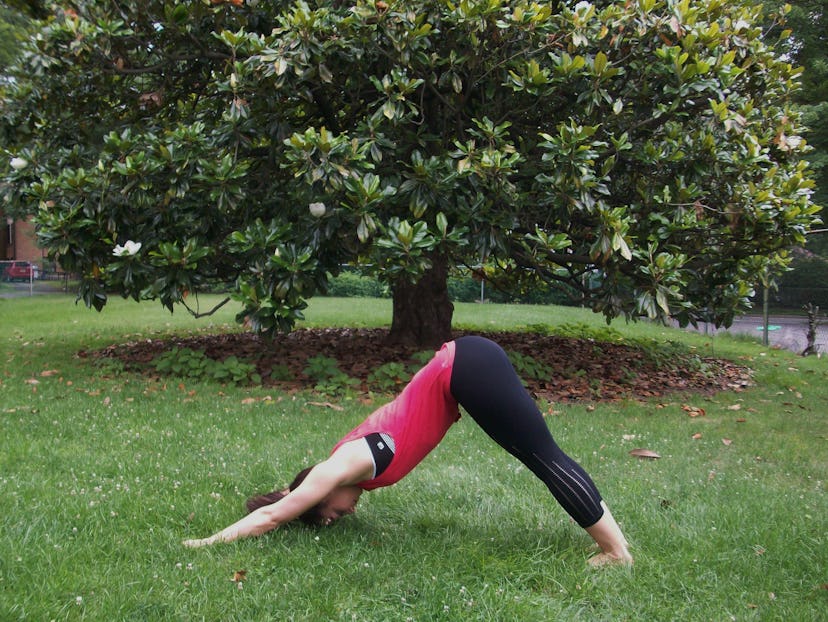
Benefits: Stretches the shoulders, hamstrings, calves, arches of the feet and hands; strengthens and tones the arms and legs.
Beginning in mountain pose (standing position), reach your hands down to the floor, bending your knees if need be. Walk your hands out about three to four feet in front of your toes. Pushing into your palms, lift your hips up toward the sky and press back into your heels, trying to get them flat to the ground (keep a slight bend in your knees to help your heels get closer to the ground). Keep your gaze toward your legs and continue pressing your chest toward your thighs to create a nice flat back.
2. Plank Pose
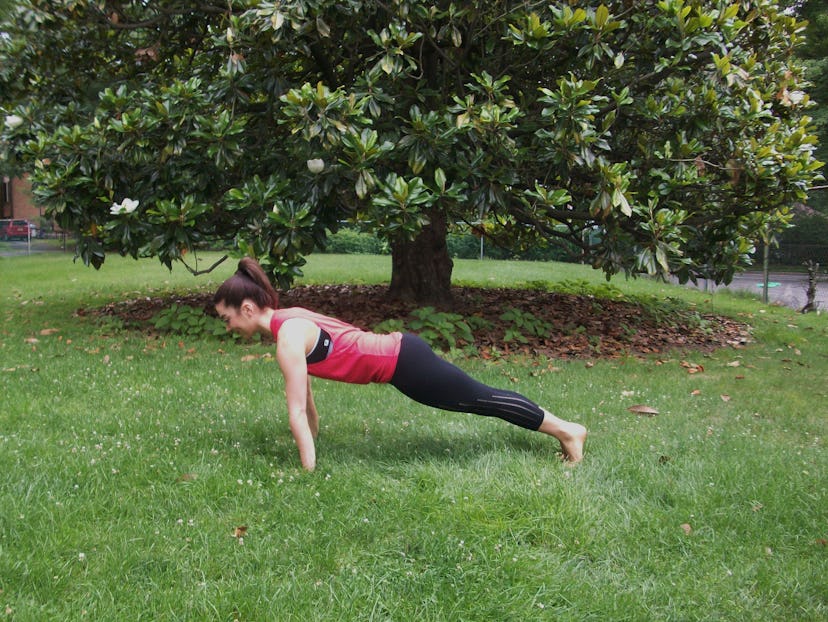
Benefits: Increases the tone of your deltoids, entire abdominal wall and quadriceps.
From downward dog, raise up onto your tiptoes, and rolling over them, come into a high push-up position. Hold here for a few deep breaths, making sure your wrists are directly in line under your shoulders, heels are lifted towards the sky and hips are lowered and in line with the rest of your body. Keep your gaze a few inches in front of your finger tips, creating one straight line with your head, neck and back, all the while tightening through the belly and engaging your core.
3. Forearm Plank

Benefits: Increases the tone of your deltoids; engages entire abdominal wall; strengthens arms and legs; stretches shoulders, hamstrings, calves and arches.
From plank position, lower one forearm at a time down to the ground, pressing the forearms and elbows firmly into the floor. Firm your shoulder blades against your back and spread them away from the spine, as you spread your collarbones away from the sternum. Try to keep your body in one straight line, engaging through the core, and gaze towards your fingertips on the floor.
4. Chatturanga

Benefits: Strengthens the arms and wrists; tightens and tones the abdomen.
From a regular or high plank position, begin to slowly lower your torso and legs down to the ground in one straight line, a few inches above and parallel to the floor. Keep your gaze forward and elbows in towards your sides and pointing back behind you, as you draw the pubis toward the navel and broaden the space between your shoulder blades. Make sure to keep the legs engaged and active while holding this pose.
5. Cobra and Upward Facing Dog

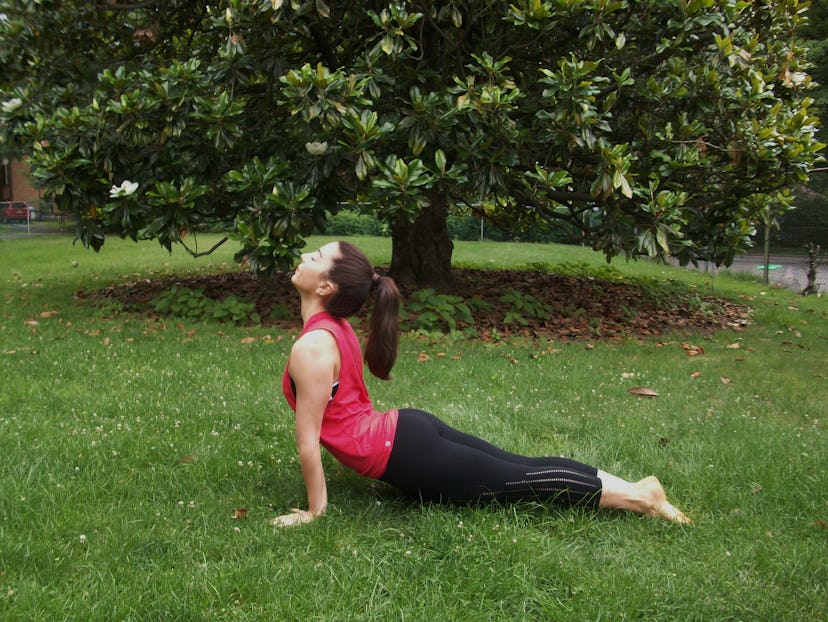
Benefits: Improves posture; strengthens the spine, arms and wrists; stretches the chest and lungs, shoulders and abdomen; firms the buttocks; and stimulates abdominal organs. Begin by laying down on your stomach, or lower your body down towards the ground through chatturanga, and then firmly press your palms into your mat alongside your chest. Roll your shoulders back and start to lift your chest up and off the mat, while keeping your hips firmly planted on the floor, keeping a slight bend in the shoulders to avoid injuries. Remain here in cobra, or for a deeper stretch, begin to straighten your arms as you lift your thighs and knees off the ground, pressing into the palms and tops of the feet, and lift your gaze up towards the sky, finding upward-facing dog pose.
6. Locust Pose


Benefits: Strengthens the spine, buttocks, and backs of arms and legs; stretches the shoulders, chest belly and thighs; improves posture; engages abdominal muscles.Begin by lying down on your belly with your forehead resting on the floor, arms along the sides of your torso and palms facing up towards the sky. Take a deep inhale and as you exhale, raise your head, upper torso, arms and legs away from the floor. Reach strongly through your legs as you firm your buttocks and extend through your toes. Keep your gaze down on the ground, slightly in front of you. You can choose to stay with your arms reaching back towards your feet, or clasp your hands back behind you, interlacing your fingers, as you roll your shoulder blades back and down and lift your chest even higher off the ground.
7. Boat Pose
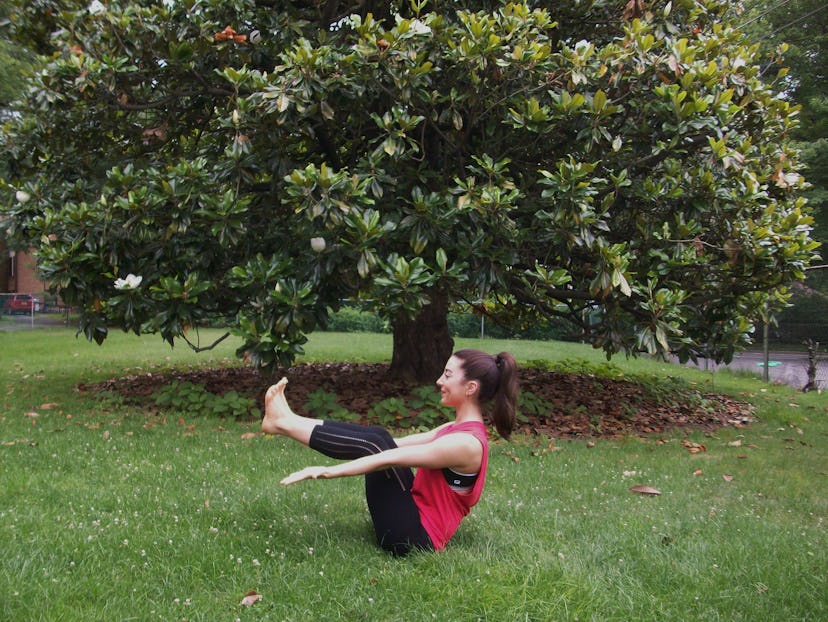

Benefits: Strengthens abdomen, back, neck, quadriceps and hamstrings.Sit down on your mat with your knees close to your chest, feet planted on the floor. Keeping your body close to vertical, hold behind your knees and lift your feet, bringing your shins parallel to the ground. Keep your hands on the backs of your thighs, or release them, stretching the arms forward. For an extra challenge, try straightening your legs and raising your arms up towards the sky.
8. Warrior I

Benefits: Stretches the chest, lungs, shoulders, neck, belly, and groins; strengthens the shoulders, arms, back, thighs, calves and ankles.
Beginning in mountain pose, step your feet 3.5 to 4 feet apart. Keep your front foot pointed straight forward, as you angle your back foot outwards 45 to 60 degrees (should be pointing towards the top corner of your mat). Extend your arms up towards the sky as you bend through your front knee, aligning it directly over your ankle, and squaring off your hips as much as possible with the front edge of your mat.
9. Warrior II
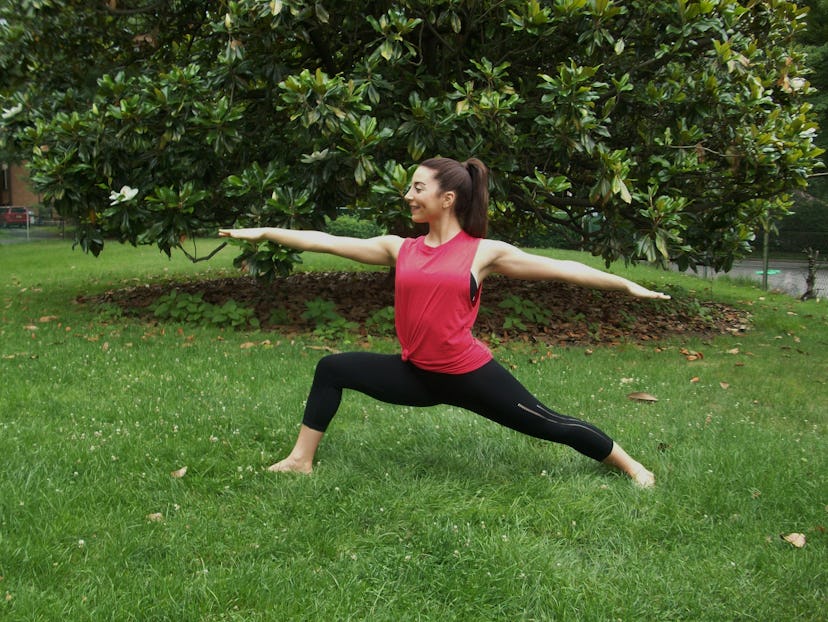
Benefits: Strengthens the shoulders, arms, and legs, and opens the hips.From warrior 1, keep the bend in your front knee as you spin your back foot so it's parallel with the back of your mat, and open up your arms so that your hands are reaching in opposite directions. Let your hips face the side of the room, as you turn your gaze over your front shoulder, extending through the fingertips and pressing the shoulders away from your ears.
10. Warrior III

Benefits: Strengthens the ankles, legs, shoulders and back; tones the abdomen; improves balance and posture.From warrior 2, spin your back foot so that your heel lifts off of the ground as you raise your arms overhead and turn your upper body back forward, finding a high lunge position. From here, keep your arms lifted as you shift your weight forward, launching off your front leg and raising your back leg straight out behind you. Balancing on your front leg, flex your back toes down towards the ground, trying to create one straight line with your body from your fingertips to your head, back and toes, allowing your gaze to remain on the floor, a few inches in front of your supporting foot.
11. Half Moon Pose

Benefits: Strengthens the lower back, upper back, glutes, hamstrings and obliques; stretches the groins, hamstrings and calves, shoulders, chest and spine.From warrior 2, keep your front knee bent as you slide your back foot forward about 6 to 12 inches. At the same time, reach your front hand about 12 inches forward of your front foot, letting your fingertips or hand come down to the ground as you straighten your supporting leg and extend your back leg behind you. Continue to engage by flexing the back foot and reaching your lifted arm up towards the sky, opening up your hips and chest towards the side of the room as much as possible. Gaze can stay down on the ground, straight ahead, or lifted up to the sky for more of a challenge.
12. Tree Pose
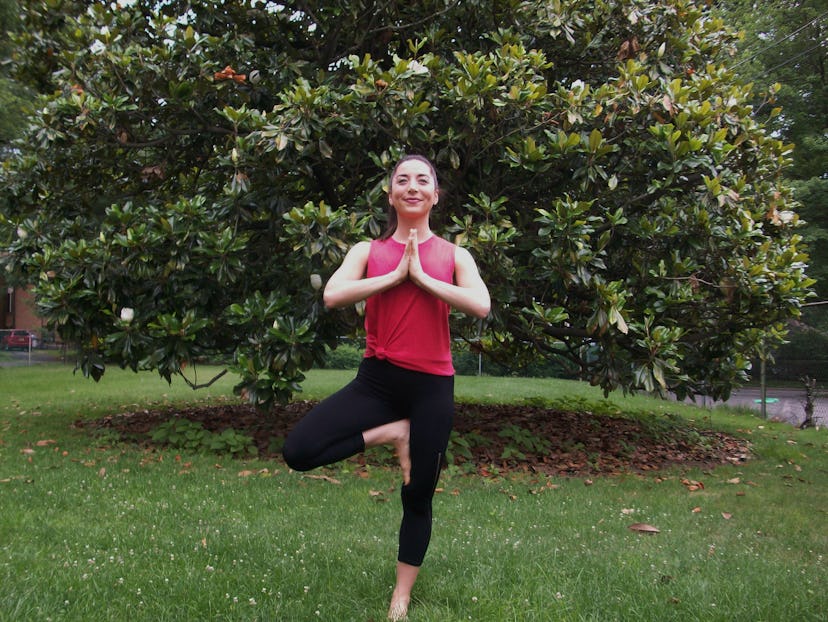
Benefits: Strengthens thighs, calves, ankles and sine; stretches the groin, inner thighs, chest and shoulders.Starting in mountain pose, interlace your fingers around your right knee as you pull it in towards your chest. From here, grab a hold of your ankle and rest the inside of your foot along the inside of your standing leg, either up above the knee on the thigh, or down below the knee along your calf. Bring your hands to a prayer at your heart, or raise them up towards the sky, creating branches with your arms.Note: Make sure to avoid resting your foot directly on your kneecap as this can lead to injuries.
13. Bridge And Wheel Pose


Benefits: Strengthens the entire backside, including upper back, glutes and hamstrings.Lying flat on your back, arms by your sides, bend your knees and plant your feet on the floor, bringing your heels as close to your bottom as you can. With your palms pressing into the floor, lift your hips off the ground and up towards the sky. Hold here for 4 to 8 breaths, continuing to push through the feet and lifting the hips as high as you can, or choose to roll your shoulder blades underneath you, clasping your hands together to form a fist. When releasing, gently release your hands and slowly roll your spine back down to the floor, one vertebra at a time. For more of a challenge, go for a full wheel. Start in the same position, knees bent, feet planted firmly into the floor. Bend your elbows and bring your hands back behind you, planting your palms on the ground so that your fingertips are pointing towards your body and elbows are pointing up towards the sky. Press into your palms and come up onto the top of your head as you lift your hips up towards the sky. Slowly start to straighten out your arms as you lift your head away from the ground, remembering to lift through the chest and press through the feet as well. Try holding for 4 to 8 breaths, then curl your chin back in towards your chest, bend through the elbows and begin to slowly lower your body back down towards the ground.
14. Headstand

Benefits: Increases overall tone of the lower body, including legs and lower torso; strengthens arms, legs and spine; tones the abdominal organs.Begin on hands and knees, in a table top position. From here, bring your forearms to the floor and clasp your hands, interlacing your fingers. Keeping your fingers interlaced, open up your palms, creating a basket with your hands where you'll place your head. Set the crown of your head on the floor and snuggle the back of your head against your hands. Take a deep inhale and lift your knees off the floor. Staying on the balls of your feet, begin walking your feet closer to your elbows, forming an inverted "V." Firm the shoulder blades and lift them towards the tailbone, elongating the front torso. From here, you can choose to raise one leg at a time up and overhead, take both feet up at the same time, or even lightly hopping both feet off the floor. Continue to breathe and engage through the forearms, core and legs as you hold your headstand. Beginners should hold for around 10 seconds, gradually adding 5 to 10 seconds each time your practice. Get my yogi look from Fabletics.Images: Maggie Giuffrida
