Fashion
How To Use Smashbox's New Contour Stick Trio
Ever since Kim K. started selfie-ing with a perfectly contoured face, I was hooked — I needed to know how long it took her to do it, how she achieved the look, and most importantly, how I could get those fierce cheekbones on my face. You can imagine then how I felt when I came across the Smashbox Step-By-Step Contour Stick Trio. My heart literally skipped a beat. Only the three basic shades needed, and it came with a sharpener, no less? So. Brilliant.
At first, I was a bit hesitant, having been burned by bad contour kits before, but I thought I would give it a try. I'm no stranger to contouring — how-to tutorials are everywhere, from Pinterest to Instagram. There are countless palettes to try, creams to buy, and powders to apply, and after trying almost all of them, I think I can finally say I found the one.
These contour crayons not only melt into your skin like butter, but work on a variety of different skin types and tones. They're easy to use, are buildable, and even come with a facial map to show you exactly where to apply each shade for your face shape.
To begin, I prepped my skin with moisturizer and applied a thin layer of my favorite foundation, Makeup Forever Ultra HD Invisible Cover Foundation, using my Beauty Blender. Word of advice: Choose your foundation based on your skin's needs. It'll make such a difference, I promise! Next, I used MAC Studio Finish Concealer to hide any blemishes or redness I had. I finished my look with a cat eye using Kat Von D's Tattoo Liner, some shadow to my crease, and Anastasia Beverly Hills dipbrow pomade to fill in my brows.
Makeup Forever Ultra HD Invisible Cover Foundation, $56, Amazon; Beauty Blender, $20, Amazon; MAC Studio Finish Concealer, $20, Amazon; Kat Von D Tattoo Liner, $30, Amazon; Anastasia Beverly Hills Dipbrow Pomade, $18, Amazon
Now, for the fun part.
No need to be intimidated, guys! The Smashbox Step-By-Step Contour Stick package comes with three makeup crayons — highlight, bronze, and contour. The shape of your face determines where each of these shades go exactly. If you've contoured before, they more or less go in the same areas where you've previously contoured on your face.

Smashbox Step-By-Step Contour Stick Trio, $33, Amazon
Once you have all the shades on your face, it is time to put your Beauty Blender to work! Make sure that your BB is damp and use small, smudge-like strokes, blending all of the shades outward toward your hairline. Make sure that you are also blending the colors into each other, otherwise you'll be left with a distinct line between each shade.
Once you're all blended, you can decide whether or not you want to build upon what you've just applied. I usually add a bit more contour to my cheeks and also add the highlight crayon under my brows and on my cupid's bow on my upper lip. I've seen a few tutorials where the artist will also apply a powder contour to the hollows of their cheeks — it all depends on your preference!
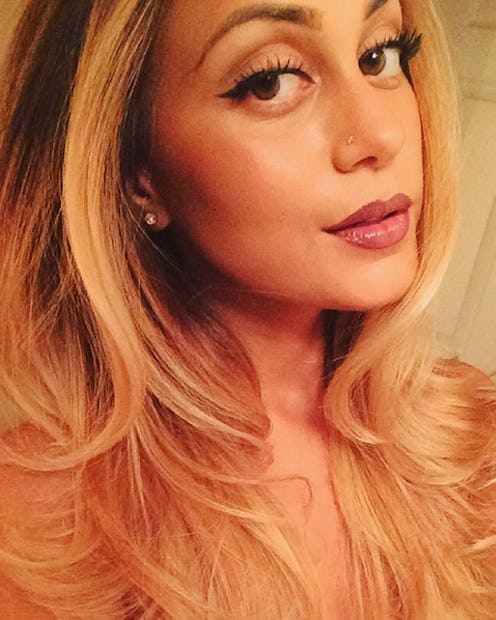
Here's my final look:

This look is so easy to recreate and can be easily taken from day to night by adding some lip color. To the left is how I used my contour stick at work, and to the right is how I vamped it up for a night out!
I highly recommend Smashbox's Step-By-Step Contour Stick Trio, whether you're a contouring newbie or are as good as Kim K!
Smashbox Step-By-Step Contour Stick Trio, $33, Amazon
Image: Krystal D'Souza
