Fashion
12 Last Minute Holiday Nail Tutorials To Follow
Who has a ton of extra time during the holidays? Not me, that's for sure. Making it to the salon for a fresh mani is near impossible, so I rounded up some last minute holiday nail tutorials you can create with colors you already have. Yep, you can get a beautiful, festive manicure without spending the extra time and cash at the salon.
I hate to sound like a grumpy old man here, but kids these days have tons of technology at their fingertips. That is especially true for beauty. The products are better, formulated with improved technology and ingredients. The tools are more accessible, so you can get everything you need for a great mani at the drugstore. Lastly, you don't have to go to beauty school to become a pro — there is a ton to learn on YouTube. Really, there has never been a better time for beauty.
To recreate some adorable, holiday-themed nails you'll need all your favorite polishes (red and green for sure, but it doesn't stop there), a toothpick and a tiny brush. I like to use my eyeliner brushes (and am sure to clean them before and after dipping them into paint). Simple dollar store paint brushes work, too! Once you have all that laid out, it's time to create some holiday-themed claws.
1. Precious Penguins
This tutorial uses a wide range of colors, like blues and blacks to create adorable penguins. It doesn't have to be all red, white and green this year!
2. String Of Lights
Grab a pointed Q-tip and some thin string to create Christmas lights. The string gives a 3D effect and you don't even have to worry about "painting" perfectly.
3. Holiday Sweater
This tutorial is a little more advanced, so only try it if you have a steady hand. With all tutorials, you can enlist the help of tape strips to make sure your lines are exact. If you don't have a dotting tool, cut a Q-tip in half and use the non-padded end.
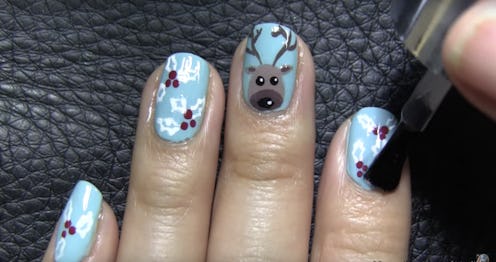
4. Cute Reindeer
Remember to coat your nails first with a base coat, so they stay healthy and protected before applying the base color. If you mess up at any point, use the base color to erase mistakes.
5. Holiday Confetti
Dots are easy! Dotting your nails with classic Christmas colors will look polished without a ton of work.
6. Olaf Nail Stickers
Yep, you can create your own nail stickers using a sandwich bag. Sounds crazy, but this tutorial will walk you through the cheapest, most impressive DIY nails ever.
7. Holly Leaves
A base coat, three dots, and teeny triangles — that's all it takes to create holly leaves on your nails. While it can be time consuming, it is totally worth it.
8. Snowman
If you don't have a toothpick, use a bobby pin to make eyes, noses, or rosy cheeks for a cute little snowman. Remember, you can DIY your own stencils and bypass free handing designs.
9. Gingerbread Man
No traditional colors needed. If you have tons of earthy browns in your nail polish collection, this is perfect for you!
10. Simple Snowflake
You can use any color for your base (probably not yellow — yellow and snow never work well together). Consider a purple, green, red, or blue to act as the backdrop for some falling snowflakes.
11. Peppermint Swirl Nails
You can top any of these designs with a sparkly, glitter and clear nail polish for a bigger statement.
12. Santa Hat
You're sure to make the nice list with these nails. You can use a green or clear, glitter polish for base to switch it up.
Want more beauty tips? Check out the video below, and be sure to subscribe to Bustle’s YouTube page for more hacks and tricks!
Images: LaurDIY/YouTube
