I'm constantly investigating the ingredients in my mom's skin care products and recently, she's become obsessed with a black tea moisturizer that is lightweight, anti-aging, and doesn't clog her pores. I couldn't be happier with her choice as it excludes many of the harmful chemicals of her past skin care routine, but I can't support her decision to pay $90 for any personal care product. That's why I decided to show her how to make a black tea moisturizer that will give her the same plush feeling on her face for a fraction of the cost.
Here's the thing about black tea: It's frickin' incredible on your skin. It's loaded with antioxidants that remove free radicals, it reduces inflammation and irritation, and it's both antifungal and antibacterial. These are all great reasons to introduce tea into your skin care, but let's focus those tannins for a second. Have you ever had a cup of black tea and felt your mouth slightly dry and bitter? Well, that's the magic of the tannins. Tea is one of the richest sources of tannins (not to be confused with tannic acid, which tea does not have) and they come with astringent properties that tighten and heal the skin. Adding black tea to a moisturizer helps balance and support the emollients with its drying properties.
So, how does one go about making their own black tea moisturizer? I've put together some easy steps that will make your tea experience refreshing and affordable.
Step 1: Choose Your Tea

There are plenty of black tea options for you to choose from that can change the aroma of your blend as well as add additional skin benefits. For my black tea lotion, I chose my favorite: Earl Grey. Choosing a GMO free, organic blend of tea is even more important than choosing your flavor. Additionally, I like to choose fair trade to keep my tea ethical and chemical-free.
Step 2: Choose Your Oils

Since tea isn't going to get the job done on its own, pick some of your favorite emollients to add to your lotion. For creams you need to choose oils, water, and butters to mix together and get that creamy effect we've all become accustomed to from OTC lotions. For my oils, I've chosen safflower oil and apricot kernel oil. For my butters? I love working with blend of kokum and mango butter, but for my this latest tea lotion, I'm going to work with shea butter as my mom has particularly rough skin. Butters help harden the lotion, but you can also use beeswax in a double-boiler.
Step 3: Melt Your Butters

If you are working with shea butter, you can blend your shea in with your oils and skip the heating process. I use about 1 to 2 cups of shea butter. For those using kokum, mango, cocoa or solid butters, heat at a low temperature on your stove until liquified. For anyone using beeswax, be sure to heat your wax slowly in a double boiler. Some prefer to add the oils into the butter/wax, but I try to only heat when necessary to avoid losing any nutrients that are going to support the goal of my product.
Step 4: Get Your Oils & Butter Together

Transfer any butter/wax into a large, nonmetal bowl. Then, add your oils of choice: For my second lotion, I'm adding two tablespoons of calendula infused olive oil, two tablespoons of apricot kernel, and about a half cup of coconut oil. The choice of your oils depend entirely on your current skin condition.
Step 5: Additional Ingredients

Now that you've got the base down, it's time to add any lovely ingredients that can help your existing ones work in harmony or keep your lotion lasting longer. I added a teaspoon of vegetable glycerin and a tablespoon of arrowroot powder. These are both totally optional, but I find the arrowroot powder helps the lotion shape and the vegetable glycerin is a good way to keep your products working together. You are welcome to add a good brand of citric acid to extend the life of the lotion.
Step 6: Tea Time

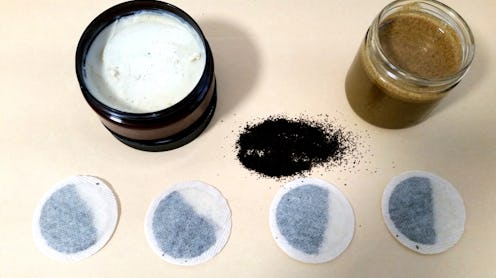
There are a couple of ways you can go about working with tea in lotion. The simplest method is to brew a cup of strongly brewed tea using two teabags to one cup and add the tea into your lotion. If you are planning on doing this step, you may want to add more butter or wax for forming a cream and definitely add preservatives like citric acid. Personally, I have found using loose tea over brewed tea gives my products a longer shelf-life. I used approximately two and a half tablespoons of earl grey tea, adding it directly to my bowl.
Step 7: Blend Ingredients

Blend your ingredients together in a blender for 30 seconds. This is a good time to make any changes like adding filtered water or more oil, depending on how the consistency you're going for. It's important to check to see how the loose tea is blending together as well, especially if it's your first time.

Blend additionally for about three to four minutes, checking the texture regularly. You'll notice the mixture becoming darker. Once it looks like tea, you're ready to move on.
Step 8: Strain Your Lotion

If you chose to work with loose tea, you'll notice little floaties in your mixture. With a mesh strainer over a bowl (again, not metal), pour the contents of the blender over the strainer to separate any flecks. I've never tried this without removing the flecks of tea, but my guess is you could keep it and it would give the same effect as a micro-bead lotion.
Step 9: Add Essential Oils

As a rule, I always add EO's last to whatever it is I'm making. I used a blend of vetiver, cedarwood, clary sage, and frankincense essential oils for this lotion. Of course, if you are unfamiliar with blending essential oils, you can purchase oils already diluted in jojoba oil to avoid irritation. It'll work just as well and save you time on research and math. Honestly, if you've chosen a black tea with a pleasing aroma, you can even skip this step.
Step 10: Using Your Lotion

After you've completed the steps for your homemade lotion, wait for it take form by either storing in the fridge for a couple of hours, or leaving it in a cool, dry place. Either way, make sure you've transferred it to a sealable container. I added water to my lotion so it can be used effectively on dry or damp skin, but if you skipped the water step, it will work best on damp skin.
Step 11: Brag About Your Lotion

Now that you've made your own black tea lotion, you have significant bragging rights: After you've put it all over your body, be sure to blast the crap of it on social media. Your new lotion should keep for 30 days in the fridge (if you used loose tea), but make sure you do smell tests before each use to make sure it hasn't gone rancid.
Image: Kristin Collins Jackson (13)
