Life
Make An Easy Fall Flower Bouquet For Under $30
Autumn is that beautiful season where everything is yellow, orange, and red. You might be busy decorating for Halloween right now, but if you have an empty room that needs some refreshing (or maybe even next to your bed!), there's no better way to add a pop of color than to make your own fall floral bouquet. Creating a fall floral arrangement will bring the colorful outdoors inside — and you can do it on the cheap. Many florists will sell flowers for a few dollars a stem, many times even less than that.
When looking through stems for your bouquet, don't purchase ones that have brown spots or look like they are wilting, no matter how pretty the flower is. Be wary of heavily discounted flowers — even though nothing may look wrong with them, many times they are on their way out. Look for stems that have buds — not full flowers — so that they will open while you enjoy them at home. To help make your arrangement look fuller without spending a ton of cash on larger buds or flowers, choose a greenery or a spray flower as a base. Next, choose flowers that have complementary colors — I chose yellow, orange, and red for my fall arrangement, but you can pick whatever you want.
Looking for some great fall floral choices? I recommend aster, goldenrod, witch hazel, chrysanthemums, daisies, sunflowers, and dahlias. When you buy a stem, think in terms of threes or odd numbers (more on this later), and look for varying flower and stem sizes. You can also think about adding a single dried branch of stems, like millet, cotton bush, or pumpkin peppers.
Once you've made your selection, it's time to get home and start arranging!
What You'll Need:

Gather a pair of scissors, a clean vase or jar filled halfway with cold water, some twine, and of course, your floral stems.
Steps:
1. Arrange Stems by Height

First, you need to separate your stems by height and gather the same flowers together. This will help you gage the arrangement order. Generally, you want to think large to small — the stems that take up the most space to the stems that take up the least.
2. Prep Stem Bottoms

Cut an inch off the flower stem at a 45 degree angle under running tap water. Remove small leaves at the bottom of the stems so that none will be submerged with the vase you chose. This process helps prevent decay, and will keep your flowers alive longer.
3. Start With Your Largest Floral "Filler" Stem

This part is easy-peasy, as this is your first stem. Just make sure you've prepped the stem and removed the bottom leaves from the water.
4. Add Stand-Alone Pieces

Once you've added the filler, now you can start adding in your single stems. Here, I've added a branch of adorable little pumpkin peppers!
5. Start Adding Your Flowers in Threes

Start with one group of flowers that you lined up earlier. If you have three of a kind, start to align them by height. We want to create a staggered effect, where some flowers are taller than others. If each is exactly the same height, you might have to trim another half-inch to an inch off the other stems (under running water) so that you create a visual triangle.
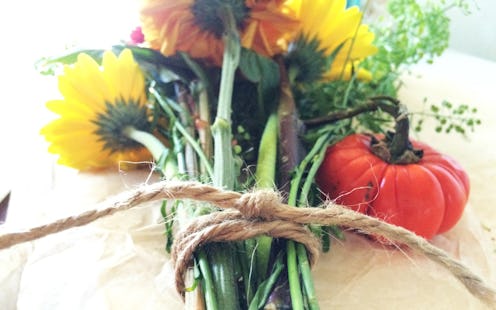
6. (Optional) Tie Your Arrangement Together for Support

If it looks as though your vase is too large and your arrangement may need some help staying put, you can tie the flowers together with a piece of twine to keep them neat and orderly.
Enjoy!
That's it! Now you have a beautiful and simple bouquet, perfect to put anywhere in need of a fall pick-me-up.

Images: Haniya Rae (9)
