Fashion
5 Easy Steps For a DIY Leopard Manicure
If you are anything like me, you spend way more time than you should browsing Instagram for beautiful manicures and nail art. And, if you're anything like me, you will never be able to achieve such talented talonry (no matter how much you'd love to believe otherwise). In the past, I have dedicated many hours to painting and re-painting my nails, attempting various designs that went far and above my rather modest skill set. I bought dotting tools, embellishments, fimo shapes, and even bags of velvet dust in order to apply whatever the nail art trend was that week on my own hands. But it must be said that the results were not always quite what I had in mind, though I did enjoy the attempts! On the odd occasion when I did manage to paint a design that even slightly resembled what I had in mind, I would get pretty excited.
These days, I spend a lot less time painting my nails (though I will always enjoy a pretty manicure), but there are one or two designs I still love to apply on my own: Polka dots, Cath Kidston-esque flowers and (my favorite) leopard print.
You may think that these things are impossible to do yourself — that they require too much skill or precision or some kind of magical powers. But I'm here to tell you that they are honestly much, much easier than you might expect. And if you have the patience (and yes, a fairly steady hand) you will be able to paint them, too.
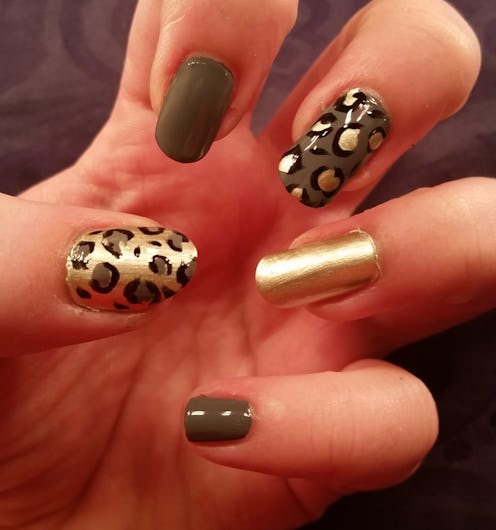
STEP 1: BASE COAT

First of all, I applied a base coat. I used OPI Natural Nail Base Coat, but any derivative will do.
STEP 2: BASE COLORS

You will need to select three different colors, including a pale hue, a very dark hue and a third shade somewhere in between. The darkest polish will be for outlining your leopard spots and the other two will be the base colors. I chose a gold and a medium grey for my bases, and applied two coats. The polishes I used were both from Nails Inc.: Chelsea Bridge Road and The Thames.
STEP 3: ADD LEOPARD SPOTS

Using your two base colors, apply leopard spots in contrasting tones to each nail. I have only applied them onto two nails, but of course you can do whatever you like! There is no special tool required for this step — just wipe the excess polish off the brush and stipple dots onto your nails with the tip of the brush.
STEP 4: OUTLINE THE SPOTS

I used a cheap, black polish that came with a striper brush, much like the ones in this BMC Polish Set from Walmart. I then used the striper brush to paint "C" shapes around some of the spots, and parenthetical shapes around others. You seriously don't need a striper brush for this, though — a toothpick would easily do the trick, or a very small dotting tool, if you have one.
STEP 5: FINAL TOUCHES AND TOP COAT

The last thing to did was add a few flecks of the black on any open spaces I saw fit. Once things had almost dried, I carefully applied a top coat using Seche Vite.
And that's it! An easy, peasy DIY leopard print manicure. Rawr away!Images: Author
