Pinterest is a magical place, full of mason jar salads and DIY centerpieces that you will never, ever be able to pull off exactly like the photos. Le sigh. Still, I'm of the mindset that if people actually, you know, included good step by steps, some of those impossible crafts might become at least slightly more doable. With clothes and accessories not getting any cheaper, learning how to make a statement necklace is one of those looks-hard-but-actually-isn't crafts we could all use a good tutorial for. Well, frazzled re-pinners, you're in luck: Erin Pruckno, founder of the Thanks, I Made It blog published DIY Statement Necklaces this February — and it's just the set of step by steps we've all been wishing for.
Even more luckily for us, Pruckno was kind enough to share a little sneak peak with all of you wonderful Bustlers. Below, you'll find incredibly thorough how-tos for three types of statement necklaces: a glamorous twisted chain, an edgy spiked chain, and a spring-break-appropriate knitted rope. It's the perfect beginners guide to dipping your toes in a little DIY action, and, if you decide you're ready to go crafting crazy, the book contains a total of 35 simple tutorials, just like these bad boys. And, yes, I can guarantee that they're all super gorg.
OK, y'all. Let's get necklacing.
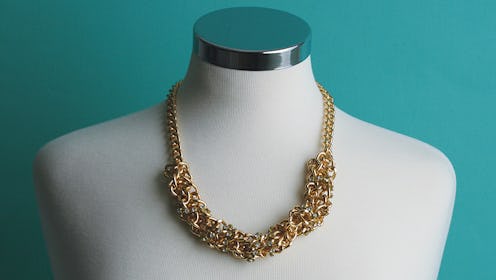
1. The Tangled Chain

While some mornings you may struggle to untangle your favorite jewelry pieces as you run out the door, the tangled chain on this necklace is essential to its elegantly undone vibe. All you have to do is braid a few lengths of chain together, then wind the necklace with a final piece of rhinestone trim to really make this necklace stand out.
Materials

- Round-nose jewelry pliers
- Chain-nose jewelry pliers
- 52 inches of 10mm curb chain, cut into one 28-inch piece and two 12-inch pieces
- 18 inches of rhinestone cup chain
- 2 rhinestone cup chain connectors, the same size as the rhinestones
- 4 jump rings
- Clasp
1. Use the pliers to open up the last link on each of the 12-inch pieces of chain.

2. Measure 8 inches in from the end of the 28-inch chain, and attach the two shorter chains by looping the open links onto the chosen link on the long chain and then closing the links with the pliers.

3. Starting at the connected link, begin braiding the longer side of the 28-inch chain with attached 12-inch chains.

Helpful Hints
It can be hard to keep your place when measuring and working with chain that slides around and looks all the same. To keep track after measuring, mark the distance by clipping a plastic bread clip around the link for an easy fix.
4. Once you’ve braided to the end of the shorter chains, open the end links of the shorter chains and connect these two ends to the longer chain by looping the open links onto the chosen link on the long chain and then closing the links with the pliers.

5. Measure both ends of the necklace to ensure they are the same length. If they’re uneven, shorten the longer end by opening links with your pliers to remove links until both ends are the same.

6. To attach the rhinestone chain to the necklace, first place the end of the rhinestone chain into the cup of one of the cup chain connectors and pinch it closed with the pliers. Then, open one of the jump rings by using two sets of pliers to grab on either side of the seam in the ring. Twist the pliers and ends of the jump rings away from each other in a north-south motion. Connect the jump ring to the loop of the cup chain connector and to the end of the braided part of the chain, by twisting the ends of the jump ring back toward each other so the ends of the ring are flush.

7. Wrap and loop the rhinestone chain around and through the braid, then connect it to the end of the braid with another cup connector and jump ring.

8. Add two jump rings and a clasp to the end of the necklace.

Helpful Hints
Large link chains like this one are often a lightweight metal coated in a gold or silver color finish. To avoid scratching the finish with your tools, wrap the tips of your jewelry pliers with masking tape.
2. The Knotted Bungee

In this project, you’ll master the art of the chain sinnet, a kind of knot used for shortening rope for use or storage. Bungee cord, available at large craft stores, gives the necklace a sporty feel, and makes the necklace’s stretchy loop closure a breeze. Add a pop of neon from some brightly colored string, like mason twine, available at the hardware store.
Materials

- 10 feet of bungee cord
- 4 feet of mason twine
- Scissors
- Fraying sealant, optional (see “Helpful Hints” sidebar in this project for more information)
1. Bring together the ends of the bungee cord. At the folded end of the cord, tie the end around into a knot, leaving a small 1-inch loop.

2. Holding the loose ends of the cord together, measure 8 inches up from the loop. Then create a pretzel-shaped loop at that spot, keeping the knotted end on the left and the loose ends on the right.

3. Pinch the section of cords under the right loop of the pretzel, and pull up to create a new loop about 1 ½ inches long. While holding the new loop, gently tug on the knotted ends of the cord to tighten the cord around the new loop.

4. Reach through the new loop to pinch and pull the cord underneath, pulling on the side of the cord from the loose end, creating a second loop. Keep the loops a uniform size of about 1 ½ inches by gently pulling on the ends of the cord.

5. Repeat these steps until you have created a knotted section of about seven loops. When creating the final loop, pull the cord ends all the way through.

6. Tie the loose ends into an overhand knot. Line up both ends of the necklace to make sure they are even, then adjust the placement of the knot and trim the cord ends as needed.

7. Tie a long piece of bright string around the cord, next to the knotted portion, and wrap a section of the cords about 1 inch long with the string.

8. Tie off the string and trim the ends of the string. You can tuck the ends into the wrapped section to conceal them. Repeat on the other side of the necklace.

Helpful Hints
Knots can be tricky to master, and practice makes perfect! Before beginning this project, practice tying a chain sinnet (they are easily undone). For extra help, watch the knot in action at animatedknots.com/chainsinnet.
9. To clasp the necklace, push the knotted end through the 1-inch loop on the other side.
Helpful Hints
Prevent frayed cord ends with a dab of fraying sealant, found in the sewing section of craft stores. You can also use a drop of clear nail polish to seal ends together. For synthetic cords, such as those used in this project, gently fuse the ends by melting them slightly with a lighter. Keep the cord out of the flame, and watch out for your fingers. The melted cord will be hot, so be careful!
3. The Spiked Chain

Rather than spending a few hundred dollars on a trendy statement design, re-create the look for a whole lot less money and a little effort. Pick up bags of spike charms and jump rings in bulk so you have enough to complete the project. A word to the wise — opening and closing the large number of jump rings can be time-consuming, so work on this necklace in pieces at a time or while relaxing in front of the TV!
Materials

- 18 inches of 4mm rhinestone chain
- 18 inches of 12mm curb chain
- 40 7mm jump rings
- Round-nose jewelry pliers
- Chain-nose jewelry pliers
- 17 spike charms
- Clasp
1. Line up the rhinestone chain and the curb chain, then measure the chains to locate the center link of both chains.

2. Open a jump ring by using two sets of pliers to grab onto either side of the seam in the ring. Twist the pliers and ends of the jump rings away from each other in a north-south motion. Loop the jump ring onto the center link of the curb chain and add a spike charm.

3. Next, hook the jump ring around the middle of the rhinestone chain and close each ring by twisting the ends back toward each other so the ends of the ring are flush.

4. Repeat to add more spikes on either side of the center, spacing the rings and charms evenly (every two rhinestones) on both chains and creating a spiked section roughly 10 inches long.

5. Once all the spikes have been added, use the jump rings to continue to evenly connect the two chains on either side of the spiked section of the necklace.

6. Finally, open and attach a jump ring to each end of the necklace, add a clasp to one side, then close the rings.

Excerpted from DIY Statement Necklaces Copyright © 2015 by Erin Pruckno, founder of Thanks, I Made It blog, and published by F+W Media, Inc. Used by permission of the publisher. All rights reserved. Photos courtesy of Erin Pruckno and Elisabeth Lariviere.
