You would think that with the amount of fancy, organic health food stores in my neighborhood that I would have coconut milk at my disposal. Nope. Instead, I've had to resort to learn how to make my own coconut milk so that I can have healthy hair, healthy skin, and have a delicious cup of coffee in the mornings. I won't bore you with another article that details exactly how amazing coconut milk is for your skin and hair, but its naturally antiseptic and moisturizing qualities that are literally great for all skin types. I will say that coconut milk is something I refuse to give up, ever. In fact, I'm fairly certain that in my OKCupid days, it was one of the six "can't live without" things I listed.
When my increasingly hip neighborhood got wind that a Starbucks was opening up, the hipsters did everything, but riot in the streets. In fact, I wouldn't be surprised if there wasn't a petition going around to keep the big bad coffee shop out of the neighborhood. Here's the thing, though: Starbucks has coconut milk! COCONUT MILK. Dear local coffee shops: I love you, I love your coffee, I want to support you, but sometimes I want an iced cappuccino and your milk options are just not cutting it for me.
Around the same time of the coming of Starbucks, I was really starting to see hair growth and limited breakouts from using coconut milk topically. A combination of beauty needs and wanting to support my local coffee shop, I decided I could probably bring my own milk to add to my iced capp. After an exhaustive search, I realized that my neighborhood may have 900 different types of quinoa, but zero coconut milk. It was time to figure out how to make it on my own.
Fortunately, the only thing hard about making coconut milk is the coconut itself. Don't hesitate in breaking it open: Inside that coconut you will find strong hair, clean, smooth skin and enough leftover juice to make your own smoothie.
You'll need the following items to make coconut milk
- 1 coconut
- 1 hammer
- 1 medium-long sized nail (cleaned)
- 1 large bowl
- 1 blender
- 1 hand towel
- A cutting board
- A strainer
Step 1: Assess The Coconut Situation

Most coconuts contain water inside them, and you can quickly figure out if yours has enough before purchasing by shaking the coconut gently and hearing the water inside. For coconut milk-making purposes, it's best to drain the water out and save for later use. To keep your coconut from rolling off the table while you whack it open, set the coconut onto the cutting board and wrap a hand towel around it. Next, place the clean long nail in one of the "eyes" of the coconut and gently hammer the nail inside. You'll want to make a big enough hole for water to pull through. Next, drain the water into a sealable container and set aside for future use. If there is no water in the coconut, it just means that your coconut is a little on the ripe side.
Step 2: Get Inside That Coconut

Arguably, the most fun you'll have while you make your own coconut milk is hammering into the shell. It also has the potential to be the scariest part. Keep your coconut steady with the additional stability of your towel, and hammer away. If the shell isn't completely broken on the first go, then gently hammer along the crack to break the coconut into two pieces. Remove the coconut from the hard shell.
Step 3: Skin Your Coconut

If you've got a particularly great vegetable peeler, peel the thin layer of skin completely off. This is the quickest way to get to the flesh of the nut. You can also use a knife skin the coconut, although it can be slightly time-consuming. After you've removed all the skin, rinse your coconut to remove any dander.
Step 4: Blend The Coconut

Remember the water you saved from your coconut? If you haven't drank all of it, then add two tablespoons into a blender with your coconut to make the milk blend easier. If you didn't have any water in your coconut, add about four tablespoons of regular water. Blend your ingredients until completely liquefied.
Step 5: Strain Your Coconut Milk

Place a large bowl into a sink with a strainer on top of it, pouring the contents from the blender into the strainer. If your strainer has tiny holes, use a potato masher to press down on the pulp to release more milk. If you want, you can take the pulp and blend it again to get more milk, then strain again into your bowl.
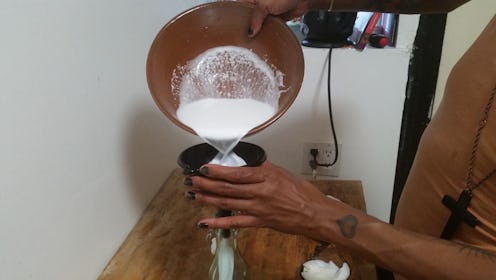
Step 6: Store Your Coconut Milk

Using a funnel, pour your coconut milk into a sealable bottle and store in your refrigerator to keep cool and fresh.
Step 7: Use Your Coconut Milk

Finally, you are ready to use your coconut milk! You can use this as a co-wash for dry brittle locks to cleanse and moisturize your hair or use your coconut milk as a daily face wash. Your milk is completely natural, with no preservatives, and completely edible. It should last in your fridge approximately two weeks!
Image: Kristin Collins Jackson; Giphy
