Life
How To Make A Flag Cake For The Fourth of July

It's always more fun to DIY. Every week, we'll spare you a trip to the grocery store and show you how to make small batches of great foods at home. Today: Our Test Kitchen Manager Erin McDowell's American flag cake was such a hit at our summer barbecues last Fourth of July, we had to share it again.
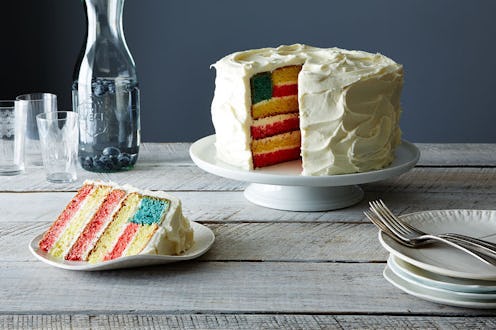
For a recent Shop photo shoot, we made a flag cake. It’s just a simple vanilla cake slathered in a healthy layer of buttercream, but it’s layered to look like a flag, meaning that every slice you take out results in resounding gasps from hungry onlookers.
When emails started pouring in asking how to make it, we couldn’t resist sharing a tutorial. After all, everyone deserves the “ooohs” and “aaahs” that you get when a piece of this beauty slides onto a plate.
So we made another flag cake, and it came together just as quickly — meaning the first time around wasn't just beginner's luck. This is an easy project that results in a seriously impressive showstopper of a layer cake; make it for your World Cup parties (go U.S.A.!), then make it again for the Fourth of July.
Full disclosure: This patriotic cake requires a little extra effort (you do need to bake five cakes). But after that, it's as simple as cutting circles. Start with a simple white cake recipe (I like the recipe below, which tastes like boxed cake mix in the best way), and use it to bake five nine-inch cakes: two white, two red, and one blue.
American Flag Cake
Adapted from Glorious Treats
Makes one 9-inch cake
For each cake (you'll need to make five!):
- 8 tablespoons butter, at room temperature
- 1 1/4 cups sugar
- 2 eggs, at room temperature
- 1 teaspoon vanilla extract
- 1 1/2 cups cake flour, sifted
- 3/4 cup buttermilk, at room temperature
- 1 teaspoon baking powder
- Salt
- Red and blue food coloring
For the buttercream frosting:
- 4 sticks butter, at room temperature
- 8 cups powdered sugar, sifted
- 2 teaspoons vanilla extract
- 1/3 cup heavy cream, plus more as needed
Bake your cakes, using about 25 drops of food coloring for the red cakes and about 20 for the blue cake. Let them cool in their pans for 15 minutes, then invert them onto a wire rack to cool completely.
While they cool, make your frosting: In the bowl of an electric mixer fitted with the paddle attachment, cream the butter and sugar until they're light and fluffy, about five to six minutes. Beat in the vanilla, then add the cream gradually, mixing until you get a smooth, creamy texture.
Cut the red and white cakes into layers about 3/4 inch thick. You'll want six layers total: three red, and three white. (Leave the blue layer whole — it has to be thicker to represent the square on the flag.)
Using a five-inch round cookie cutter (or a paring knife to trace around a small plate or bowl that's roughly five inches in diameter), cut one of the red layers into a smaller circle. Then do the same with one of the white layers. These small circles will be the shorter stripes that line up with the flag’s blue square. (You won't need the outer rings for the cake, but save them to munch on!)
Then, use the same technique to cut a hole in the center of the blue cake. You won't need the inner blue circle, so set it aside.
More: You could also turn your cake scraps into a bonus trifle.
To build the cake, start with a red layer and top it with a thin coating of frosting. The key is to make it thin, otherwise you will interrupt the "stripe" effect. Top the red layer with a layer of white cake and another thin coating of frosting.
Repeat with another red layer and another white layer so that you have four layers total.
On top of this, place the blue cake doughnut (the thick layer with a hole in the middle).
Spread a thin layer of frosting onto the small red circle, and insert it into the hole of the blue cake. Top it with a thin coating of frosting and the small white circle. Gently press the small layers into the hole of the blue cake.
Now you're golden. Frost the cake with creamy frosting using a small offset spatula — be sure to make it swirly.
The cake will look lovely from the outside, but the real kicker is when you cut into it! Make sure there's a hungry crowd nearby to watch.
See the full recipe (and save and print it) here.
Photos by James Ransom and Mark Weinberg.