Style
I Created A Makeup Look Inspired By My Starbucks Unicorn Frappuccino
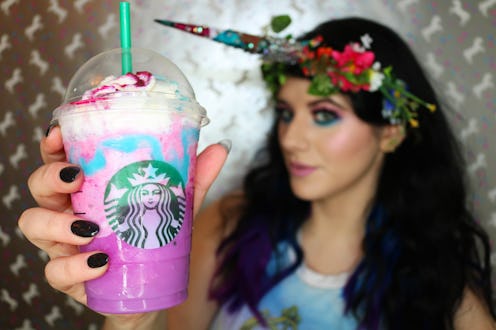
When Starbucks announced its Unicorn Frappuccino, my social media exploded. I'm the self-proclaimed queen of sugar, spice, and everything unicorn — naturally friends, family, and strangers I met once on a subway car all tagged me in pictures of the magical drink, and I wasn't even mad about it. As it so happens, the other thing I'm obsessed with is makeup — so obviously, I had to create a makeup look inspired by the Unicorn Frappuccino. I did this with the intention of wearing the look while I took my first sip of the drink — if that's not dedication, IDK what is.
I know unicorns are super trendy now, almost to the point of grinding them into mythical extinction, but I've been obsessed with these candy-colored creatures since long before it was cool. As a kid, I pasted technicolor Lisa Frank unicorn stickers all over my school supplies. For years I had a unicorn phone case that served as the best conversation starter. Friends gifted me with shirts that said, "When I look in the mirror I see a really badass unicorn," and "always be yourself, unless you can be a unicorn. Then be a unicorn." My former Starbucks baristas in California would even draw little unicorns on my iced coffee cups. Observe:
Though my unicorn love has phased out a bit, mostly due to the recent rainbow explosion of unicorns in pop culture, I couldn't help but jump for joy when I saw the Starbucks announcement. Call me crazy, but slap "Unicorn" onto any delicious food — or any part of the face — and I'll be there ASAP. Thus, my Unicorn Frappucino makeup tutorial was born.
The Process
I prepped my skin with skincare before applying my usual complexion routine and brow pencil. Because I wanted the colors to be as vibrant on my lid as they are in the Starbucks cup, I applied my Urban Decay Original Eyeshadow Primer Potion from lashline to browbone, then tapped the excess onto my lower lashline. We have to make sure the electric blue under smoke stays in place!
Urban Decay Original Eyeshadow Primer Potion, $20, Sephora
I applied a shimmery bubblegum pink shadow with glitter flecks from the Dior 5 Couleurs Eye Shadow Palette in Tutu from my lashline to my crease, but really any glittery pink shade will do. To achieve maximum shimmery saturation, I tapped the shadow on with my finger before smoothing out any harsh edges with a fluffy blending brush.
Dior 5 Couleurs Eye Shadow Palette In Tutu, $62, Neiman Marcus
For the remainder of the look, I utilized my favorite obsession, the Natasha Denona Eyeshadow Palette 28 in Blue Purple. Definitely a worthy investment. I've been using it for months and it looks like I've barely touched it. The shadows have some much pigment so a little goes a very long way.
Natasha Denon Eye Shadow Palette 28, $239, Sephora
Alternating between a dense brush to build saturation at the outer corners and a fluffy brush to blend out harsh lines and edges, I applied Nina's Orchid, a pinky-purple shade, along my crease. When working with vivid colors, I don't like to use neutral transition shades that either water down the color or make it muddy. Instead, I like to use a small amount of a matte shadow in the same color scheme that's slighter deeper than the lid tone. Start with minimal product. It's easy to add more, but much harder to take it away once its there. When ever I pick up more product, I always place it down at the outer corner first to create a gradient that mimics the natural contours of the eye.
To add depth, I repeated the process using the true purple shade, Electric Violet. The deeper I go in color, the less I use of it. I kept Electric Violet very close to the outer corner, so the gradient from dark to light would be visible.
To give my lids their iridescent unicorn appeal, I tapped some Makeup Forever Star Lit Liquid in Arctic White to the center of my lid, right on top of the pink Tutu shadow.
Make Up For Ever Star Lit Liquid, $24, Sephora
If you're prone to getting fallout, I would suggest doing these steps before you apply your complexion. But if you like to live on the wild size like myself, just make sure you clean up the lower lashline before moving on. To achieve the most flattering shape, follow the lower lashline and clean upwards from there.
To give my lower lashline some life, I smudged in some NARS Eye Paint in Solomon Islands and blended out harsh lines and edges with Koh Tao from the Natasha Denona palette. My eyes tend to water, so using a cream or gel under my lower lashline powder helps to improve longevity. When blending, make sure that all of the shadow colors overlap at the outer corner.
NARS Eye Paint In Solomon Islands, $26, NARS Cosmetics
It's easy to lose the definition of the eye shape with so much color happening, so I lined my bottom lashline with Marc Jacobs Highliner in Over(night) and my top lashline with Highliner in Blaquer. I also created a little tiny top wing using Kat von D's Tattoo Liner in Trooper.
Marc Jacobs Matte Highliner In Over(night), $25, Sephora; Marc Jacobs Gel Highliner In Blaquer, $25, Sephora; Kat Von D Tattoo Liner In Trooper, $20, Sephora;
I finished off the look with a couple coats of Marc Jacobs Velvet Noir Mascara and fluffy false lashes.
Marc Jacobs Velvet Noir Mascara, $26, Sephora

Because my eyes were clearly the focus, I wanted to keep all my other features a bit more muted. Using a big fluffy brush, I applied Yves Saint Laurent Blush Volupté in Light 04. Just make sure you choose a pink shade of blush that's in the same color family as the pink lid shadow.
Yves Saint Laurent Blush Volupte In Light 04, $48, Sephora
To give my skin a magical, unicorn-like finish, I dusted my Pat McGrath Skin Fetish 003 in Nude to the high points of my faces. If you missed out on this Pat McGrath product the last time around, you can use any pink-reflecting illuminator, like Pink Opal from the Kat von D Alchemist Holographic Palette.
Kat Von D Alchemist Holographic Palette, $32, Sephora
To support the look, I added a coat of Kat von D's Everlasting Liquid Lipstick in Requiem to my lips and tapped some Pat McGrath illuminator on top to create a mythical glow. I debated adding gloss, but since the whole purpose of creating this look to to drink the Unicorn Frappuccino in style, I thought, "better not."
Kat Von D Everlasting Liquid Lipstick In Requiem, $20, Sephora
Ta da! The completed look! Quite magical AF, if I do say so myself. Now we're ready to consume this heralded beverage.
And to take some awesome seflies with it because, IMO, it doesn't really taste that good. But it certainly is pretty.

And I think I did a pretty good job color matching, if I do say so myself.

Love it or hate it, the Starbucks Unicorn Frappuccino is only here until till April 23, so if you want to live your best magical unicorn dreams, get it while the going is good.
