Beauty
How To Get The Marble Nail Look At Home In 5 Easy Steps
With just three polishes & a bowl of water.
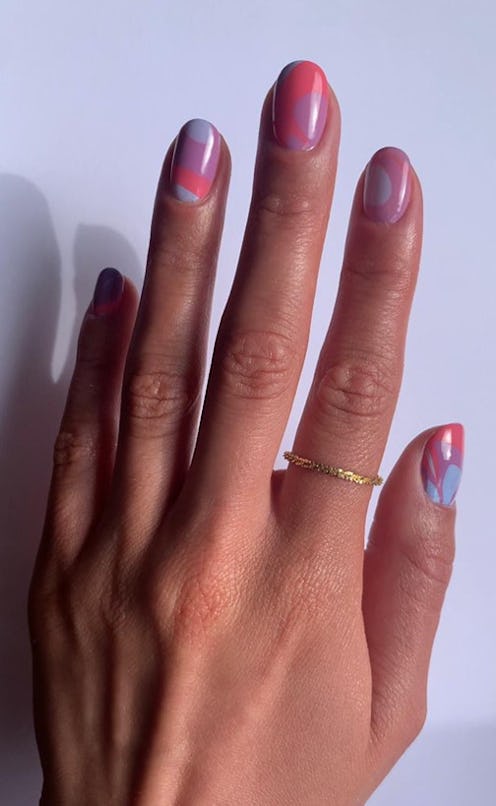
While nail salons have re-opened in most places, many of us are still looking for D.I.Y nail art ideas we can do from home, both because it saves us a fair bit of money and, well, it’s fun! If you’re on the hunt for something to try, may I suggest giving water marble nails a go? I spoke to top nail artist Imarni who revealed how to do pastel water nails from home, from the technique itself to the best polishes to use.
Search the hashtag “watermarblenails” on Instagram and you’ll be greeted with more than 62 thousand posts. There’s a huge variety in the styles and designs, as well as the techniques that have been used to create them. But Imarni’s recent Instagram video revealed just how easy this look can be to achieve from the comfort of your own home.
First up, you’ll need to get you’ll tools in order. The nail polishes themselves are of course essential, and you’ll need at least three different colours. Imarni likes using the plant-based, vegan Sally Hansen Good.Kind.Pure range for this technique (in the video she uses the pastel shades Crystal Blue, Coral Calm, and Laven- Dear, which are £8.99 each).
Next up, you’ll need a small bowl of water – and it has to be lukewarm. Speaking abohte water temperature, Imarni says: “When you do the marble, you need to get the temperature of the water correct, because [otherwise] it doesn’t ‘drop’ and disperse to make the right effect. So it needs to be tepid, not too warm, not too cold, in-between.”
Lastly, you’ll need to grab a little dotting tool or a small metal instrument of some kind, some cotton wool buds, and nail polish remover, as “the only thing that can be annoying [about the look] is the clean up when you get it on the skin,” says Imarni. Have your buds and remover handy for when your nails come out of the water.
The technique is super simple, and can easily be followed via Imarni’s video. The basic steps are:
- Drop in a little of each nail colour on top of each other in the water.
- Swirl the colours slightly with your metal tool.
- Dip your nail into the water for a few seconds.
- Use a cotton wool bud to ensure the colour has gone onto the nail.
- Pull out your nail and remove the excess on you skin.
Once that’s all done, you’ll be left with a super cool marbled effect that is totally unique every time.
The great thing about this look too is that it doesn’t have to be perfect. In fact, says Imarni, “it doesn’t even have to cover the whole nail sometimes.” Whatever effect you end up with, it usually looks amazing. Happy experimenting!
