The moment I heard about tape contouring trending on the Interwebs, I had to know more about it. I mean, by now, I think it's safe to say that everyone knows what contouring is, but tape contouring? Now that was something that definitely sparked my interest — it sounded crazy and, well, painful, to be honest, but if it worked just as well as clown contouring, I didn't really care how ridiculous it sounded (or looked).
If you haven't heard of tape contouring, here's what it entails: You're supposed to apply tape to your designated facial areas and then apply bronzer and highlighter on top. According to The Gloss, "You are meant to use the tape as a guide on the areas you are going to apply your darker contouring color. Once you have applied the color, you peel off the tape then add your lighter contouring color or highlighter."
Simple enough, right? There are some pretty crazy contouring techniques out there, like skull, lip, and heart contouring, so using tape to have extreme precision made some sense to me. And after watching Huda Beauty on Instagram do a tutorial, I was pretty much convinced that I had to give it a try.
Here's how it all went down:
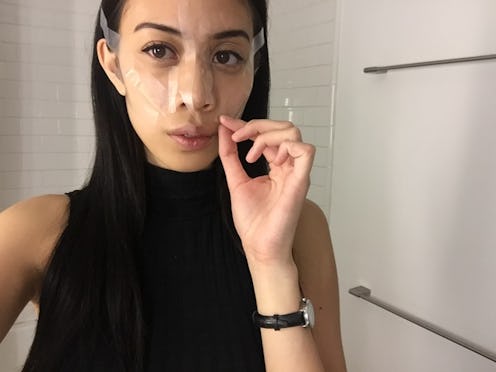
Step 1: I Applied The Tape

I put two pieces of tape on each cheek: one on top of my cheekbone and one underneath to get that contouring line perfectly in the middle. For your nose, you'll probably need to cut each piece in half vertically to fit. I put a piece on each side, and one piece in the center.
Step 2: I Applied Bronzer

I applied a generous amount of Benefit's Hoola Matte Bronzer on my cheekbones and also put some on my nose, jawline, and forehead. The tape acted like a guard for unwanted bronzer, which was definitely useful for creating a precise line.

Benefit Hoola Matte Bronzer, $38, Amazon
Step 3: I Removed The Tape

I was literally itching to take the tape off by this point. While removing the tape didn't hurt, the feeling of having something stuck to my face was so irritating.
Step 4: I Applied Highlighter On Top

I used Benefit Watt's Up! Cream-To-Powder Highlighter underneath and on top of the bronzer just like I normally would with regular contouring.

Benefit Watt's Up!, $39.99, Amazon

This is what it ended up looking like.
Step 5: I Blended, Blended, Blended

After blending all of the product in, I was super happy with the result. I'm not convinced it looked any different from how I normally contour my face, but it definitely got the job done.
The Verdict

Tape contouring was super fun to try, but I don't think I'll use this technique again. I thought it was kind of unnecessary to chop up and stick pieces of tape all of over my face since I ended up having to blend all the makeup in anyways. I was not a fan of having tape stuck to my face either — it also felt like a bit of a waste, in my opinion.
I don't mean to discourage you from trying this trendy contouring method. If you're not a huge fan of blending in your bronzer and highlighter and really want to go for a super defined, chiseled look, then perhaps this technique is for you! Although I won't be adding this beauty hack to my regimen, you should definitely give it a go.
Want more style tips? Check out the video below, and be sure to subscribe to Bustle’s YouTube page for more hacks and tricks!
