Aside from surrounding yourself with festive décor, indulging in seasonal flavors is one of the best ways to get into the holiday spirit. And if you’re anything like me, that means baking up a storm of spicy, warm, and cozy holiday recipes. It also means watching shows where other people bake up a storm of gingerbread, pumpkin-infused, and peppermint-glazed treats on holiday baking shows and thinking — "Hey, I should try that out!"
Now, the Food Network has always been a major source of mouthwatering inspiration for me. And while I'm an avid baker, I'm nothing like the fast home cooks that grace the episodes of Holiday Baking Championship (Sundays at 9/8c on Food Network). As any foodie with a sweet tooth would, I tune in to admire the skill of these bakers and swoon. And sure, I like to experiment, but I certainly haven’t done it all. For instance, I've never baked in front of a camera crew. The most eyes I have had on me in the kitchen belonged to friends and family, impatiently waiting for dessert.
So in preparation for this year’s festivities, I decided step out of my comfort zone and try three different holiday recipes that I've never made before. Taking Food Network's Holiday Baking Championship as a source of inspo, each treat is a Food Network holiday original featuring techniques that were totally new to me. Being a recreational baker, I learned quite a bit along the way. And like most new experiences, there was a diverse medley of feelings, including excitement, panic, curiosity, and relief.
Thankfully, after tasting my creations, I can add “a happy stomach” to that list. Here’s what happened when I challenged myself to baking three recipes inspired by Food Network’s Holiday Baking Championship . Join me in my humble baking journey!
1. Almost-Famous Peppermint Bark

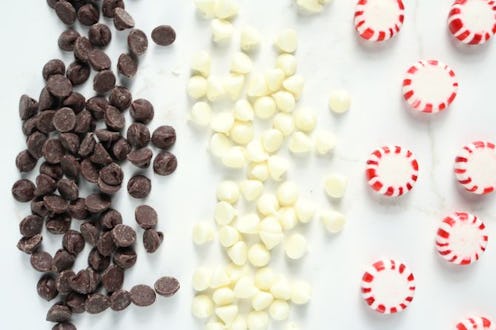
First up was the Almost-Famous Peppermint Bark. From what I've seen, it's easy to make and extremely budget-friendly. I also love how you can customize it with all your favorite fixings. And as someone who loves treats that can be personalized, I had to stop and wonder how it's possible that I've never made chocolate bark before. But hey! There's a first time for everything.

To start, I melted a generous helping of semi-sweet chocolate using the double boiler method. This technique calls for a bowl to be placed on top of a saucepan of steaming water. The number one rule of a double boiler? The hot water shouldn't hit the bottom of the bowl. If you don't believe me, refer to the recipe's instructions. Do it for the chocolate, guys.
Next, I poured the melted awesomeness into a baking sheet and let it hang out for a bit. Don't forget to tap the pan; this will help get rid of those pesky air bubbles.

While the chocolate hardened, I smashed up some peppermint candies with some help from a hammer and my enormous muscles. I highly recommend heading outside for this step. Work on the sidewalk or driveway, if possible. I did this on a spare marble tile and it totally broke in half! (#Enormousmuscleproblems). Imagine if I did this on my kitchen's marble counter top or tile floor? Whoops.

After melting the white chocolate using the double boiler method, I poured it onto the first layer of chocolately goodness. Unexpectedly, the chocolates swirled together and created a marbled look. I panicked at first. However, I realized that it actually looked kind of cool. And according to the recipe's reviews, I wasn't the only one that experienced this. Phew!

After adding the peppermint pieces and letting the chocolate harden, it was time to break apart the bark. This part was way too fun. Success!
The final verdict? This one is hard to mess up. It requires zero fancy kitchen skills or equipment. I can see this one working extremely well as a deliciously easy holiday gift, too. Just toss a handful of pieces into a cellophane bag, tie it up with a festive ribbon, and gift it to the people that you actually like. Easy peasy.
To see the experts take a stab at it, watch here!
2. Pumpkin Spice Chocolate Whoopie Pie

Next in line was the Pumpkin Spice Chocolate Whoopie Pie. While I've made my fair share of cakes and cookies, I've never made a whoopie pie recipe. Once I whipped up the batter, I couldn't help but notice that the consistency seemed to be a hybrid of both cookies and cakes. Sure enough, I later found out that Whoopie Pies are basically considered to be both. You really do learn something new every day.

The pumpkin spice cream cheese filling was to die for.

The batter was extremely interesting to work with. After scooping it out onto the baking sheets, the recipe directs you to use moistened fingers to shape each scoop. And while I could definitely use a little more practice in this department, it was exciting to slowly see the Whoopie Pies come to life. After chilling and baking them, it was time to add the tasty filling.

Success, part 2!

How charming are these? I brought these babies to a party and they were a huge hit. My biggest piece of advice is to follow the directions for this one very closely. Read/watch the entire tutorial before you start and take your time. It will be so worth it, promise!
Check out a video of the action via Food Network below!
3. Gingerbread Roulade Cake

Eventually, it was time to take on the Gingerbread Roulade Cake. If we're being honest, I was super nervous about this one. I can roll up burritos like no one's business... but actual cake? Whelp — here goes nothin'!
The batter for this cake smelled divine. It boasted all those familiar holiday scents that make me think of fireplaces, snowfall, and plaid pajamas. Talk about some major holiday feels.
I also realized that using a 10 1/2 by 15 1/2 pan was super important. Thankfully, I had one on hand. A bigger pan would result in a thin cake that would be more likely to break. Any smaller would yield one that's way too thick. This one was perfect for the recipe, so be sure to check your cupboard before taking this on!

Don't forget to use the parchment paper. It helped keep the cake in one piece. Whatever you do, don't use aluminum foil. Not only will it a promote a crispier bottom — which is undesirable for this recipe — but it also might not be as even. Trust me, the parchment paper saved my life on this one.

This was the part I was especially nervous about. I've never held my breath so hard before.

Luckily, it ended up being totally fine. Neither the cake nor I fell apart during the process. I realized it all came down to patience and taking your time, which doesn't always come naturally. Sorry, I'm a New Yorker, OK?

After unrolling the cake, it was time for the glorious cream cheese filling.

Finally, it was time to roll the cake back up (sans towel, of course) and decorate the exterior. I decided to add a thin layer of the cream cheese mixture to the outside before adding a sprinkle of confectioner's sugar.

Success, part 3. I felt super proud of myself for pulling this one off. Now, I'm three holiday recipes in deep and can't help but think about what's next on the list. With some patience, I was able to complete three new techniques. Now, I'm that much more stoked for the holiday season. BRB, time to go stalk Food Network again.
This post is sponsored by Food Network's Holiday Baking Championship. Catch an all-new episode Sunday at 9/8c only on Food Network.
Images: Kirsten Nunez/ Bustle
