Life
An Easy At-Home Mozzarella Recipe To Try
When my cousin told me she and her boyfriend had learned how to make mozzarella at home, I was more than intrigued. I am the kind of person who likes to take on food favorites and try to recreate them in my own kitchen — everything from restaurant style raviolis to limited edition frappuccinos — so the idea of being able to learn how to supply my own cheesy demands seemed too good to be true. Then my cousin told me she took a class she found on Groupon, but that it was simple enough that you could teach yourself... so that's just what I did.
With a little help from my dear friend Google, advice from my local grocer, a recipe courtesy of The Kitchn, and an extra helping of stick-to-itiveness, my fridge is now chock-full of gooey mozzarella goodness. The best part? Yours can be too, and here is how:
Ingredients
- 1 1/4 cup water
- 1 1/2 teaspoon citric acid
- 1/4 rennet tablet
- 1 gallon milk, whole or 2 percent, not ultra-pasteurized
- 1 teaspoon kosher salt
Don't let the ingredients scare you off! Seeing something like citric acid and rennet tablets on the recipe card threw me at first too, but once I found out that they were common ingredients and can be purchased at Whole Foods, it seemed a whole lot more normal.

Citric acid is an organic acid and a natural preservative that is found in citrus fruits. For your cheese-making needs, you can find it sold in bulk at the grocery story (like above), or in small containers, like spices. Rennet is a combination of enzymes that acts as the curdling agent in the cheese-making process. It is usually something found in the stomach of mammals, but there are vegetarian-friendly substitute rennets, like the tablet kind I used for my cheese (above). I was able to find both of these ingredients at my local grocery store, but you can also find them at beer and cheese-making shops as well as online.
When you are selecting milk, it is important you choose a milk that is not ultra high temperature pasteurized (UHT). Milk that has gone through this process loses its ability to solidify into the curds, leaving you with a soupy mess instead of a solid cheese.
Kitchen Supplies
- 5-quart pot, either stainless steel or ceramic
- Measuring cups
- Thermometer
- Long spatula
- Slotted spoon
- Stainless steel strainer (if you don't have a microwave), or a microwave safe bowl
- Rubber gloves (optional)
When selecting a pot, make sure it is big enough to fit an entire gallon of milk, plus the liquid you are to add. As you can see, my pot was just big enough, and I can tell you one thing: cleaning my stove after was not fun.

The other important aspect to consider when choosing your pot is to make sure it is non-reactive, meaning the material it is made of won't impact the flavor, look, or structure of the food. Avoid iron, copper, and aluminum, and opt for stainless steel or ceramic instead.
The Process
1. In a small bowl, dissolve the citric acid in 1 cup of water. In a separate bowl, dissolve the rennet tablet in 1/4 cup of water. Set aside.

2. Pour milk into the pot, and add the citric acid mixture. Over medium-high heat, warm the mixture to 90°F.
3. Once the milk has reached the desired temperature, remove from heat. Add the rennet. Stir for 30 seconds. Cover and let sit for five minutes.

4. When the five minutes is up, the milk should have set (the texture should be similar to that of tofu). If the liquid has not firmed up, let it sit covered for another five minutes. Using your spatula, cut the mixture into evenly sized pieces, which we will now call curds. Be sure to cut all the way through to the bottom of the pot.
5. Put the pot back onto the stove on medium heat. Warm the curds to 105°F. Stir slowly without breaking the curds too much. They will clump together, and separate from a yellow liquid (the whey).
6. Remove from heat, and stir for five minutes.
7. Ladle out the curds into a microwave safe bowl, or your strainer. Set aside the whey to cool.
8. If you are using a microwave: Heat the curds in 30 second increments, until the internal temperature reaches 135°F. If you do not have a microwave: Heat a pot of water just below boiling, about 190°F. Submerge your strainer of curds into the water until the internal temperature of the curds reaches 135°F. Drain curds, and proceed.

9. Sprinkle the salt over the cheese, and mix in with your fingers. Pull, fold, and stretch the mozzarella with your hands until it has a glossy sheen and begins to tighten and firm up. Roll into balls.

10. Use immediately, or store in a tupperware container filled with cooled whey for up to one week.

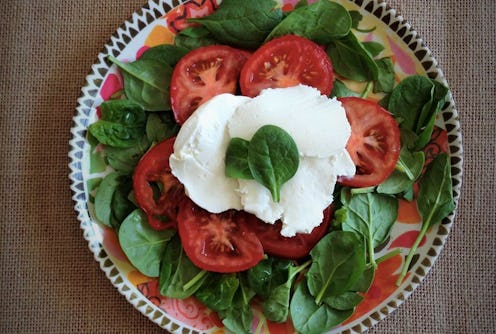
And that's it — it is that simple! From start to finish, not including the cooling time, you can go from a gallon of milk to fresh mozzarella in about 45 minutes. My mozzarella came out a little creamier than the store bought kind, but it was still melty and gooey and oh-so-delicious. I sliced it up and ate it plain, and later, made a spinach and tomato salad with some olive oil and vinegar dressing.


For more tips on melting and cooking with homemade mozzarella, be sure to check out the original recipe from The Kitchn.
Images: Sadie Trombetta
