Fashion
How To DIY Embellished Sandals
Summer's version of the comfy sneaker trend are sporty slider sandals. Luckily, if you’re not ready to go rock the whole Adidas sandals and socks thing, there are plenty of ways to embellish slide sandals for a slightly fancier (read: office appropriate) iteration. In fact, it only takes about five steps to whip up a pair of bedazzled beauties. Don't you just love when DIY is the answer?
I’m all about cutting costs where I can, so while you can buy slider sandals already embellished, they’re typically more expensive than a plain pair. Like, why would I pay extra when I can just do it myself, you know? If you’re with me on that, then you’re going to love this tutorial. At the end of it, you'll end up with a pair of shoes that work for basically every single occasion. Summer weddings, anyone? All the gold means you won’t ever look too dressed down in them, but they’re still so comfortable. And what more could you ask for when it comes to shoes, am I right?
Oh, and you don't have to be incredibly crafty to get that perfect jewel pattern. All you need is the ability to work a glue gun without burning yourself. Let's get started.
Step 1: Gather Materials

You’ll need:
- A cheap pair of slider sandals (I ordered mine at Go Jane for only $8)
- A hot glue gun and/or super glue (I used both)
- Bling (I got my beads from Michael’s. You can also feel free to break apart jewelry for this project)
- Jewelry Pliers (If you want to take apart some old jewelry)
- Pencil
Step 2: Decide An Arrangement

Play around with your beads, etc. until you find a pattern or arrangement that you like. Don't go glueing willy nilly! Have a plan, or you'll end up with regrets.
Step 3: Mark Where You Want To Put The Beads

Before you begin gluing, make sure you mark where your beads will be placed to get them in just the right spot.
Step 4: Glue The Embellishment In Place

Once you’ve made marks with your pencil, begin gluing the beads using your hot glue gun. I used the hot glue to initially get the beads in the right place, then I went around the edges with super glue just to make sure it was really secure.
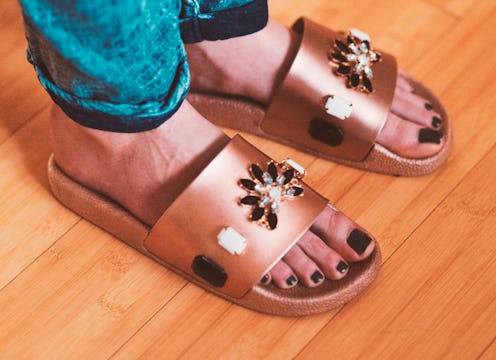
Step 5: Wear Your Shoes

After you let your shoes dry for a couple hours, they're ready to wear! I opted for this minimal design, but they’re still so much dressier than they were before. This DIY is definitive proof that a little bling goes a long way.
Images: Dario Ortega (6)
