As Game Of Thrones progresses, the Mother Of Dragons only gets more and more incredible. If all her recent fire-work has you extra inspired to emulate the blonde queen this Halloween, proper Daenerys Targaryen braids are arguably the most crucial part of the costume to get right. Although Dany's hair looks pretty complex on the show, there are versions pretty much anyone can do from the comfort of their own castle.
Sacha Harford, the hairstylist who came up with the Daenerys-inspired braids below, advises keeping one thing in mind as you start creating your own Dany 'dos: The look you see on the show is a massive wig. "You're likely not going to get the same volume you see on the show, but you can loosen or backcomb the braids to get a slightly bigger look," Harford tells Bustle. "This is your version — have fun with it!" After all, isn't Halloween the perfect time to get a little creative?
Harford also recommends doing a few trial runs before your first Halloween party, since these take practice even if you consider yourself a braiding pro. And you'll definitely want to work with two mirrors so you can see the back of your hair as you go.
Here are three braids that would make any Dothraki proud.
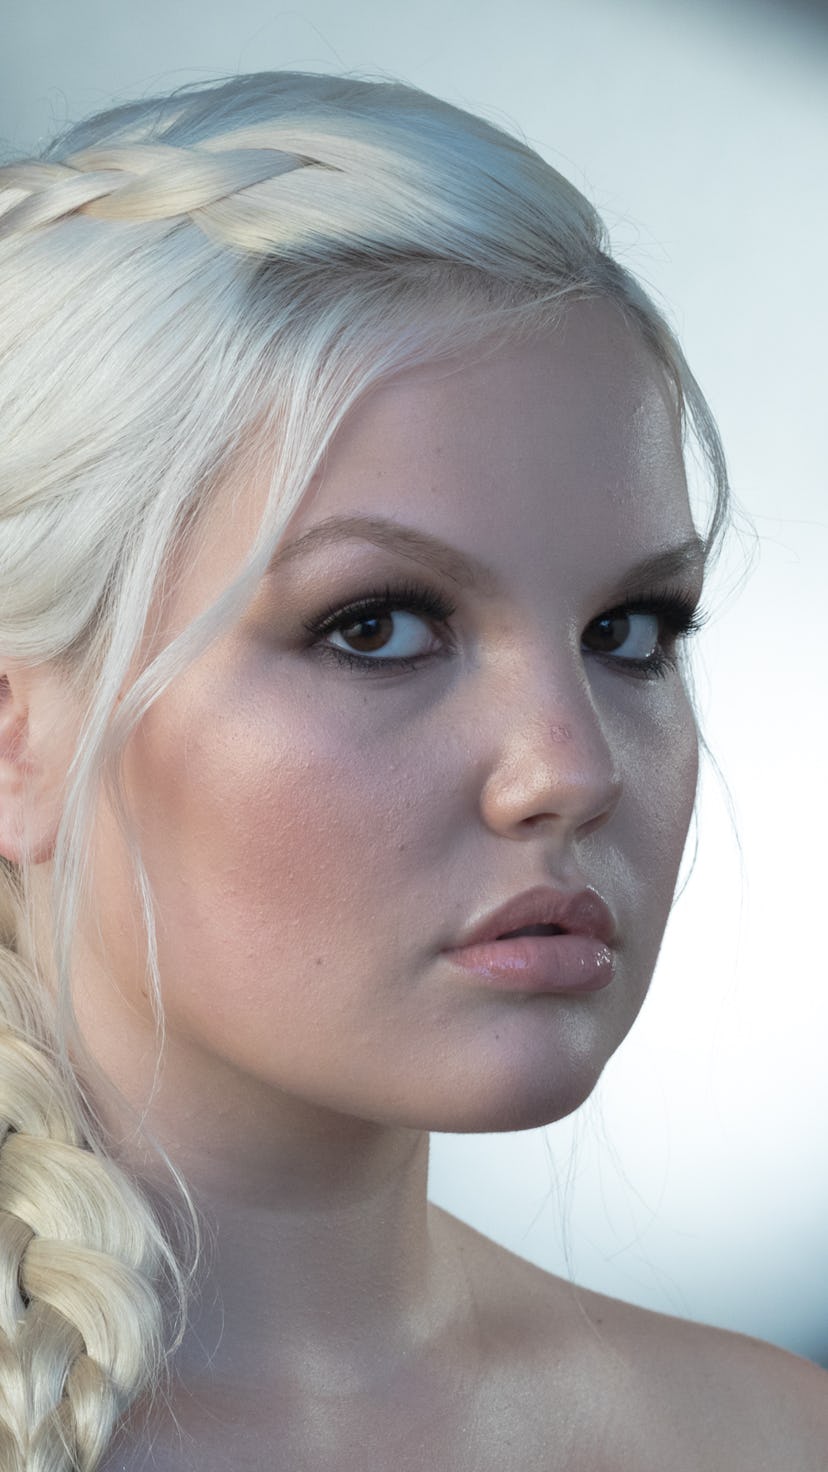
Braid 1: Inspired By Dany's Quadruple Braid

For this look, you'll need:
- Clips in a variety of sizes to hold sections and braids you aren't working on
- A large and small comb to make partings
- Elastics or fabric hair ties you don't mind cutting up
- Bobby pins that match your hair color
- Thread can be harder to find, so you can use the cord
- A weave needle
- Weave thread that matches your hair
Step 1

Prep your hair with a little bit of oil, like Bumble and bumble Hairdresser's Invisible Oil, to give it some slip and make it easier to work with. You can start with your natural hair texture or add some wave with a curling iron.
Harford also recommends putting a dollop of braid paste on the back of your hand so you have it handy to add to the style anywhere that needs more definition.
Step 2

Start the look by making clean partings to map out where you'll make the four braids needed for this look. Leave a bit of hair out at the front (Dany's signature look) and clip each section out of the way except the top right.
Step 3
Comb your fingers through the loose section to ensure you don't have any knots that'll make braiding harder. Then, begin to Dutch braid the top right section of your style, gathering hair only from the top.
Harford encourages anyone attempting these braids to take their time. "Slow is fast," she explains. It's better to work at a slower pace than to try and go quickly, which could lead to a mistake and having to start all over again.
Harford also advises making your braids tighter than you'll want in the end, so you have room to loosen the braid when you're done.
Step 4

Once you've reached the end of your section, braid the lengths of your hair; you want to have enough loose braid to weave it with the other sections. Clip this braid out of the way while you work on the other three.
Step 5
Next, work on your lower right braid. This one has a lot of sag at the front, and you'll want to braid in a downward direction.
Unlike the top braid, you should gather from both the top and bottom to create this one. Stay tight to your neck as you go.
Step 6

Once you reach the nape of your neck, braid the length of your hair and clip the section out of the way. Create two matching braids on the other side of your head.
Step 7
Unpin your two upper braids, and combine the lengths into one braid. Gently tug at the sections to loosen them slightly, which makes the hair look thicker. Tie it off with an elastic.
Step 8
Unclip the bottom two braids. Part all of the hair (except the top unibraid) into two even sections. Evenly distribute the loose hair on the right into the right lower braid, then braid to the ends. Repeat on the left lower braid. You'll want to leave a good amount of hair loose at the end so you can tease it.
Step 9
Unclip the center braid. Make sure all the braids are opened up to be as big as you want, the front looks even, and you're generally stoked about your braids before you start combining them.
Then, tie the weave thread to center braid, and weave it through the other two braids to hold all three together. This creates a more voluminous look than braiding the three braids into one big braid.
Step 10
Continue to weave your thread through all three braids to create the illusion of one massive braid. At the end, go all the way around the bottom of all three braids. Tie it off in a secure knot.
Step 11

Backcomb the tail to make it fluffy and full. Do any last minute loosening to get the final effect you want. Take out any remaining clips.
Step 12

If something feels loose in the final look, use a pin to secure. Harford says you should twist the pin in the middle (like the photo above) to ensure it stays put. Add any braid paste and hairspray you need to keep everything in place.


The beauty of thread is you can just cut it out of your hair at the end of the night! Cut the bottom, then just pull it out portion by portion.
Braid 2: Inspired By Dany's Intricate Ponytail Braid

For this look, you'll need:
- Clips in a variety of sizes to hold sections and braids you aren't working on
- A large and small comb to make partings
- Elastics or fabric hair ties you don't mind cutting up
- Bobby pins that match your hair color
Step 1

Prep the hair with oil for smoothing. If you have curly hair, spritz with a mixture of water and curl cream to make the hair slightly damp and easier to work with.
Step 2

Create four braids, following steps one through six from Braid 1.
Step 3
Tie the top two braids and two bottom braids together to create two ponytails. About four inches down the top ponytail, twist the hair together and secure with an elastic to create a bump. If you have finer or straighter hair, you might want to tease this section a bit for a bigger bump.
Step 4

Wrap some hair from the bottom ponytail around the end of your bump, then secure with hair elastic and pins.
Step 5

Add water and curl cream to smooth out ends and define your texture. Twist strands around your finger to create ringlets. You can diffuse your hair if you have time, or just leave your hair to air dry.


Braid 3: Inspired By Dany's Rope Braid

For this look, you'll need:
- Clips in a variety of sizes to hold sections and braids you aren't working on
- A large and small comb to make partings
- Elastics or fabric hair ties you don't mind cutting up
- Bobby pins that match your hair color
Step 1

Wet your hair slightly to make it easier to twist. Part your hair into two sections, leaving some out at the front. Create a triangular section at the hairline, then split into two parts to start your twist.
Step 2
Twist your sections toward the face, then cross them away from the face, adding from both the top and bottom to build the braid. The twist takes some practice since you're going in all sorts of directions, so don't be discouraged if you have to start over a few times!
Step 3
Once you hit the back of your head, stop adding hair but continue to twist the lengths toward the face, then cross away from the face. Secure the twist with an elastic. You can wrap a piece of hair around the elastic to hide it.


If your hair is curly enough, the twists might stay on their own, but it never hurts to tie things off — especially if you'll be riding dragons all night long. Add pins anywhere that needs to be tightened.
Hair: Sacha Harford for Bumble & Bumble at Ray Brown Pro
Makeup: Markphong Tram using Valour Lashes
Bustle Team
Photographer: Ashley Batz; Art Director: Brit Phillips; Photo Editor: Sepp Dasbach; Production Manager/Bookings: Guillermo Perez
