Life
How To Use The New "Do Not Disturb" Function On Your iPhone For When You're Sleeping
You know when there's a new update out for iPhone and you press "remind me tomorrow" when it prompts you to update for, like, five days in a row? You won't want to waste any time downloading iOS 12. Just released on Sept. 17, Apple's latest update comes packed with a ton of new features that'll make your life way, way easier. The new interface is faster and more responsive, there's a whole slew of new (and personalize-able) emojis, notification activity reports, and even a long-awaited group FaceTime feature. That said, learning how to use the "Do Not Disturb" feature in iOS 12 might be the best thing to take advantage of first — because sleep is truly precious.
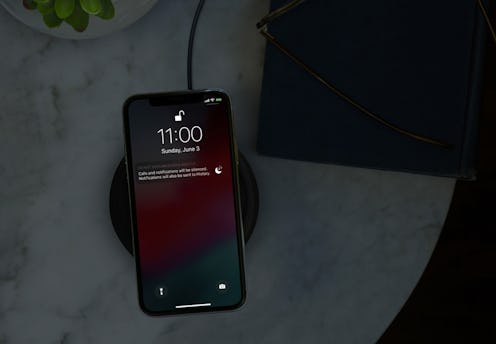
"iOS 12 brings enhancements to Do Not Disturb, making this powerful time management tool even better by helping people stay in the moment during times like studying as well as during a class, meeting or dinner," Apple explained in a recent press release. iOS 12 introduces the "Do Not Disturb during Bedtime" mode, which will allow users to dim screen display and hide lock-screen notifications at bedtime until a designated time in the morning. You can customize it to your exact schedule so that it'll automatically end when and wherever you want it to — read on to find out how.
1. Download iOS 12
The first and most important step to accessing the new Do Not Disturb feature, head over to the Settings app, click on General, and then choose the Software Update option to download the update. If you're low on battery, you'll need to plug into a power source to download iOS 12--and make sure that you're connected to WiFi.
2. Open Control Center

After the update has finished downloading, you can head over to the Control Center to manage the new Do Not Disturb features (to access the Control Center, right-side swipe downwards on the screen for iPhone X or iPad, and swipe upwards from the Home button for other iPhone models). From here, you can 3D-tap or press-and-hold the Moon icon to bring up the Do Not Disturb option list.
3. Navigate Through Do Not Disturb Options

As you'll see on your screen at this point, there's several ways that you can customize and toggle with the new Do Not Disturb settings. For example, you can set your phone to Do Not Disturb for a specified number of hours, until an event ends, or until you leave a certain location. After the selected time has ended, the Do Not Disturb setting will automatically turn off. (If you want to use the feature for a location or event, make sure that you have location on or an event scheduled in your calendar so that these options will appear).
4. Manage Do Not Disturb Feature In Settings App

Next, you can finalize your newly minted Do Not Disturb options in the Settings app. At the bottom of the Do Not Disturb list in the Control Center, you'll see a "Schedule" button. If you click on it, you'll be directed to the Settings app where you can set your Do Not Disturb time limits or select the bedtime option--meaning that no notifications will display while you sleep. You can also access this page by going straight to the Settings app and selecting Do Not Disturb. Here, you can find more specific options: you can decide when Do Not Disturb will mute calls and notifications and customize "Do Not Disturb While Driving" options.

