Style
I Tested 3 Different Approaches To Finger Waves
The only time that I've ever rocked finger waves was for my graduation, when I went and got my hair done professionally. The vintage style has always been one I adored but seemed impossible to manage at home — at least, without buying a million new products to make it work.
But as I've been playing around more and more with different hairstyles and products, I felt it was time to take the plunge and find out a way to get finger waves at home. Finally, I would be red carpet ready for sitting in bars and being my usual extra self.
I was adamant that I wasn't going to buy anything new for my experiment, so I researched and decided to try out three different ways of getting finger waves. I tried using bobby pins, as well as a dramatic gelled finger waves look and finally, using a flat iron to achieve the perfect vintage waves.
At the end of all this, hopefully I would have a go to method for finger waves that I could, eventually, perfect. While none of these styles turned out perfectly first time, the potential for some was definitely higher than others.
1. Bobby Pins

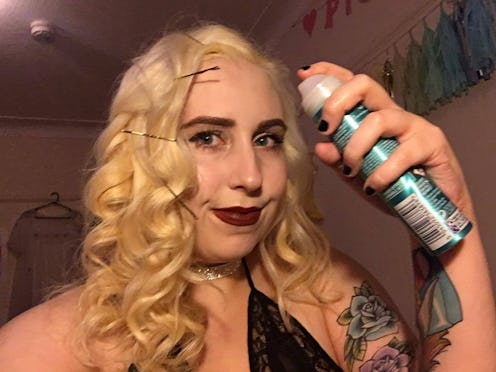
To save you the boring part, I curled my hair as usual with a curling wand. If you don't know exactly how to approach that, there's plenty of tutorials and tips out there. Following in Waller's footsteps, I pushed and prodded my front curls into a finger wave shape and held it in place with bobby pins.

To set the hair, I liberally sprayed my curl with hairspray and was sure to get a cute candid to prove it.

Unfortunately, this technique didn't really work for me. I'm sure if I had the rest of my hair straight, it would have been a more noticeable attempt at a finger wave. Combined with my curls, however, this wave just blended into the background.

I'm not gonna lie and say this curl wasn't cute, and the more definition helped to make my hairstyle look a little more thought out than my usual curly 'do. But for the finger waves effect? I'm not sure I'd try this one again.
2. Hair Gel

First up for this look, I got my hair wet. This wasn't a post shower, conditioned wet but a threw my head under the shower wet. I thought this would add more texture to the look and as always (ahem) I was right. Next, I combed my hair into a deep part, simply because that's a huge part of the finger waves look.

Next, I slathered my newly parted hair with gel but if I'm honest, I had to keep reapplying the gel throughout the process - so keep it on hand. Considering I'd not used gel since a terrible pixie cut in 2005, handling it took a little longer to get used to. To my wet, gelled hair I started pushing my hair into the perfect '20s waves.

Like I said, I used a pretty liberal amount of gel during this part of the process. But once you got your hair and your hands used to the moulding process, it became pretty easy to push my hair into finger waves.

Because my hair is a little longer than suited to this hairstyle, I ended up pulling the leftover hair over my ear before repeating the process on the other side. Without boring you with any more progress pictures, here's how it turned out on both sides.


My thoughts on this final product ended up being twofold: Firstly, it looked awesome and I can't wait to wear it to the club with a fringed dress. Secondly, it's not exactly an everyday look, meaning I probably wouldn't be comfortable running to the store for milk in this look.
In case you're wondering where the rest of my beautiful blonde locks went, they ended up in a low ponytail at the back of the look. For extreme occasions or looks, this was definitely a winner in my books. For a low key style? Probably best to avoid this one.
3. Flat Iron

Using a flat iron for finger waves is something that I've seen time and time again on Instagram and YouTube and while they made it look relatively easy, I'm here to tell you it's not. At least, it's not so easy to get the perfect finger waves they show. To start, I straightened all my hair to have some semblance of smoothness to it.
As per the video, I pushed my hair through my flat iron in an s wave motion.


During this process, my waves looked so promising. Once I let go of the straightener, the waves kind of fell. Repeating the process three times on one part of my hair led to a better result but unless you have an hour or two to dedicate to a whole head of finger waves, I'm not sure this is one for a casual day out.

Of all the ways of forming finger waves, this was probably the best for a more wearable look. Over time, it would probably get easier to get into a routine and learn how to do it quickly.
Probably because I'm not a professional hairdresser, these looks didn't always turn out how I'd imagined from the tutorial. With practice, however, I'm sure each of these could become go to styles in my routine — except that bobby pin one. If I learned anything from this, it's simply to not trust you'll get a tutorial right the first time and if you're keen on getting a certain look, practice it.
