Style
You Only Need 2 Tools To Recreate These Cute AF Nail Art Designs
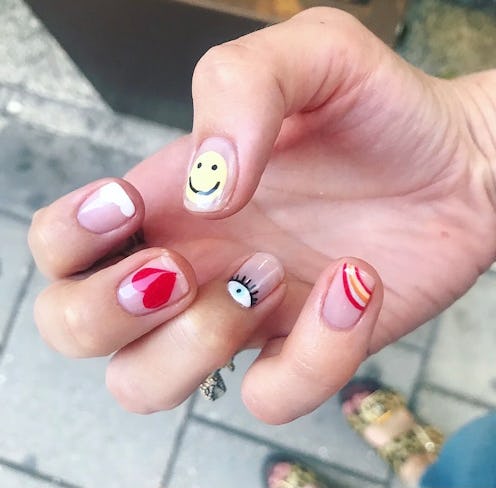
Mismatched nail art, made easy.
When it comes to nail art, there is a seemingly endless list of trends and looks doing the rounds at any given time. But you may have noticed that mismatched nails have really become a staple over the past couple of years, and they won’t be budging anytime soon, according to celebrity nail artist Imarni. In fact, different designs on each nail (be that nail art or just different block colours), are the way to go for summer 2021, she tells me. Luckily, you can easily do this yourself; here’s how to create easy shapes for mismatched at-home nail art.
“It is such a fun, wearable design with fun colours,” says Imarni of mismatched nails. Whether they’re being done with little clouds, smiley faces or rainbows, there’s no chance you’ve missed these on your Instagram feed. In fact, they’re more popular than ever, and have become highly requested at top nail salons. You may look at this trend and think it’s impossible to do from home by an amateur, but in fact, it’s so incredibly simple if you just master the individual shapes.
For this look, you will definitely need two things ahead of time: dotting tools and a selection of super fine nail art brushes. Both can be found online for under £10, making this a much cheaper option than forking out £50+ in a nail salon.
Interested in giving it a try? Here’s how to create each easy shape to get that awesome mismatched look.
Rainbows
Let’s start with the most challenging shape: rainbows. For this, you’ll need a steady hand and a touch of precision. But once you’ve got the hang of it, you’ll be laughing.
Imarni’s handy Instagram tutorial in honour of Pride will help (see above), and can be mixed up to create corner rainbows, rather than across the whole nail.
Nail artist Marissa Marsh has the following tips: “Make sure the polish you are using has a good consistency; if it’s too thick or dry it may look slightly lumpy when painted.
“A thin striping brush is a must for the rainbow to paint closely beside each coloured line without them merging.”
Clouds

Little clouds (such as the one seen on my pinky finger above) may look challenging, but Imarni assures me they are easy to do from home. “Literally just get a white nail polish and cotton bud, and dip the bud into the white,” she explains. “Then press in to create the shape on the nail. Even if it’s not that neat, it still looks like a cloud!” Wondering where on the nail to place your cloud? A corner could work wonderfully, as in the picture above.
The Evil Eye
For your ‘evil eye’ design, you’ll just need three colours: a white, black, and blue, brown or green. You’ll just need a fine brush to draw in the white, then two dotting tools in differing sizes. Follow The Hang Edit’s super super easy tutorial above, which shows just how achievable little eyes are. You could even add eyelashes with a super fine brush dipped in black, if you’re feeling brave.
Smiley faces
According to Imarni, all you need for your smiley faces is a dotting too and fine brush. Use the brush of the yellow nail polish to create the circle (you can perfect the edges with a clean brush or cotton bud with remover on it) and, once it’s dry, dot on the eyes in black, followed by the smile with a fine line brush. Simple.
Cherries
This quick summer cherry tutorial is one of the best out there. Again, you just need your dotting tool to create the two red cherries, along with two fine line brushes and a green and dark brown paint for the stem and leaves. If you want to keep it simple, just restrict yourself to one cherry per nail.
Hearts
Minimalist designs aren’t complete without mention of some hearts, so grab your red nail polish and let’s go. These are very achievable, and only require a few things. Marsh recommends “putting two dots (using dotting tools) together, then painting the tip or end of the heart to a point with a thin nail art brush.” Want something that requires even fewer tools? This YouTube video asks for just one thing: a toothpick!
