Fashion
How To Make A DIY Galaxy Bath Bomb
There are a fair amount of of bath bomb DIY tutorials on the Internet, including some less than inspiring DIY fails and mishaps consisting of immovable egg whites on bathroom tiles or permanently dyed pink necks. Remember the guy who drank his chicken ramen bath bomb in the water? Yikes.
What the bath bomb memes of the world often fail to mention is that it's actually more than possible to create your own LUSH-worthy product at home with the help of a few handy kitchen ingredients. I promise: Achieving a Rainbow Brite-approved bathtub while making yourself smell like a flower garden or lavender cocktail is totally doable.
With a little help from our go-to baking necessities, baking soda, food coloring and let's not forget this great video tutorial from YouTube beauty-guru RCLBeauty101, I’m going to show you how you can create your very own beauty store-inspired galaxy bath bombs from scratch. While YouTuber Rachel decided to opt for brighter colors for her bath-bombs, I decided to stick to pastel hues. But feel free to adapt the mixture to whatever you prefer.
Alongside saving you a buck or two, the DIY is also great fun if you have friends around. It'll make a nice change from sitting around binge watching your favorite Netflix show. Don’t worry: You can have a glass of wine while doing it as well. The same goes for when you're DIY-ing on your own, of course. It's that easy.
What You'll Need
To make your very own bath bomb, you’ll need the following:
- Baking Soda
- Epsom Salt
- Lemon Juice
- Water
- Spray Bottle
- Food Coloring
- A Mold
- Mixing Bowl
- Spoon
- Fragrance (Optional)
- Glitter Or Eyeshadow Pigment (Optional)
1. Pour Baking Soda Into A Bowl
Start by pouring baking soda (aka bicarbonate of soda for Euro-folks) into a bowl. A standard cup (eight ounces) is a good starting point. The best thing about the recipe is that you can pretty much do it by eye, and you don’t need to mess around with weighing scales.
Since we’ll be making the bath bomb colors in various portions, you can always make more as you go along if you don’t have enough of the mixture.
2. Add In Epsom Salts
Once you’ve added baking soda to the mixing bowl, pour in some Epsom salt. Again, I did this without measuring, but opting for a semi-equal amount of both.
Many how-to’s online say that regular salt works just as well. But the point of Epsom salt is to ultimately sooth those achy muscles and give the bath bomb its relaxing properties.
3. Mix The Two Together
Mix the two dry ingredients together as best you can. If you have a whisk, it should give the mixture a smoother texture. If not, a spoon will work just as well.
4. Add Lemon Juice To Water
You now need to combine lemon juice and water into a spray bottle. Many bath bomb recipes incorporate citric acid powder, but this liquid blend is a much more budget-friendly alternative. When creating the spray, you'll want both the water and lemon parts to be even. Once you’ve added them into a spray bottle, shake it well and allow them to mix together.
5. Spray Lemon Water Into The Mixture
Next you want to spray the lemon and water combo into the baking soda mixture. It’s important you do this one spray at a time. If you add too much of the liquid, the bath bomb generally won’t fizz come bath time.
Carefully spray the solution into the bowl and mix it in before adding another spray, and so forth. The aim here is to create a wet sand texture, whereby the mixture is sticky enough to be molded in the palm of your hand. If it begins to resemble slush, you’ve probably added too much of the liquid. You can counter this by bringing more baking soda and Epsom salt into the mix.
6. Separate Into Different Bowls
If the solution is beginning to resemble wet sand, divide the portion into smaller bowls. These are going to be the different colors of the bath bomb.
Here I’ve chosen three, although you can make as many or as little as you like. Now is also an ideal time to whip up another batch of the dry ingredients if you’ve realized your measurements were slightly off at the beginning.
7. Add Food Coloring
It’s time to brighten up the bath bomb. Drip some food coloring into each of the dishes, slowly and gradually. Just like the lemon juice, you don’t want to add too much. Just take it one drop at a time.
8. Mix It All Together
Here I'm stirring in two drops before adding another two. As I used gel food coloring, my dye is a little thicker than originally planned and it didn’t mix in as well as it would have if it was in liquid form. If this is the case for you, feel free to gradually knead the dye into the mixture. Just make sure your hands are clean first!
This is also a great way to check the texture of the formula before you go ahead and continue making the bath bomb.
9. Do The Same To The Other Portions
After dyeing one portion of the mixture pink, I did the same to the two others using blue, yellow, and purple coloring.
10. Add Glitter And/Or Fragrance
You can get as creative as you like during the food coloring process. For those wanting to give the bath bomb a luxe twist, adding glitter or sparkles is a must. Beware, though: They will be a massive pain to scrub off both your skin and bathtub. You can also use eyeshadow pigment to create a speckled, galaxy-like effect.
Oh, and don't forget to mix in any scented oil or fragrance. I typically gravitate towards patchouli, lavender, or rose oils.
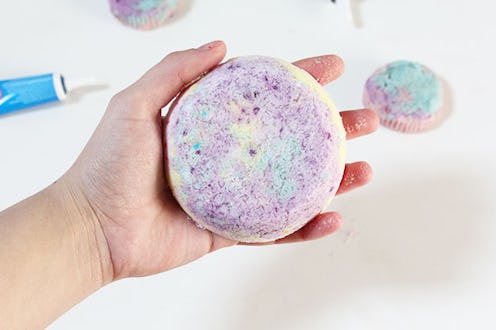
11. Press Into Mold
You’re going to need a mold to shape the bath bomb. For a perfect round shape, opt for something like an egg poacher case. If, like me, you don’t have one around the kitchen, you can use alternatives. For a half dome shape, opt for a bowl, like I did here.
For tart-sized bath bombs, you can even use cupcake cases.

If you want to create shaped bath bombs, you can utilize a non-stick baking sheet or ice cube tray. I purchased this Easter-themed one for another tutorial and it worked just as well as the bowl I used above.
When putting the mixture into the mold, you want to pack it as tightly as possible. This will ensure the the bath bomb doesn’t crack. It also reduces the amount of air that could get trapped inside it.
Simply scoop out whatever color takes your fancy and press it into the mold using your fingers, before adding another color, and then another, mixing the hues together throughout.
12. Run A Bath And Relax!

Once you’ve finished adding the mixture to the mold, you can either leave it out to dry for the rest of the day or pop it in the freezer. For this tutorial, I put the molds in the freezer for three hours. I then took them out and left the bath bombs on the side until they reached room temperature. You want to make sure that they are completely dry before you use them, otherwise they won’t fizz and spread through the water.
Bath bombs? Done.
Bathtub? Filled.
Now, where’s that cork screw?
Want more fashion and beauty tips? Check out the playlist below, and be sure to subscribe to Bustle's YouTube page for more hacks and tricks!
Images: Emma Matthews
