With the summer 2016 Olympic Games in full swing, fans and athletes all over the world are showing off their excitement. And after spotting Marina Bravo of Spain’s Olympic women’s rugby team sporting an official pair of shades, I knew I had to attempt an Olympic ring sunglasses DIY. It’s like a pair of New Year’s shades that can be used over and over again.
Don’t let a DIY version intimidate you, though. The technique is quite simple; it is just a matter of wrapping ribbon around wire. Sure, things can get tricky when it comes to placing the rings on the sunglasses. But that’s where I come in. This tutorial breaks down every last step and detail, complete with close-up photos. I got your back, people.
It’s also crucial to remember that these fun shades are just for… well, fun. They don’t have to be Pinterest-perfect. Instead, use them as an excuse to throw an Olympics party and dress up in Olympics uniforms. They will give you an awesome way to show off your enthusiasm for the 2016 Rio games, regardless of your athletic (or crafting) abilities.
Ready to go for the gold? It’s time to tune into your favorite sport, relax, and get crafting.
Let's start off with Marina Bravo and the original inspiration piece:
Aren't they awesome? Below is the DIY version. Enjoy!

Supplies:
- Round plastic sunglasses (check out stores such as Forever 21 and H&M)
- 3/8-inch wide ribbon (yellow, black, red, green, blue)
- Soft 12-gauge aluminum craft wire
- Hot glue gun
- Pliers
- Scissors
- Cylindrical item*
* The cylindrical item should have a diameter that is about the same size as the lens of your sunglasses. Check your toiletries for possible matches. For example, I used a small bottle of dry shampoo. If you can't find a good match, use an item that is slightly bigger than the lens. You can make the wire circles smaller and trim accordingly.

1. Using the cutter portion of the pliers, carefully cut a long strand of wire. Do not straighten the wire; the pre-existing circular shape is exactly what you need.

2. Tightly wrap the wire around the cylindrical item two times. I'd recommend holding down one end of the wire with one thumb, and using the other hand to wrap the wire around.

3. After wrapping around twice, cut the wire. It should look a bit like a key chain ring.

4. Double check that the wire ring is about the same size as the frames. Adjust accordingly.

5. Hot glue a long strand of yellow ribbon to the wire. Remember, a little bit goes a long way. Too much glue will end up looking lumpy.

6. Wrap, wrap, and wrap some more. Add a dot of hot glue every now and then to add extra security.

7. Once the entire circle is covered, cut away the excess and hot glue the end. First Olympic ring... check.

8. Now that you're a ring-making champ, repeat steps one through four to create four more wire rings.

9. Repeat steps five through seven with a second ring using green ribbon. Don't glue them down just yet. Instead, double check that the rings fit well on the frames. Set aside.

10. Grab a third wire ring. Line up the raw ends and cut the wire next to it.

Here's a close-up to help you out. See where the raw ends overlap? Cut the wire next to it. You will be left with two separate rings.

11. Wrap together with blue ribbon. Your best bet is to start at the raw ends and work your way around. Here's a tip: keep the rings together by adding a dot of hot glue to the raw ends. Then, wrap as usual. Repeat this process to create a fourth and red ring. You're almost to the finish line.

12. Now, it's time to make the center black ring. Wrap half of the ring with black ribbon. Again, start by wrapping around one of the raw ends and the wire adjacent to it.

13. Snip both sides of the circle, right next to where the black ribbon ends.

One half will look a little something like this.

14. Wrap black ribbon around the other half-circle of wire.

15. Time to glue these babies on! Add a few dots of hot glue to the left-hand frame, and add the yellow ring. Slowly work your way around the frame, adding glue and pressing down the ring. Keep in mind that the rings will not likely be completely flat, so don't worry about adding glue all around the frame. Pick spots where the ring touches the frame. Repeat with the green ring on the right-hand frame.
If you mess up, don't worry. Hot glue is extremely forgiving and can be peeled off of plastic frames.

16. Bring in the blue and red rings. The opening of each ring should rest around the existing ring on the sunglasses. For example, the opening of the blue ring should be placed on the outer side of the yellow ring (bottom arrow). Add a small amount of hot glue to keep this in place. Add more hot glue at the spot where the blue ring overlaps the yellow (top arrow). Repeat with the red ring on the other side.

17. To attach the black ring, add a dot of hot glue along the top of the yellow. Carefully attach the raw end of the black half circle. Add another dot of glue to the green ring. While holding the black piece with your left hand, position the other end of it onto the green. Repeat with the bottom half.

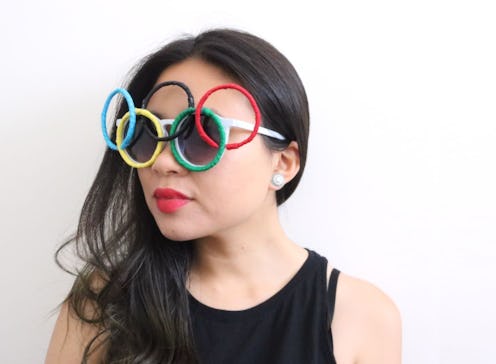
Now, here's the extra-fun part. Try your new shades on and bask in the awesomeness of the Olympics.

Biggest. Win. Ever.
Images: Kirsten Nunez/Bustle
