Fashion
How To Do Harley Quinn Makeup For Halloween

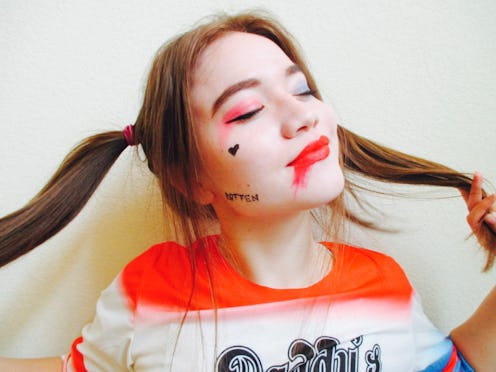
Oh the time I would save everyday doing my makeup if only I were Harley Quinn. Seriously, this girl has a signature look down and it's pretty unique for five-minute makeup. Which means doing Harley Quinn's makeup from Suicide Squad will be one of the easiest (not to mention coolest) Halloween looks you've ever done. And the best part is you can achieve this look with products you probably already own.
For the base, you'll need either a foundation that is a couple of shades lighter than your natural skin tone, or white cream makeup. For the rest of your makeup, all you'll need is a red or pink eyeshadow, a blue eyeshadow, black eyeliner, mascara, a brow pencil, and red lipstick. As for the difficulty level, you won't really need any professional makeup skills or even a steady hand. In fact, you're probably going to have to resist the urge to blend your makeup properly.
Harley's look is pretty messy, so you can actually just slap it on and be good-to-go. Of course, pigtails and accessories like a "Daddy's little monster" shirt, a baseball bat, and a "Puddin" choker will complete this look. So if you want to channel Harley Quinn for Halloween this year, here's how to quickly and easily get her look.
Step 1: Base
To achieve a lighter base, I used a buffing brush to blend a white eyeshadow crayon into my face. Don't forget to drag some down your neck so everything looks blended.
Step 2: Brows
Harley's brows are darker than her hair, so I used more pressure than usual to fill in my brows slightly thinner and darker than I normally would. You could also use a dark brown or black eyeshadow to fill in your brows if you don't have a pencil that is dark enough.
Step 3: Eyeshadow
OK, here's the fun part. On my right eye, I patted a red eyeshadow all over my lid, and then dragged it down to about my cheek bone. Then, I did the same thing on my left eye with a blue eyeshadow. The key is to keep it messy. You can even use your fingers instead of a brush if it will help you prevent your blending instincts from kicking in.
Step 4: Eyeliner
Harley has a bit of a wing, but it's not sharp enough to cut anyone. Try a gel eyeliner that can be smudged for a messier look, and drag it along the lower lash-line as well. You can go back in with a black eyeshadow if you want to smudge out your liner even more.
Step 5: Mascara
Mascara is always necessary, and you can add falsies too if you like.
Step 6: The Heart
To achieve Harley's little heart tattoo, I first used a more precise liquid eyeliner to outline the shape I wanted. Then, I went in with a darker liner to fill in the heart and make it stand out. If you're not comfortable free-handing this part, use a heart stencil or even temporary tattoo instead.
Step 7: Rotten
The "Rotten" tattoo was slightly more awkward and difficult to draw on. But along my right jawline, I followed the same procedure as with the heart: I first outlined the letters with a more precise liquid eyeliner, and then went over the letters and added little flourishes with a darker liquid liner. Again, if you're uncomfortable trying to free-hand this part, use letter stencils, try to find a temporary tattoo, or ask a friend to draw it on for you.
Step 8: Lipstick
Finally, line and fill in your lips with your favorite red lipstick.
Step 9: Finishing Touches
Time to get your Harley Quinn on. Pull out some face-framing pieces from your pigtails, smear your lipstick if you want, and practice your crazy eyes.
Oh, and don't forget your puddin.
Images: Miki Hayes (10)