Fashion
How To Do Easy, Stitched-Mouth Halloween Makeup
As much as I love some creepy Halloween makeup looks, many of them require special effects makeup like liquid latex and cream colors to really go all-out. But stitched mouth Halloween makeup is one of those looks that you can achieve almost as easily with products you probably already own. And while this look does take a little more time to complete (you may want to give yourself about two hours to be safe), the process is actually pretty simple, and the results are so worth it. Here's what you'll need:
- Red and black eyeshadow
- Black lipstick
- Red liquid lipstick
- Red lip gloss
- Lash glue
- Thread, cut to size
- Tweezers
Before doing the creepy part of the makeup, start by applying a full face of makeup either how you normally would, or glammed-out. I took the glam approach and did thick, winged liner and applied falsies. Regardless of how you choose to do your eye makeup though, make sure to apply a nude lip. This will act as a blank canvas for the stitching. Oh, and don't worry about the stitches. With this particular technique, you'll still be able to talk, and of course, eat all of that Halloween candy. Here's how to get creepy, stitched-mouth makeup with products you likely already have:
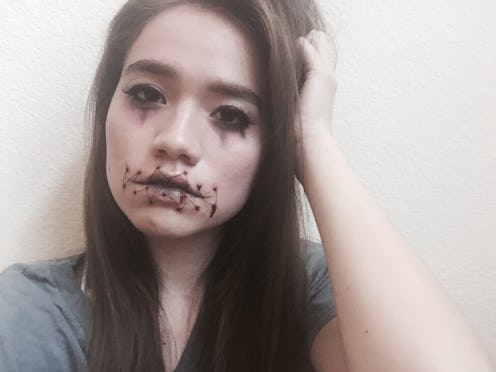
Step 1: The Eyes
For a creepy take on puffy, mascara-tear eyes, start by sweeping some red shadow underneath the lower lash-line. Don't worry about keeping it neat; drag it down and make it messy. Then use black shadow to color in some tear streaks. Again, the messier it is, the better.
Step 2: The Lips
For the lips, start by patting some black lipstick across the center of your mouth. Then, using a detail brush, extend the corners of your lips out about an inch.
Step 3: The Wounds
To create some dimension for the stitch wounds, start by dotting red eyeshadow where you want the marks to be. Not only will this help outline where you want your stitches to go, but the shadow will create an inflamed look. Next, go over the center of the shadow marks with black lipstick on a detail brush to mimic depth or holes. Finally, go over the black with red liquid lipstick to give the impression of raw edges.
Step 4: The Stitches
OK, here's the time-consuming part. Use a dotting tool or detail brush to apply lash glue over the wounds you created. You'll want to work in sections so the glue doesn't dry before you have a chance to get to it. I'd recommend doing no more than four spots at one time. Then, after waiting about 30 or 40 seconds for the glue to become tacky, use tweezers to apply pieces of thread and connect the dots. So you don't have to stitch up your mouth, when you get to where your lips actually are, apply stitches on your lips instead of across them.
Step 5: The Finishing Touches
Once all of the stitches are secured, dab a bit of red gloss over each wound spot. You can even drag it down a couple of the sites for a bloodier look. Then just put on your sad eyes, and you're good to go.
Images: Miki Hayes (6)
