Fashion
How To Make Lipstick Last Through Holiday Parties
Statement lips can be the focal point of your whole beauty look, so you want your lip color to stay where you put it, right? Getting your lipstick to stay throughout all of your holiday parties can be done, I promise you — it just takes a few extra steps. Personally, when I want my lips to last all night, I reach for a liquid lipstick, but I still use most of these same techniques. Whether you're a liquid person or prefer traditional bullet lipstick, these steps will ensure great looking lips all night long.
Here's the thing. I would love to whip out some hack that will keep your lips locked down from morning to night with just one application, but sadly, that's just not the world we live in. At some point in the day, you're gonna have to eat something, you know? That's the one thing you can't avoid and coincidentally the one thing that's gonna mess with your lipstick. Once you accept it, everything becomes a whole lot easier. Most foods contain oil and oil breaks down makeup — so despite my advice, you're probably going to have to reapply after you eat, sry. Despite that unavoidable fact, check out my tips to make your lipstick last as best it possibly can — you can definitely be more proactive than delicately sipping through straws and hoping for the best.
1. Start Smooth

Start out with moisturized, smooth lips. I always make sure to sleep with a good amount of lip balm on just to make sure my lips are hydrated. It's also a good idea to exfoliate your lips if your mouth has been dry, as lipstick accentuates dryness and dead skin, and flaky lips will mess with wear.
Something to keep in mind throughout this process, use only just as much product as you need, nothing more. You can always add more, but too much product will cause the lip color to have a hard time staying in place, making it rub off easily, which is what we're trying to avoid. I know everyone loves their lips to feel hydrated throughout the day, and that's great, but the more moist your lip product, the easier it's going to be for it to rub off. Some lip products feel a little dry for a reason: stay power.
2. Cover Up

Cover up your natural lip line with foundation or concealer. This is necessary for me personally because my lips have a lot of color to them, which tends to flush out over my lip line. I wear a lot of statement colors, and when I don't cover my lips with foundation, you can see redness peeking out on the sides of, say, my blue lip, which looks odd. This isn't the case for everyone, though, but it is a good starting point.
I tend to use Anastasia's Stick Foundation because the formula is very pigmented with a matte finish, creating a flat base that your other products will sit nicely on top of. Foundations that are too glowy tend to make products slide around.
Anastasia Beverly Hill Stick Foundation, $25, Sephora
3. Prime The Hell Out Of Them

Prime everything, including your lips. You will never regret it. Right now I'm all about Ciate's Magic Pout Potion because it's a liquid primer that dries down matte, creating a nice, grippy base for your lip products to cling to. I don't even use all that much, I just touch the applicator the middle of my bottom lip and then rub it around with my fingers. A little bit goes a long way. Like I said, you don't want to use too much of anything.
Ciate's Magic Pout Potion, $20, Sephora
Congratulations! Now you look like a corpse.

4. Line Your Lips

Okay, we're finally onto color, so grab a liner. I'm using MAC's Nightmoth Lip Pencil, a limited edition blackened plum from the Brooke Candy collection. Take a breath and take your time. Use light, short strokes. You can even cheat your lips out in any way you want to adjust their shape. I always make my top lip a little wider to sit evenly on top of my bottom lip, since my tip lip is skinnier. Don't tell anybody.
MAC Nightmoth Lip Pencil, $18, Nordstrom

Then fill them in. The matte base is going to be perfect for your lip color to cling to all night long. Start with one pass of the liner, but again, be careful not to use too much. Look at my lips right now:

I lined both lips by tracing around them but only filled in the bottom lip, then pressed it against my top. All of the color you see on my top lip is transfer. I do this to make sure I'm not caking my lips in product, and then go back in and lightly fill in where the liner is patchy.

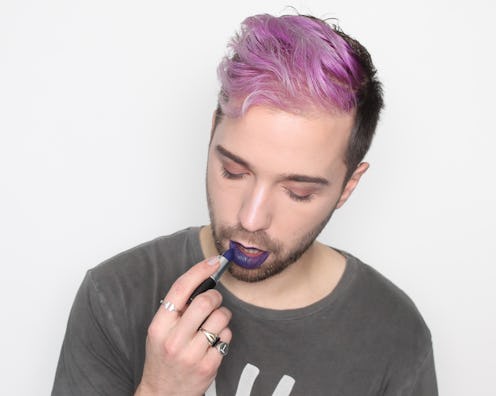
5. Grab The Lipstick

Now, grab your lipstick. I'm using MAC's Matte Royal, a deep blue that pairs nicely with the liner. Trace the lipstick over your lips but don't, like, go crazy. Apply just enough to reach opacity.
MAC Matte Royal, $17, Nordstrom
6. Blot — Yes, Blot

I always feel like I'm about to ruin everything I just did, but take a tissue and softly blot any excess color off of your lips. Softly is the operative word here: Don't use any pressure and wipe anything away. This will take away what would have rubbed off anyway. Next, go back in with the lipstick and tap to fill in any gaps that blotting left. Then gently blot once more.
Before we finish, do that little trick that's a favorite of every grandmother/drag queen. Take a paper towel, or, let's be real, your finger, and put it in your mouth. Gently close your lips around it and slide it out.

The ring of lipstick around your finger was what was hanging out on your inner lips, and what would have smudged on your teeth without any of your asshole friends telling you. Now you're safe.
Before our final step, make sure your lips are fully filled evenly with no patches.

7. Powder Your Lips


Finally, take a translucent powder on a fluffy brush and lightly dust it against the surface of your lips. This will help take away any slick finish and lock the lipstick, helping it stay where you put it. I use Bye Bye Pores Pressed Powder from IT Cosmetics because I use it for everything and it is truly the best. Again, don't go crazy, if your lipstick has gone from a satin to soft matte finish you're good, that's all you need.
IT Cosmetics Bye Bye Pores Pressed Powder, $35, Amazon
And you're all good!


You've done everything you can to set your lipstick and ensure that it clings to your lips all night. This may seem like a ~elaborate~ way to apply, but you'll be thanking me at last call when your lips still look perfect — and, you're using less product than you would by simply applying, and then reapplying, over and over again. Even when you do need to re-up later in the evening, chances are, less lipstick will have come off, so you'll just be filling in bare spots, not starting from scratch.
With all the incred holiday parties coming up, there's definitely a need to lock your lips in place as best you can. This is a tried and true process for me, and you might even be able to power through some of your holiday hors d'oeurves. Follow the steps, grab something from the circulating tray of comestible holiday puffs, and enjoy.
Images: Author's Own
