When I was in middle school, crimped hair was all the rage. I was literally obsessed with making my hair look as popstar chic as possible. Now, with the trend coming back (see: Stella McCartney's 2015 Spring Show or Fan Bingbing sporting the hairstyle at Paris Fashion Week), my inner pre-teen is literally screaming for joy. This prompted me to add it back into my hairstyle rolodex, but I didn't want to go out and buy a crimper again. So, fellow readers, this is what I did: I crimped my hair without heat, and the results were not bad. Not bad at all.
Of course, this wasn't the first time I had done it. During my middle school years, I crimped my hair as much as possible, but it was a lot of heat and over time, I knew I was damaging my hair. On top of that, it took way more time than I had in the morning. As a result, I went into survival mode and figured out a way to crimp my hair overnight, all while not having to apply heat at all. It was life-changing! And for an 11-year-old Britney Spears-loving pre-teen, I felt like I had unlocked the secrets to all my wildest hairdo dreams.
In my attempt to bring back the crimped hairstyle, I've decided to bring back the method of how I used to do it, sans crimper. If you're willing to revamp the hairstyle with me, the process is super easy to follow. But before you start, I highly recommended creating a throwback playlist to really set the mood.
1. Wash, dry and straighten your hair the night before
OK, so super important: Before the crimping process, it's imperative that you wash and dry your hair. That way when you set your hair, it won't have all the natural oils from your scalp. Now, I love my natural oils. Without them, my hair wouldn't be shiny. But for this process, we need your hair to be as clean as possible for the best results. Also, make sure your hair is straight or straightened before you start. (You don't need heat to straighten your hair if you choose not to).
2. Prep and divide

Divide your hair into sections and make sure to prep your hair with hairspray. Any hairspray should work, just pick one that works best on your hair and holds in your style. Depending on how intense you want your crimp to be, you can divide your hair into more sections. The more sections you divide your hair into, the more crimped it will look. I usually divide my hair in two, for a easier, lighter crimp.
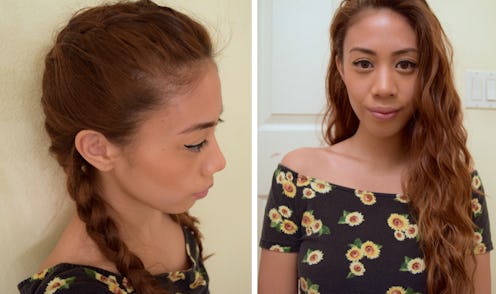
3. French braid each section

This is when the magic happens. While your hair is already prepped with hairspray and divided, french braid each section. The tighter the braid, the more crimped your hair will be. For the ends of your hair, tie your hair about a half inch from the ends and continue to braid. Loop the excess braid to the hair tie. This way your ends won't look completely straight while the rest of your hair is crimped.
4. Apply hairspray and set for the night
Hairspray is crucial for this hairstyle. After braiding your hair, apply more hairspray to lock in and set your french braids. Sleep with your braids and dream of all the hair happiness they're about to bring you.
5. Let loose and mousse

When you wake up to start your day, your braids will have already set and will be ready to let loose. Gently loosen each braid from the bottom all the way to the root, slowly and gently. The quicker you loosen, the more tangled your crimped hair will become. Then, let your hair relax for about five minutes after loosening. After waiting, apply a dab of mousse all around your hair, starting from the ends all the way to your scalp.
And this is how your hair should look:

If you want your hair to look more crimped, create more sections and braid them as tightly as possible.
And since I'm not 11 anymore, and red lips are a staple, I paired my new/old crimped 'do with red lipstick and my '90s crop top.
Voilà! Now go listen to some Dirty Pop and get to crimping.
Images: Danelle Sandoval
