Fashion
Dip Dye Your Clothes With This Easy Peasy DIY
The weather is finally warming up, the birds are chirping, and women all around the world are pulling out their old denim to turn jeans into distressed shorts — or even cooler yet, to figure out how to dip dye clothes. We've all been there and done that, right?
Whilst other DIY projects begin surfacing this time of year (including making DIY Mother's Day gifts), my all-time favorite spring DIY project has to be dip dyeing. I love that you can tie your shirt any which way possible, drench it in an array of colors until it's a weird green-black hue, and have it turn out to be this awesome, multi-colored, crazy-patterned shirt. Legions away from a boring plain tee.
I used to have an entire drawer full of tie dyed and dip dyed shirts at one point, but my collection has dwindled down in the past couple of years. Recently — during one of my online shopping binges (which happen way too often) — I came across a top from ASOS that I really liked, but its $40 price tag didn't sit well with me, considering it was just a tee. But then it hit me: I could most definitely recreate the style with my old tie and dip dyeing skills.

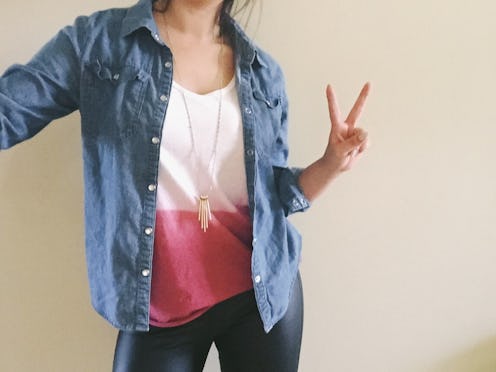
So I went to a nearby craft store and picked up a bottle of dye. I had an old white tank I didn't really care for that was perfect for the project. Seriously, this is probably the easiest DIY endeavor you will come by. And it's exactly as simple as you think it will be: You dip your shirt into the dye carefully and ta-da! Ok, not exactly. Here are more thorough steps for those of you interested in giving this a go:
Step 1: Gather Your Materials

Materials needed: White clothing, dye, bucket or jar, water, salt.
I've been using Rit Dye to tie dye since I was in middle school. The colors aren't as vibrant as the dyes you would get with tie dye kits, but I find them to be more "everyday" colors that you could actually incorporate into your grown up life. I'm an avid fan of wine red — I think it complements my skin tone really well and looks lovely with denim.
Step 2: Get To Pouring

Pour hot water into a giant mason jar (or a similar container), and add in approximately two tablespoons of salt. Next pour in your dye of choice, and let it sit. Not really rocket science! Next, stir the solution carefully. (I actually stirred it with a stick I found nearby...)
Step 3: Dip The Fabric

This is the trickiest part. First, you should eyeball where you want the dye to go up to on your garment. Mark it with a safety pin if you're not too confident in your eyeballing skills. Carefully, very carefully, immerse the shirt into the dye.
To give it a slightly ombre look, I immersed the shirt halfway into the solution, and then quickly took half of it out so that the bottom half was still in the dye. This way, the bottom would be darker than the top portion, creating a slightly more natural-looking ombre effect.
It's important to keep the top portion of the shirt or garment very clean, so that it contrasts the half you just dip dyed. If you're not confident in keeping the white portion clean, you can put the top half into a plastic bag and secure it with a rubber band so that dye doesn't get on it.
Step 4: Leave To Soak, Then Hang Dry

I left the bottom half of the shirt in the jar full of dye for about five minutes to let it really soak in. Luckily, it doesn't need to be left overnight for the color to adhere. Make sure to hang dry your shirt on a clothing rack, or a nearby tree, so that the dye doesn't accidentally get on the top portion. This ensures that the dye runs towards the bottom of the shirt, keeping the ombre consistent.
Step 5: Throw It In The Washing Machine

After letting it dry, throw your item into the washing machine by itself to get the excess dye out, and you're all set! Because I used an old tank that I had laying around, I cut off the bottom hem and reformed it a bit so that it fit more relaxed. But you can get even more creative: Maybe cut the bottom into fringes and add beads for true festival-esque style.
(And yes, I used a selfie stick to take the above picture.)
Images: Author's Own; ASOS
