Spend five minutes on social media and you’ll find countless cat-eye tutorials — but most aren’t actually made for everyone.
If you have hooded or deep-set eyes, classic “one-size-fits-all” techniques don’t always translate — which is why so many people (myself included) end up frustrated that their wings don’t look quite right.
As it turns out, the problem isn’t a lack of skill; it’s that most liner hacks are designed with different eye shapes in mind. On certain lids, the “standard” wing — one with an upward flick from the top corner — can disappear into the crease or look uneven when your eyes are open.
Thankfully, TikTok has divulged a trick that actually works for those who just aren’t made for the classic cat-eye. The secret? Following the shape of your eyes.
Cat-Eyes For Hooded & Deep Set Eyes
Earlier this week, creator Mikayla Flynn shared a winged liner tutorial she swears works.
“Going from the top corner of the lid out doesn’t work for hooded or deep-set eyes, because it doesn’t follow your eye shape at all,” she explains. “You’re basically drawing into empty space —there’s nothing guiding the line, which is why you need to start on your lower lash line and extend straight up.”
The best part? It’s probably the easiest eyeliner hack out there. Here’s how to try it.

1. Grab The Right Tools
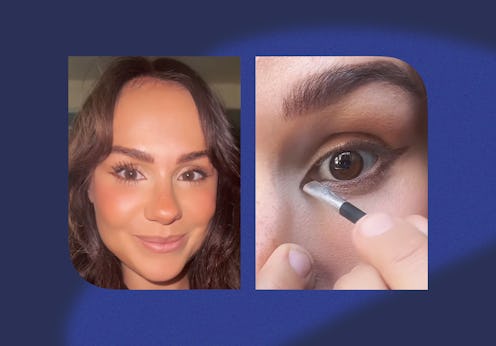
Instead of a pencil or liquid liner, Flynn recommends using a powder eyeshadow (she likes brown, but you can use any shade you’d like) and an angled brush. Powders deliver a softer finish and are easier to manipulate than traditional liners — and they’re a whole lot more smudge-proof on these particular eye shapes.
2. Start From The Bottom

While most winged liner hacks will tell you to begin on the top lid, Flynn’s technique involves starting on your lower lash line. You’ll want to draw an upward flick from the outer corner toward your brow, following the natural contour of your eye. The longer your wing, the more dramatic the look will be.
3. Line The Top Lid

From the midpoint of your upper lash line, draw out to meet the flick and fill in the shape. “No matter what you do, it’s going to be sharp and the right shape,” Flynn says.
4. Add Some Oomph

For a more subtle look, you can leave it at that. If you’re going for something more bold, use the brush underneath your top lashes to tightline from the inner corner all the way across to your wing. To add even more drama, repeat this step on your waterline.
5. Try An Inner Corner Flick

Want an elongated effect? Reverse the trick: Start at your upper lash line and draw downward into the inner corner for balance.
What Happened When I Tried It


Even after a decade as a beauty editor, I’ve never been able to figure out how to do a cat-eye — and this trick felt like all my prayers had been answered.
Not only was it so incredibly easy (it literally took me two minutes to complete), but it was also totally smudge-proof and made my slightly hooded eyes pop.
The comments on the tutorial echo the relief. “I feel like I’ve been waiting my whole life for this,” one wrote. “You’ve changed my life,” said another. Honestly? Same.
