Style
7 Ways To Wear Glitter On Every Part Of Your Face
Take a moment and gaze over images from this season's music festivals. Gone are the dots and swirls of yesteryear, and in come the chunky glitter pomades that help us embrace our inner unicorns. If you're a glitter novice, here are seven easy ways to wear glitter on every part of your face.
If you've been too timid to try glitter in the past, I don't blame you. After all, who hasn't heard the vicious rumor that glitter is the herpes of all craft supplies. If you don't know how to apply it, and remove it, the mess might not be worth the glittery glory. But, with the right product, and adhesive, you can easily go from sparkly chaos to shimmering goddess.
When creating a glittering look, it's best to pick only one focus feature to play up. After all, we can't all be Beyonce. If you apply a bold purple lip with a sparkling silver lid, the two elements will fight for attention. When creating your full look, make sure to incorporate Kelly and Michelle as well.We need a Destiny's Child, or one of the solo acts is bound to fail.
Let's get started with the eyes. They are the windows to the soul, after all.
1. Eye Lid

Urban Decay Original Eyeshadow Primer Potion, $20, Sephora
This is by far the easiest and "most traditional" way to incorporate glitter into your look. Begin by prepping your eye with eyeshadow primer to really grip the shadow and glitter from the inside out. I applied a grain of rice-sized amount of my favorite Urban Decay Original Eyeshadow Primer Potion from lashline to crease.
Urban Decay's Moondust Eyeshadow, $21 , Sephora
Urban Decay's Moondust Palette, $49, Sephora
If you're new to the wonderful world of glitter and you just want to dip your pinky toe into the shimmering, shining pool of goodness, then I suggest using Urban Decay's Moondust Eyeshadows. The Moondust glitter really is a... well, dust. It's super fine, super lightweight, and super easy to apply. You don't even need an adhesive. Some are like glitter top coats, while others have a bit of pigment as well. For my look, I utilized my Moondust Palette.
For full saturation, I used my finger to apply Specter, a ballet slipper pink, from lashline to crease. Finger pads grip glitter really well. Natural hair brushes, not so much. If you're having trouble applying the glitter to the inner and outer corners of the lid, you can use a synthetic brush dampened with setting spray to saturate those areas. It's the perfect subtle use of sparkle.
Look straight ahead, and your eyes look nice and bright. But blink, and a magical disco ball appears.
For an additional pop of color, I topped it with Element, a reddish pink with a gold shift.
ABH Modern Renaissance Eye Shadow Palette, $42 , Sephora
Since glitter reflects a lot of light and will bring the plane of the eyelid forward, balancing it with a light matte neutral shade in the crease will add dimension and flatter most eye shapes. I carved out my eyeshape using the Anastasia Beverly Hills Modern Renaissance Eye Shadow Palette. I used a fluffy brush to lightly buff Tempera, a bone shade, from crease to browbone. This prevents the deeper colors from sticking too much to the primer and getting patchy.
To deepen the socket, I blended three shades into the crease: Golden Ochre, Burnt Orange, and Realgar. I started lightest and ended with the deepest. The darker the shadow, the less I used of it and the closer I kept it to the outer corner of my eye. This creates a gradient.
Don't forget, what goes up must come down! I smudged Burnt Orange and a little bit of Realgar into my bottom lashline.
For maximum pop, I blended a bit of Love Letter, a deep pink shade, right into my outer V.
Marc Jacobs Beauty Highliner in Blaquer, $25, Sephora
Marc Jacobs Beauty Velvet Noir Mascara, $26, Sephora
If you blend away too much glitter, you can always tap a little more to the center of the lid.
To prevent my eye from disappearing into the glitter, I smudged a little Marc Jacobs Beauty Highliner in Blaquer into my lashline and applied a little Marc Jacobs Beauty Velvet Noir Mascara.


The next step is for the real glitter fiends — Lemonhead.LA . Every sparkle lover needs a bit of Lemonhead. These glitter pomades apply like a dream. They're loaded with fine and chunky glitter in an adhesive solution that won't come off until you want it to. The paste dries super quickly and doesn't feel sticky or tacky. And the glitter mixes are to die for.
Crystal Tokyo Spacejam, $32, Lemonhead LA
Mesmerizing, right?
For my look, I simply applied a little Crystal Tokyo to the center of my lid using my finger.
So simple it's kinda ridiculous.


I got three compliments from fellow glitter lovers during the journey to work alone. Who can resist some sensible lid sparkles?
2. Inner Corner

If you're just dipping your toes into the shining, shimmering, splendid pool that is the world of glitter, then this may be the look for you. Just create your normal everyday eye look. For me, that's contouring the eye by applying a lighter, shimmery color to the lid and blending a deeper matte color in the crease.
Urban Decay's Heavy Metal Glitter Eyeliner in Midnight Cowboy, $20, Sephora
I gave my eyes a little extra definition by applying some brown liner to the top lashline. I also added on some mascara and a pair of false lashes.
To precisely apply the glitter to the inner corner of my eye, I utilized Urban Decay's Heavy Metal Glitter Eyeliner in Midnight Cowboy. This glitter liner comes with adhesive mixed in and a thin brush for easy application.
The result was a super cute, super subtle little accent of glitter.


But I'm not the most subtle of humans. So I opted to add on some chunky glitter from, once again, Lemonhead, in the shade Paradise Beef.
This glitter is awesome. Huge chunks of gold with some multi-colored flecks.


Seriously rad.
3. Lower Lashline

Lancôme Drama Liqui-Pencil Longwear Eyeliner, $23, Sephora
If your eye lid is hooded (like mine), the lower lashline may be your most valuable real estate. Why add glitter to a nearly invisible lid space when you can adorn your under eye for the whole world to see? Once again, start with your everyday eye look. I opted for a warm-toned, contoured eye.
Once I was done with adding mascara, I lined my lower lashline with Lancôme Drama Liqui-Pencil Longwear Eyeliner in Brique.
Violet Voss Glitter Adhesive, $15, Violet Voss
Once again, I applied a bit of Violet Voss Glitter Adhesive, this time using a synthetic lip brush.
Mehron Paradise Glitter, $7, Mehron Makeup
Then, using the same brush, I pressed a layer of Mehron Paradise Glitter in 827-OH on top of the tacky adhesive. Mehron glitters come in wide array of jewel and metallic tones, and they're extremely reflective.
If you have any glitter fallout, just use a small piece of Scotch tape to pick it up without disturbing the makeup underneath.

There's nothing like a little glitter under smoke.
4. Liner

Glitter liner is a very easy way to incorporate a little glittery accessory into an otherwise natural look. Start by contouring your eye with matte shadows using a lighter on the lid and a deeper in the crease. Then add a wing, the same way you would on any old day.
Violet's Secret Weapon Glitter Adhesive, $15, Violet Voss
Then, using an angled synthetic liner brush and Violet's Secret Weapon Glitter Adhesive, I lightly traced along the top on my wing.
NYX's Face and Body Glitter in Crystal, $6, Ulta
Then, using the same brush, I lightly pressed a bit of NYX's Face and Body Glitter in Crystal on top of the adhesive. If the glitter accidentally adheres to the black wing liner, just brush it off with a spoolie.
Forget crystal, this liner is sharp enough to cut a diamond.

Subtle, but scintillatingly shimmery.
5. Lips

Urban Decay 24/7 Glide-On Lip Pencil, $17, Sephora
As long as you don't mind eating a little glitter, sparkly lips are a great way to mesmerize and hypnotize.
I began by lining my lips with Urban Decay 24/7 Glide-On Lip Pencil in Broken. Because glitter can appear patchy once applied, the liner will ensure that the lip shape remains defined after the application.
Sephora Collection Cream Lip Stain, $12, Sephora
I then filled my lips in with a thin layer of Sephora Collection Cream Lip Stain in Pink Tea. Because glitter lips take so much effort, we don't want to be touching up with a handful of products all day long. This stain base locks in the color and camouflages any gaps in the glitter.
Violet's Secret Weapon Glitter Adhesive, $15, Violet Voss
After the lip stain fully dried down, I used a synthetic lip brush to apply a sheer layer of Violet's Secret Weapon Glitter Adhesive to my bottom lip. Make sure to do one lip at a time so the adhesive doesn't dry before you apply the glitter.
Rosalind Glitter, $9, Violet Voss
Using the same brush, I patted on some Violet Voss Glitter in Rosalind.
Don't forget to repeat the same process on the top lip.

This lip lasted me from 8AM to 11PM and a barely had to touch up the center after eating. Seriously indestructible.
6. Lashes

Birthday Bitch Glitter, $32, Lemonhead LA
If you love the glitter, but hate all the clean up, then why not paint some sparkles onto a pair of falsies that you can easily remove at the end of the night?
First, grab a pair of old lashes, since they'll remain glittery for all time after this. Thicker lashes work better because they'll hold glitter without clumping together.
I gathered all the glitter I own in the pink color family.
I started by painting on a sheer layer of Lemonhead's Spacejam in Birthday Bitch. This paste also acts as the adhesive to hold on all the other layers of glitter. You can also paint on a sheer layer of Duo Brush On Adhesive to hold on all your glittery goodness.
Duo Brush On Adhesive, $9, Sephora
I then sprinkled on a healthy layer of all my other pink glitters. I really focused on the tips of the lashes rather than the base.
I waited for the lashes to dry completely before applying them. If you accidentally knock any glitter off the heavily laden lashes, you can always touch them up with a bit more glitter after they're applied.

Sometimes all you need is faith, trust, and pixie dust.
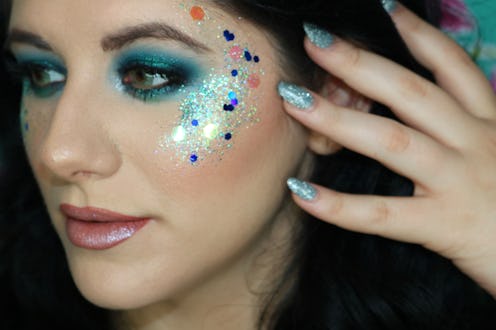
7. Cheekbones
Make Up For Ever Star Lid Liquid in Arctic White, $24, Sephora
Now this part is super easy. Just tap a little Make Up For Ever Star Lid Liquid in Arctic White onto your cheekbones after you've applied the rest of your makeup, and you're good to go.
By far the easiest way to incorporate glitter into your look.

Done in a flash.
Now go glitter and be gorgeous my friends. If you live for the sparkle, you can even layer multiple shimmering features together.

Talk about a glow-getter. Whenever you need a little extra pep in your step, just throw on some sparkly, shiny stuff.
