There's one thing, one little thing, that can take your mani from meh to next-level and truly Insta-worthy: nail art. It can add a splash of color or a flash of shine. Plus, while all of your friends show up to dinner wearing the exact same shade of cute but snooze-y nude, you'll be the only one wearing fun, bright stripes on your digits. You'll basically win #ManiMonday every single week.
The thing about DIY nail art, though, is that it's just as temporary as a solid coat or two. That geometric grid you carefully painted? Or those multi-color polka dots you stamped? They might have looked pristine at hour one, but fast-forward a few days — a few hours, even — and all that time and hard work starts to peel and and lose its sheen. Enter the no-light-needed, at-home gel manicure. We've partnered with Sally Hansen, since the brand's two-step Miracle Gel manicure brings you nail art designs that don't quit for up to 14 days.
Whether you're a pro or have two left hands, there's an option here for everyone. Sand? Salt water? Sunscreen? Bring them on. With a Miracle Gel mani, your nail art will stay colorful and bright all the way through Labor Day Weekend. Now that's what we call #nailgoals.
1. Summer Stripes
If your skill level is more paint-by-numbers than Picasso, try an unintimidating striped design to amp up your nails. First, paint two coats of your base color. Here, it's the peachy Sally Hansen Miracle Gel in Sweet Tea. "When overlapping colors, it's always easier to start with lightest color first and work up to the darker shades," explains manicurist Alicia Torello. Once that dries, use a striping brush dipped in a soft lilac polish to draw a line from the base of the nail to the tip. Use the same color fill in the space to the right of the line. Then use the (cleaned) striping brush and bright red polish to draw another vertical line at the far right edge for a final pop of color, followed by a swipe of clear top coat.
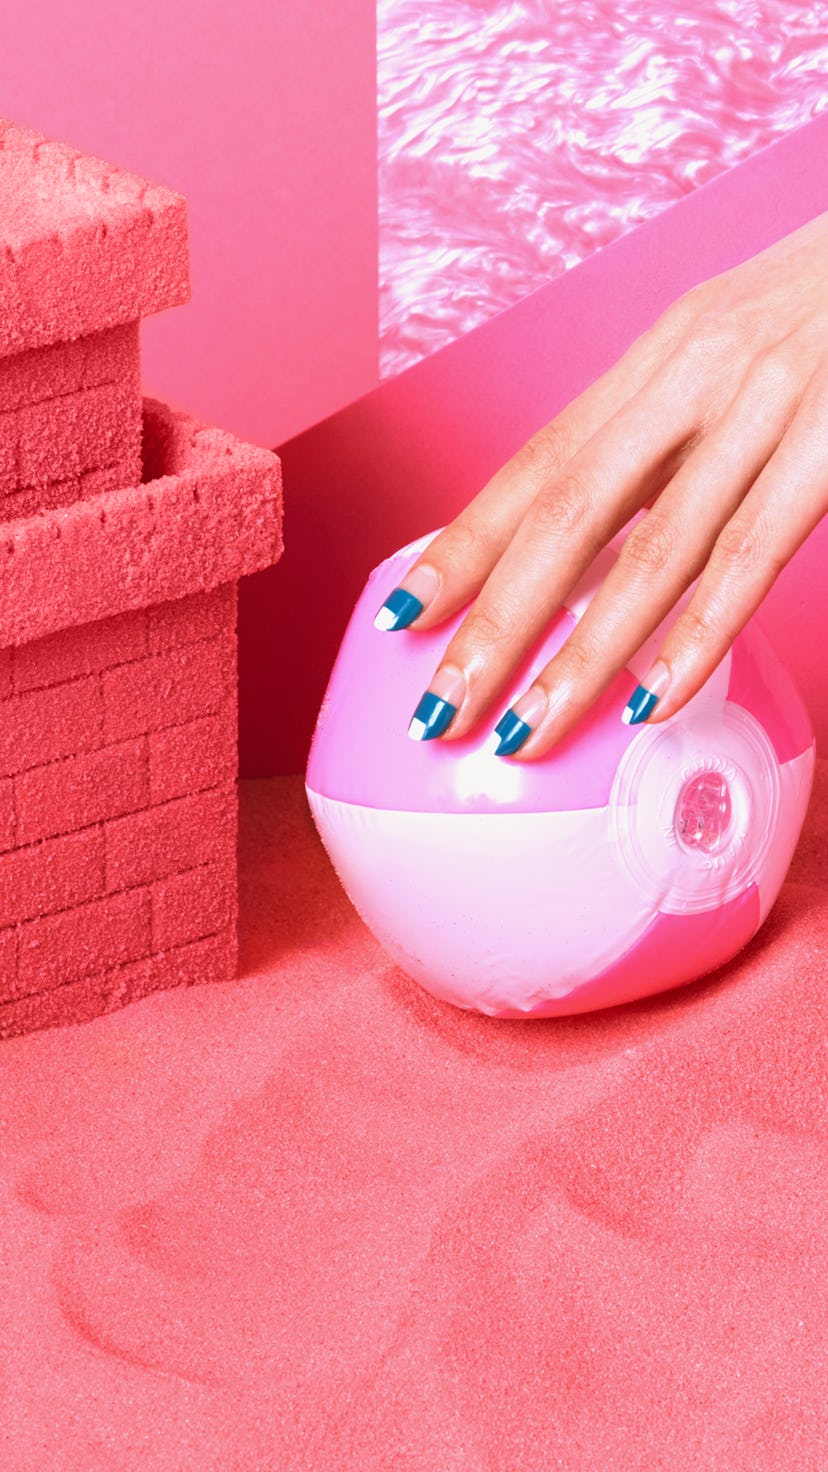
2. Squared Off
This graphic manicure is as much a bold, summery fashion accessory as oversize cat-eye sunglasses or rainbow tassel sandals. First, use a striping brush to paint a thin, dark teal line across the center of the nail. Switch to the polish brush to fill in the top half of the nail. Once that dries, paint a small box at the center tip of each nail in a classic white shade. "If you don’t think you can swing it with the striping brush, you can use striping tape to tape off and then fill in the sections," says Torello. Then complete the look with a layer of top coat for a long-lasting, glossy finish.
3. Polka Dot Party
This look is the lovechild of two nail-art trends: negative space and polka dots. First, pour out a small puddle of each color you plan to use in the design. Then with a dotting tool (or the tip of a small paint brush handle), dip into your first polish and lightly press it onto the nails. Repeat with with all the other colors. Here, Torello used teal blue, light peach, rosy pink, and wine red. "Wait about 15 minutes or so after you've completed [the dots] before adding top coat, as it can cause streaking," says Torello.
4. Going Gingham
This gingham design may look like it's not for the faint of heart (or shaky of hand), but with the help of some nail tape, the only tough part will be picking your favorite color combos. First, apply two thin pieces of nail tape diagonally across each nail. Fill in the blank spaces with a pale pink color, remove the tape, and let the polish dry completely. Then, with the tape strips, "create two more angled lines in the opposite direction," says Torello. Fill in the gaps with your pink shade. Once that's dried, use a striping brush dipped in dark pink polish to create squares at the intersection points. Wait until everything is fully dry before applying a layer of top coat.
5. Side Space
Here's another case where striping tape is your BFF. "Place it vertically, but slightly off-center," says Torello. Dip a striping brush into burnished gold polish. Then on one side of the tape, paint two parallel, angled lines, leaving a bit of negative space between them. Fill in above and below the lines with the same gold shade, and quickly remove all the tape before the polish starts to dry on it. Then use a clean striping brush to paint a vibrant teal line straight down the center of the nail—make sure to get it right up against the gold edge. Fill in the opposite side with teal, let it dry, and finish with the top coat.
This post is sponsored by Sally Hansen.
Images: Filippo Del Vita; Nail Art: Alica Torello; Art Direction: Jenna Wexler/Bustle; Set Design: Pakayla Biehn; Editor: Irma Elezovic/Bustle; Senior Editor: Lexi Novak/Bustle.
