Something about bloody marys is distinctly summery, despite the fact that we continue to down them at brunch throughout the rest of the year. Bloody marys are like the lobster roll of drinks, and whether enjoyed on a Brooklyn rooftop, dockside in Cape Cod, or on a yacht in the south of France (a girl can dream, OK?), that nostalgic savory flavor combo has the ability to transport you to a happy place — and make whatever you're doing instantly more enjoyable. (Unless you're one of those people who only drinks Bellinis, in which case you can get out right now.) And what's even more summery than tasty cocktails in pretty locales? Popsicles. So, in prepping for Labor Day weekend, the clear choice was to combine these pillars of summery excellence — by making bloody mary popsicles.
Bloody mary popsicles are all you ever dreamed of while lazily laying poolside and wondering if you felt more like a nice refreshing drink or a portable snack delivered directly to your sun-bathing self. With bloody mary popsicles, you don't have to choose. After just a few minutes of prep and some waiting, you'll be well on your way to effortless, crowd-pleasing magic. Part snack, part cocktail, and fully perfect, these are the future — and the future is tasting like success.
What You'll Need:

- 2 1/2 cups tomato juice
- 1/4 cup fresh squeezed lemon juice (or bottled, not from concentrate)
- 1 tablespoon Worcestershire sauce
- Several dashes of hot sauce, to taste
- 1 heaping tablespoon prepared horseradish
- 1 to 2 teaspoons Old Bay seasoning
- 1 tablespoon fresh chopped dill
- 2 big pinches of salt
- Fresh ground pepper, to taste
- 1/2 cup vodka
- Popsicle molds
1. Combine all ingredients in a pitcher.
Use the above as a guide, but feel free to doctor to your taste. Sometimes I'll add extra horseradish and hot sauce for a spicier pop. Just beware of adding more vodka, because too much alcohol will keep them from freezing. (Sad, I know.)
2. Fill molds to the top and secure the bottoms.

You can fill the molds all the way up, as these won't really expand like typical ice.
3. Freeze 4-5 hours or until fully frozen.

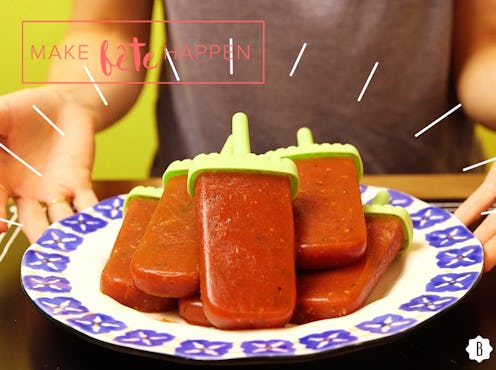
4. Un-mold & enjoy!

Beware: You can't pull these directly out of their molds straight out of the freezer. Let them sit out for about 10 minutes to loosen, or dip them in warm water for about 20-30 seconds. Wiggle the stick when you think they're ready, and if there's any resistance, wait a bit longer — you don't want the top half to break off.

Now enjoy these on a sunny roof deck or seaside for maximum effect.
Images: Lou Marillier/ Bustle
