Fashion
How To Do A Bun With Short Hair
Before my junior year of college, I decided it was time for a change and cut my chest-length hair to my shoulders. I loved the new cut, but was left with the task of figuring out how to do a bun with short hair. I loved how it made my hair look more thick and like I had more volume, but hated that I could no longer do a messy bun, which was an essential part of my studying uniform. In case you feel my pain, I put together a step-by-step guide of how to do a messy bun with short hair. But I took it a step further. This is a guide on how you can create a ballerina bun and a messy bun, because different situations call for each.
Three days a week, my co-worker and I will go to a CrossFit class at lunch. For the workout, I'll typically just throw my hair on top of my head so it doesn't get touched by sweat or get hit by a jump rope.
After a class this week, I came back to our office to find an email from a friend inviting me to a networking event after work. Thankfully, I had packed extra clothes and items at least smell presentable, but had no idea what to do with my hair. Thankfully, after many years of practice, I've found ways to throw my hair on top of my head and still look classy.
Ballerina Bun
Step 1: Use Dirty Hair

I've always found that the more dirty my hair is, the more messy (and awesome) my bun looks. That doesn't mean you need to take a CrossFit class then put your hair in a messy bun. Just use dry shampoo instead of washing your hair, and try putting it in a bun. Trust me, it will cooperate a large amount more than it does with clean hair.
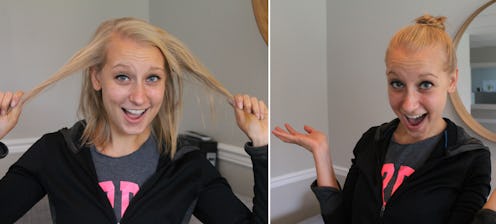
Step 2: Gather The Hair

To make sure I get every last strand of hair, I will flip my head over and gather it all in a ponytail in my hands. A few pieces may fall out in the back, but we'll get to that later.
Step 3: Twist It

After I've gathered all my hair in a ponytail, I'll twist the hair, like so, all the way up to my unfortunate split ends.
Step 4: Twist Into A Bun

From twisting my hair above my head, I'll then twist my hair down and around itself to create a ballerina bun. A few pieces may fall out of place, but IMO, that adds to the "messyness" of the bun, and puts a spin on super perfectly round bun.
Simply tie a thin hair tie around the circumference of this bun and twist large loose strands into the ponytail. It's important to first twist the strands of hair instead of just pulling loose hairs into the hair tie. This creates a more messy look. Additionally, if the bun is "too perfect" I'll pull my hair leading to the bun out a bit as well as a few strands from the bun.
Step 5: Address The Loose Hair Situation

As I stated in step two, a few pieces of hair may fall out from the back during this project. Not to worry, there's a super cute way to deal with that. Instead of simply throwing the stands up and bobby-pinning them to my gathered hair, I like to have fun with this part. I'll either twist or braid those loose strands to create a bit of a surprise to whoever is behind me. It may just cause that guy you also run into at the coffee shop another reason to look twice. Even if it is at the back of your head.
Additionally, try to place the bobby into your hair, so only the tips are seen. I try to find pins that match my hair color, so they may not be seen at all and everyone can think that my hair just looks like that on its own.
Step 6: Admire The Finished Product

You've got yourself a classy, messy ballerina bun! Don't waste it on a night in.
To Create a Messy Bun...
Step 1: Repeat Steps 1 and 2

Having dirty hair makes a true messy bun, well, truly messy. I think this works better for a messy bun than a ballerina bun. And the gather step is the same -- put it in a ponytail shape with your hands holding your hair together, however do not twist your hair.
Step 2: Tie a Ponytail Into a Noodle Bun

Pull your hair through a thin ponytail once without pull it all the way through. This will create a small bun with some space in the middle. I'm not sure why, but my friends refer to this type of ponytail as the "noodle."
Step 3: Gather All Hair Into a Bun

This is where we may have an advantage over those with long hair. After the noodle bun, I simply just gather all hair in the palm of my hands, twist the loose strands around the circumference of the bun, and tie my hair tie around the bun. I will warn you, it will not be perfect at this point.
Step 4: Fix Loose Ends

After I gathered it all in a bun, there was a lot of space between the hair tie and my actual hair. Additionally, large pieces of hair had fallen out or never made it into the hair tie. All of this is fixable.
Much like step four of the ballerina bun, I twisted strands of hair together, then tucked them into the hair tie. I also did that with pieces that were already tucked into the hair tie, but had large chunks of folded hair sticking out.
Step 5: Just Bobby Pin

Typically with a messy bun, I won't do anything fancy to the loose hair. Instead, I'll just pull it up into one large section and hide the bobby pins.
Step 6: Create a Loose Texture

After I like the way the bun looks and all of my hair is safely pinned back, I will run my fingertips through my hair to create a loose texture. The end product looks like I just woke up and put my hair on top of my head, instead of going through a six-step process.
Step 7: Admire The Finished Product... Again

Netflix, I'm ready for you.
Short hair, don't care.
Images: Heather Hartmann
