iOS 10 has arrived, and with it has come third-party app integration with Siri that will allow you to order rides from Uber, Lyft, and more with one simple command. But Siri isn’t the only new way to use your favorite ridesharing app — and if you’ve been wondering how to book a ride with Maps in iOS 10, the good news is that it’s super easy. Not I would expect it to be anything else; after all, our smartphones are meant to streamline our lives, and each iteration of each device and operating system is more efficient than the last. The future really is now, isn’t it?
Although its official release on Sept. 13 was a little bumpy, iOS 10 managed to bounce back quickly — and now that I’ve had almost a week to play around with it, I’ve warmed to it considerably. Not going to lie: I’m quite enjoying being able to take pictures of my cat, draw goofy little hats on her, and text them to everyone I know. (If you’ve been on the receiving end of one or more of these masterpieces and are quickly growing tired of them… sorry. But also possibly #sorrynotsorry.) But beyond simply the ability to text people hilarious doodles, iOS 10 has also granted us greater power than ever before: With it, we can do everything from send people money to run our homes.
And making it easier to get around is one of the mobile operating system’s biggest strengths, largely due to how many different modes of transportation it includes. Now, in addition to including driving, walking, and public transit directions, you can also order a ride via the ridesharing service of your choice from directly within the Maps app. You’ll need to have the ridesharing app already and installed on your phone — but once you’ve done that, it’s as simple as using the Maps app the same way you always have and making a few additional taps.
For the curious, here’s the step-by-step:
1. Download And Create An Account With Your Ridesharing Option Of Choice (If You Haven’t Already Done So)

You can’t order a ride via Maps if you don’t have an account on any of the services that actually grant those rides. So, start by downloading whatever ridesharing app you like and creating an account on it, if that’s not something you’ve already done.
2. Make Sure Your Ridesharing App Has Access To Maps

To do this, go to “Settings,” then “Maps”; then, under “Extensions,” make sure your ridesharing app is toggled on. I’ve got Lyft activated here.
3. Open Maps And Input Your Starting Location And Destination

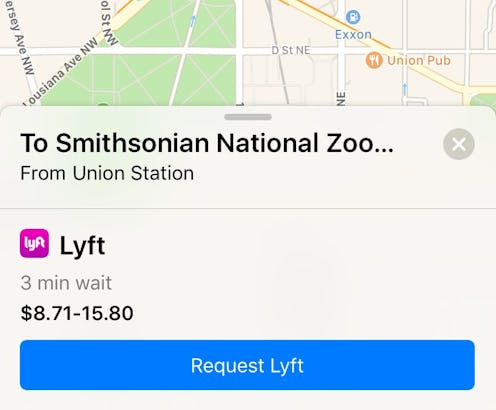
You probably already know how to do this, but if you don’t, tap the search bar at the bottom of the screen and input your destination. For the purposes of this example, let’s use the Smithsonian Zoo in Washington, D.C. Then tap “Directions.” The default setting will use wherever you GPS currently thinks you are as your point of origin, but if you tap “My Location,” you can input a different address. In this case, let’s say I'm leaving for the zoo from Union Station:

4. Tap “Ride”

It’s at the bottom of the screen as one of your many options for exactly how you’ll get from Point A to Point B. Tapping it will bring up the list of available rides nearby according to the ridesharing app you’ve hooked up with Maps.
5. Tap The "Book" Button Next To The Ride You Want

But we’re not done yet! After that, you have one more step to go:
6. Tap “Request”

In this case, the button says “Request Lyft”; obviously, though, this will change depending on which ridesharing app you’re using.
And that’s all there is to it! May you never be lost again.
Images: Lucia Peters/Bustle (7)
