Style
This Barbie Makeup Transformation Proves Life In Plastic *Is* Actually Fantastic
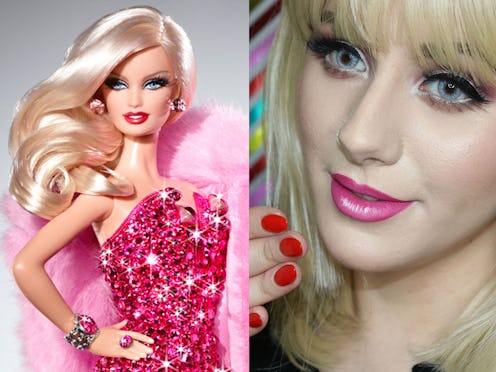
Barbie transformations are all the rage these days. From beauty gurus to Buzzfeed ladies, beauty babes are painting their faces to transform into the Mattel icon. Not one to back down from a trending challenge, I too followed a Barbie-inspired makeup tutorial — and what I learned is pretty surprising.
From a very early age, I was mesmerized fashion and beauty. And, at the time, Barbie was at the pinnacle of all of it. Of course, as I grew older, I learned that Barbie's existence was much more complex and controversial than the simple beauty I had seen as a child. Barbie didn't really look like me — or any real human being for that matter. I learned she represented a very specific ideal of beauty, one that didn't reflect a wide array of races, shapes, and sizes.
It had been years since I had given any thought to Barbie. I mean, let's be real, she doesn't really have any bearing on my adult life. But recently, Barbie has made a major comeback in popular culture. With the release of more inclusive dolls and real issues being discussed in Barbie's films, she's certainly been making headlines. Beauty gurus like Kandee Johnson and Michelle Phan have garnered millions of views transforming into her. Even the girls of Buzzfeed's Ladylike have given Barbie makeup a try. So I decided to transform into my childhood beauty ideal to see how I would feel.
On the daily, I wear a lot of makeup.

Makeup is my morning meditative therapy, 45 minutes that I spend with a clear mind, creating. I'm constantly trying out new techniques, products, textures, and finishes, so my makeup never looks the same. I don't feel like I need my makeup, but I like it. It makes me feel unique and artistic and awesome and, well, like me.
But for this, I didn't want to look like me — I wanted to look like Barbie. I borrowed some tips and tricks from Kandy Johnson's infamous Barbie makeup tutorial for this look, and put my own spin on some techniques to make it work for my bone structure.
1. The Wig

I started by pin curling my black hair so it would lay flat against my head and not stick out underneath my synthetic blonde bob wig. You may recognize this hair from my Taylor Swift and Katy Perry Transformation piece, but it was $40 and I'm determined to get some use out of it, dammit. I also eventually put in my Icy White Desio colored contacts to look more Barbie.
2. Smoothing Primer
To get that plastic-y, poreless, inhuman skin effect, I used a smoothing primer. Lately, I've been obsessed with Urban Decay's Optical Illusion Complexion Primer. It has a matte, slightly powdery feel once you apply it to the skin, allowing it to combat any oiliness. A pea-sized amount is all you need. Start where you have more pores or texture, generally at the center of the face, and work outward. Any foundation you put on top will look pretty much perfect. If you have drier skin, you can use something with a little more slip, like Benefit's POREfessional or Yves Saint Laurent's Touche Eclat Blur Primer.
3. Full Coverage Foundation
Full coverage is full. You will see little to none of your natural skin through. Beauty gurus love it because it photographs beautifully, but in real life, it tends to look a little, well, makeup. But for a look where I want to look a little lifeless and plastic-y, it's perfect.
I used my Beauty Blender to apply my everyday foundation, the Givenchy Teint Couture Blurring Foundation Balm, all over my face. Then, I took my Kat von D Lock-It Foundation and applied it to the areas where I could still see discoloration or flush to my skin, like my nose, cheeks, chin, and forehead. I didn't stop until my skin looked like a totally blank canvas.
4. Full Coverage Concealer
I started with Smashbox's Color Correcting Stick in Look Less Tired (Light), which immediately knocks out any blue or purple hue from my undereye area. If you have deeper skin, or really intense undereye discoloration, I recommend Look Less Tired (Dark), which is more orange and less peach. I drew the color corrector on top of the blue in my undereye area and blended out the edges with my Beauty Blender.
I then followed up with my Lancôme Teint Idole Ultra Longwear Camouflage Concealer, which I normally reserve for super stubborn spots and blemishes. A little baby bit goes a very long way, so a grain-of-rice-sized amount is all you need. It has a crazy amount of pigment, but lays super flat on the skin. To achieve full coverage, I applied the concealer with a flat, synthetic brush and blended out the edges with my Beauty Blender.
5. Highlight and Contour to Change Facial Structure
For my cream highlight and contour, I used my Anastasia Beverly Hills Cream Contour Palette in Fair. I started with highlight to prevent my face from getting muddy or grey. I used a flat, synthetic brush to apply the lightest shade in the kit to the areas where Barbie is naturally highlighted. I stared at a picture of Barbie's face and wherever the light hit on her plastic face, I applied highlight onto my own face. I focused on the center and tip of my nose, jawline, corners of the mouth, triangle of light, outer corners of the eye, chin, and forehead right above the brow. I then quickly blended out the cream, starting at the area of most saturation, working toward the area of least.
Then, I applied my contour, first to the hollows of the cheeks, the temples, and the jawline. Then, I used a small synthetic brush to chisel the tip and sides of my nose and to extend the corners of my smile and accentuate my natural dimples, so that way I appear to be permanently smiling. Creepy, no?
Once again I used my Beauty Blender to get rid of any harsh lines and edges, this time starting at the perimeter of the face working inward.
6. Set It With Powder
If you don't want your powder contour and blush to be muddy, you have to set all the liquid and cream with translucent powder. Today, I opted for Kat von D's Lock-It Setting Powder, which I pressed in place with a Beauty Blender before brushing off the excess with a fluffy powder brush. Pressing the powder in allows all the highlight and contour work to stay in place.
7. Reinforce The Contour
I used my Kat von D Shade and Light Face Contour Palette to really detail my face to look like a Barbie doll. I shaded underneath my bottom lip, my dimples, the tip and sides of my nose, the hollows of my cheeks, my temples, and primarily the bottom of my chin to make my face look more rounded and less angular.
8. Add A Kiss Of Blush And Highlight
I mimicked Barbie's subtle glow by opting for a baby pink blush, the lighter shade from Marc Jacobs's Air Blush in Lush & Libido to be exact. I used a fluffy brush to apply it from the apples of my cheeks sweeping up toward my temples, slightly above my contour. For a little plastic-y shine, a applied a soft layer of Burberry's Fresh Glow Highlighter in Pink Pearl.
9. Create Those Bright, Unblinking Eyes
The eyes definitely too the most effort. My eyes are naturally super hooded, but Barbie's eyes are more rounded with a super defined crease. I started by prepping my eye with Urban Decay Eyeshadow Primer Potion in Eden, which not only holds on my shadow, but also evens out my skin tone.
To make my eyes appear larger, I applied my NYX Jumbo Eye Pencil in Milk all over the lid, creating a very rounded shape at the center. I used a tiny brush to extend the white cream toward my inner corner. Once again, I stared at a picture of Barbie to mimic the proper placement.
To make my eyes even brighter, I tapped some Liberatus, a white matte shadow, from the Kat von D Shade and Light Eye Contour Palette on top of my NYX pencil.
To reshape my eyes to look more like Barbie's, I took a tip from Kandee Johnson and lined my bottom waterline, but only at the inner and out corner, with my Marc Jacobs Fineliner in (Big)Eyes!, a white liner with a very punctuated name. I also slightly extended my inner corner.
Then, I did the most frustrating and time consuming part of the entire look: the cut crease. Barbie has a very defined and painted on crease line. I, however, have hooded eyes which makes creating a cut crease very difficult.
Because I knew this would take some trial and error, I started with a super tiny stiff brush and Samael, a soft, light brown shade from the Shade and Light Eye Palette, to sketch out the crease. I knew I'd be able to fix any mistakes made in light brown shadow more easily than a mistake with a dark brown liner. This was pretty much like the sketching before painting. After I placed my line where I needed it to be, I used a pointed, fluffy brush to diffuse the line upward.
After I perfected the placement, the next few steps were easy-peasy. I basically repeated the same process, sketch out with the small brush and blend out with the fluffy brush, with a Love Letter, a deep pink from the Anastasia Beverly Hills Modern Renaissance Palette and Sytry, a deep brown shade from the Shade and Light Eye Palette. With each deeper shade, I used less and less product and kept it closer and closer to the crease line.
I then used a little Liberatus to clean up right along the crease, where my blending had made the line blurry.
Of course, what goes up must come down, so I used my same tiny brush to line my bottom lashline, below the white liner, with Samael and Sytry.
Now that the structure of the eye was laid out, I needed to my wing. I lined my upper lashline with Givenchy Khol Couture Waterproof Retractable Eyeliner in Black before creating the cat eye shape with Kat von D Tattoo Liner in Trooper.
For extra added flair, I used a stiff brow brush and the same Sytry shadow to draw on my bottom Barbie lashes. Again, I just mimicked an image of Barbie's painted-on face.
Of course I applied some Marc Jacobs Beauty Velvet Noir mascara and a pair of Velour fluttery false lashes.
10. Frame Those Brows
Now that my very dramatic eyes were done, it was time to move on to my brows. Barbie has very thing brows with a soft arch, and my natural brows are dark and intensely arched, so I decided to split the difference and use a lighter brow pencil to soften what's naturally there while still defining the structure. I opted for Dior's Universal Diorshow Brow Styler.

My eyes look like a totally different shape than they normally do. The white liner, cut crease, and lighter brows truly transformed me.
11. Overdraw That Plastic Pout
Barbie has a full, highlighted pout with a very defined, rounded Cupid's bow. To reshape my natural lip line, I used Bite Beauty's new Lip Pencil in 096. I started at the center of the bottom lip and connected the line to the corners of my mouth, then did the same for the top lip. Starting at center ensures my symmetry, especially because I'm drawing so far out of my natural lip line. To get that Barbie gradient lip, I filled in my entire pout before applying my lipstick.
I used a lipstick that has since been discontinued, since it was the best match from my personal collection, but Urban Decay's Vice Lipstick in Double Team and Bite Beauty's Nearly Neon Pink Amuse Bouche Lipstick from the Nearly Neon Collection will work just as well. I applied a little bit of the brighter pink cream to the center of my lip, blotted my lips straight together to create the soft ombre effect, and tapped out any remaining lines between the deeper and brighter pink with my finger pad.
For those Barbie-ish details, I created shadowing by applying my same lip liner to the inner rim of my upper and lower lips as well as the inner corners. It's like highlight and contour for your pout.
For the finishing touch, I used my NYX White Liquid Liner, which is my favorite for painterly makeup details, to create a faux highlight on the center of my bottom lip.
And with that finishing touch, I became a Barbie girl in a Barbie world.

Turns out, life in plastic is fantastic.


I'm not gonna lie, it felt pretty cool transforming into Barbie. I took nearly 100 selfies and posted multiple videos to my Instagram story. Sure, her look and standard of beauty are a lot different than what I've come to understand for myself as an adult, but there was some power in transforming into her: If I was going to be Barbie, then I couldn't worry about vanity. I needed to be unabashedly proud of how I looked. Who knew becoming Barbie could be so empowering — and above all, ridiculously fun.
