Thanks to today's social media, everything has become gram-worthy material: My food, your food. My face, your face. Some random stranger's face. Basically, everything is a photo op. There is a pretty good chance you have a solid picture stash brewing on your phone. So, why not show it off with a sweet DIY photo garland? It's the perfect excuse to get pictures off of the screen and onto your walls. Thankfully, there are several apps out there that provide awesome printing services for your most beloved moments, people, and food. From personal experience, I've had great results with PostalPix, Print Studio, and Artifact Uprising. You can also try out the new Polaroid camera, which will really up your memory-making game.
Once you round up the supplies for this project, you will have enough to make multiple garlands. This is the perfect gift for housewarmings, BFF reunions, and holidays. Plus, it is extremely useful. You will also get some major bragging rights for helping your girls dress up their walls. Want to make it super personalized? Include printed photos as part of the gift! Just be sure to skip the photo of a random stranger's face, please and thank you.

Supplies:
- Wood circles*- Baby clothespins- Round metal filigree pieces*- Super glue (or hot glue gun)- Scrap paper- White acrylic paint- Flat sponge brush- Wood stain and cloth - Hemp, twine, or yarn- Scissors- Recommended: protective gloves and the great outdoors
*I used 1 1/2-inch wide wooden circles, and one-inch wide filigree pieces. Feel free to use a different size; just make sure the filigree parts are a little smaller than the wooden circles.
Don't know where to find these supplies? Most craft stores have a wide variety of wooden shapes, ready to be crafted on. You can also check out Amazon for wood circles and Etsy for round filigree pieces.
Directions:

1. Using the foam brush, add a light wash of white acrylic paint to the filigree pieces. Protect your work space by doing this on scrap paper. Set aside to dry.
Tip: Try your best to not cover the metal in tons of paint. A little bit will go a long way! Otherwise, the paint will fill up the holes and the decorative pattern will get lost. And that would be a bummer.

2. Stain both sides of the wooden pieces with a cloth. I recommend wearing gloves and heading outside for this part; you'll need top-notch ventilation while you work with the stain.
Leave the wood to dry completely. As always, follow the directions on the can's packaging. Drying times might differ from brand to brand. I left mine outside overnight on top of old magazines... I'm really glad the local stray cats didn't snag them.

3. Once dry, glue a white filigree piece to the center of each wooden circle.
Again, work in a well-ventilated area whenever you use glue. I always like to go outside and give the neighbors something to talk about it.

4. Glue a baby clothespin to the back of each wooden circle.
In case you're wondering, these cuties can be found in the wood or scrap booking sections of craft stores.

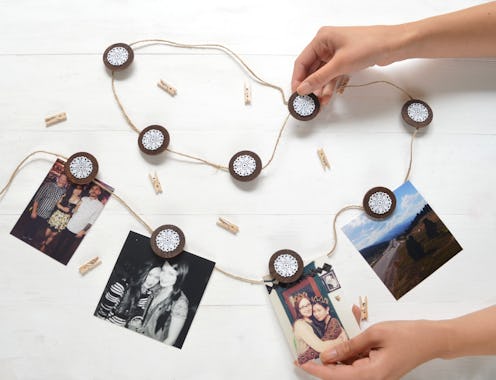
5. Clip them on to a strand of hemp, twine, or string. You can make the garland as long or as short as you'd like. The longer the garland, the more clips you'll have to make.
Of course, it'll also depend on how far apart you place each clip. I added mine in five-inch intervals. Adjust the number of clips according to your wall space, and how many people you like enough to take photos with.

Hang up your garland with some thumbtacks or nails. If you're unable to hammer things into your wall (hello, lease agreement), use decorative tape to hang up your creation. How's that for a space-saving DIY?
Images: Kirsten Nunez
