As someone who has neither the time, patience, or skills to create perfectly coiffed hair, I'm always on the lookout for new tricks to create different hairstyles with ease. After stumbling across a bunch of videos recommending the method online, I tried curling my hair with duct tape to see if I too could achieve gorgeous curls with little effort.
Before watching the videos in their entirety, I was perplexed at how someone could create curls out of duct tape — I had visions of the tape getting stuck, and the poor ladies having to rip out their precious strands. Luckily, this wasn't the case. The art of using duct tape to curl hair is similar to using the rag method, wherein you take strips of material, wrap your hair around them, tie them securely, and leave overnight. However, sometimes the rag method is performed with wet hair, whereas the duct tape curling method is intended for dry hair.
But what was the coolest thing I learned about curling your hair with duct tape? It requires no heat. I was pretty excited about this prospect, as I had only ever managed to achieve proper curls in the past by using heated hair tools, like tongs, straighteners, or heated rollers. Here's what happened when I ditched all of that and tried to use duct tape instead.
The Method
I am a glass half full gal, and I normally think that if you put your best effort into something, you will usually succeed (or at least learn something if you fail). However, I was a little dubious about curling my hair with duct tape.

My hair, although naturally straight, is quite thick, so I felt like I was starting off with a disadvantage. I could understand how this method might work on thinner, wavier hair, but I was slightly doubtful that it would work on my mane. I watched the beauty blogger in the video above curl her hair with duct tape and made mental notes on her process. I purchased some duct tape, waited until just before bed, and I began!
Preparing The Tape

I started by cutting a piece of duct tape.

Next, I folded it in half lengthwise.

Then I folded down any exposed edges so as not to trap my hair.

I repeated the process until I was left with a good handful of duct tape strips.
Applying The Tape

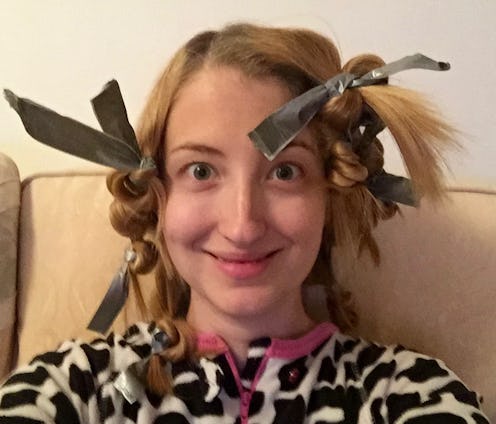
As per the video's demonstration, I grabbed a section of hair and wrapped it around a piece of my prepared duct tape, and I secured it when I thought I'd reached my hair ends. However, as you can see, this first piece didn't go to plan so well and I ended up with a small section at the tips that I knew wouldn't get curled. I didn't worry too much about this and thought I'd improve my method as I went along.

As predicted, I got better as I progressed.

By the time I'd reached the halfway point, my arms were aching and I had to have a little rest.

But it didn't take long before I'd finished my whole head.

I was actually quite surprised by how quickly I got through the whole process, from cutting strips to tying the final knot. I'd guess the whole thing took me somewhere between 30 minutes to an hour.

However, I would have benefitted from having someone assist me to ensure all of my knots were tied at the same level and closer to the root; it was quite a challenge doing it by myself! I wrapped a scarf over my new 'do and I went to bed.
The Morning After

My silky scarf had slipped off in the night, but my knots had done rather well, all considering.

I unravelled the first knot to reveal a gorgeous strand of wavy hair. I couldn't believe it had worked! This was my first knot too, which I knew wouldn't turn out as well as the others, so I couldn't wait to see the entire results.

It wasn't all smooth sailing — as you can see, there were a few casualties on the way. There was also a huge tangle that I had to rip apart, which wasn't the most pleasant experience.

After reaching the halfway mark, I was astounded to see that, for the most part, I had tight, bouncy curls.

After removing all of the duct tape, this was the result: Smooth, spiral curls.
The Final Result

I finger-combed the super tight curls to reveal big, bouncy waves that reminded me of Serena van der Woodsen's signature hairstyle.

I was a little disappointed that my results were not the same as the vlogger's tight, voluminous curls, but I still liked the effect.

If I was going to try this again, I would use longer strips of duct tape and smaller sections of hair to make the process easier and my curls tighter.

Because of the sheer amount of hair I have, I'd probably also get a friend to help me out, because as previously mentioned, I struggled in parts.

For me, the duct tape definitely worked, but it's worth considering that it may have different results for different hair types. I'd be really interested to try it again with adjustments to see if I ended up with tighter, bouncier curls. I would recommend this hair curling method to anyone — especially those who prefer not to subject their hair to potential heat damage. Who knew that a humble roll of duct tape could have an awesome beauty use?
Images: Phoebe Waller
