Now that it's fall, it's time to celebrate the unofficial icon of the season: the pumpkin. From our hot drinks to our beauty products, our obsession knows no boundaries. And if it does, I ask that you kindly back away from said boundaries, because I take pumpkins very seriously. Things could get messy if you stand in the way, especially when it comes to these seriously cool and seriously easy DIY pumpkin ideas.
While we love everything that pumpkin can make, we can't forget about its original form. There's something so cozy about decorating your porch or deck with a pumpkin. Heck, I even have a tiny pumpkin on my desk right now. But when all of the pumpkins (alright, most pumpkins) look alike, things can get a little boring. Girls and pumpkins just wanna have fun, right?
That's why I've rounded up 18 ridiculously easy pumpkin projects for your crafting pleasure. These ideas are beginner-friendly, so don't worry if you're not Martha Stewart (hint: you're probably not, and that's totally OK). There's also something for everyone on this list, so you're bound to find something that suits your style. It's the best way to honor your pumpkin's awesomeness by letting its personality shine. Do it for the pumpkins, ladies.
1. Succulent Pumpkins
Even if you don't have a green thumb/hand/anything, you can totally recreate this project. It's the perfect marriage of natural elements. The combination of green hues and orange will create the ultimate autumn color palette. It is so swoon-worthy, if you ask me.
What You'll Need:Succulents, deer moss, sticks, stones
What to Do:Carve out the pumpkin, and remove the insides. Fill the pumpkin with sticks and stones; this way, you won't use up all your deer moss on filling it up. Add deer moss and succulents on top. Because air plants look super cute in any setting, this one's pretty hard to mess up. Just have fun with it!
2. Doily Pumpkin
For a feminine and rustic chic pumpkin, bring in some lace elements. Doilies can be purchased at your craft store for a few bucks each. It's a pretty rad way to get a head start on your "cool grandma" status.
What You'll Need:Doily, hot glue gun
What to Do: Hot glue a doily to the top of the pumpkin. Add another one to the bottom for ultimate lacy awesomeness.
3. Neon Pumpkins
Rave fans will adore this one. Made with a healthy dose of neon paint, these pumpkins will glow under the black light. So good.
What You'll Need:Paint brush, neon acrylic or spray paint, newspaperWhat to Do:Protect your work space with old newspaper. Add a splattering of neon paint or spray it right on. Once dry, your new pumpkins are ready to party.
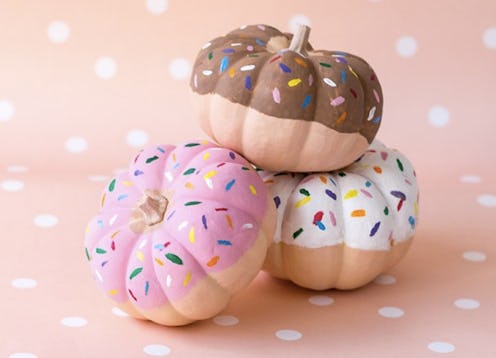
4. Painted Doughnut Pumpkins
I am thoroughly convinced that any object is 10,000 times cuter when it looks like a doughnut. This is especially true when said object is the farthest thing from a doughnut. My sweet tooth is falling in love with this.
What You'll Need:Paintbrush, acrylic paintWhat to Do:Paint the top half of the pumpkin brown, pink, or white. Once that's dry, add small dashes in bright rainbow colors for "sprinkles." Leave to dry, and try not to eat it with your morning coffee.
5. Striped Pumpkin
You can never really go wrong with stripes. I'm partial to black and white versions, but you can switch it up to fit your style or party theme. And can we talk about that checkered squash? I'm in love.
What You'll Need:Paintbrush, acrylic paintWhat to Do: Paint thick stripes down the side of the pumpkin. If you want super clean and straight lines, add strips of masking tape in equal intervals. Apply the first paint color, let dry, and remove the tape. Add more tape along the stripes you just painted, and bring in the second color.
6. Book Page Pumpkin
Bookworms will adore this fall pumpkin DIY. If you can't bear to tear up any of your own books, head to the thrift store and pick up an old one on the cheap. This is a great way to save a damaged, well-loved book from the landfill.
What You'll Need:Old book pages, foam brush, decoupage (such as Mod Podge)
What to Do:Rip up the pages. Apply a layer of decoupage to the pumpkin and adhere the book page pieces. Add another layer of decoupage, smoothing down any creases or bubbles as you go along.
7. Metallic Spider Pumpkin
The fall season is prime time for spiders to shine. Or in this case, the pumpkin is shining and the spiders are chilling. This project is ideal for the ultimate novice crafter; it's super cheap to make, too.
What You'll Need:Metallic spray paint, hot glue gun, plastic spiders
What to Do:Spray paint the pumpkin metallic. Hot glue plastic spiders onto random spots of the pumpkin. Try not to forget they aren't real.
8. Sequin Pumpkin
What's a craft project without a little (or a lot of) bling? This easy fall pumpkin DIY is great for adding some sparkle to your home. For the ultimate autumn look, use sequins in gold, brown, black, or red.
What You'll Need:Sequins and craft glue (such as Elmer's)What to Do:Apply dots of glue to the pumpkin, and add the sequins. Here's a tip: Tweezers come in handy for this sort of thing. Use them to pick up each sequin with ease.
9. Tie-Dye Painted Pumpkin
This tie-dye pumpkin is so easy to make, even your kids or siblings can get in on the fun. It can get pretty messy though, so be sure to work outside, if possible.
What You'll Need:Paint brush, acrylic paint
What to Do:Choose two to three colors. Pour a few dollops of each shade onto the pumpkin. Swirl around with the paint brush or your hands. Show off your tie-dye hands to anyone who will pay attention.
10. Beach Pumpkin
Mermaid wannabes and beach buffs will swoon over this project. It's an excellent way to bring in some fall vibes, even if you live in an area that doesn't experience all four seasons (I feel your pain). All it takes is some gluing, and you've got yourself a seaside pumpkin.
What You'll Need:Hot glue gun, scissors, hemp or twine netting, seashells, faux (or real) crab shells
What to Do:Drape the netting over the pumpkin, and trim accordingly. Hot glue in place. Adhere the seashells and crab shells to your liking. For an extra charming touch, glue or wrap a strand of pearls for a mermaid-inspired look.
11. Studded Pumpkin
For the most badass pumpkins of badass pumpkins, add some studs. Your best bet is to use flat-backed studs; these can be found in the scrap booking or jewelry sections of craft stores. Painting the pumpkin beforehand is optional, but I'm really digging the edgy look of studs against white. BRB, buying supplies to make this now.
What You'll Need:Acrylic or spray paint (optional), flat-backed studs, hot glue gun or craft glue
What to Do:Paint the entire pumpkin. Once dry, glue the flat-backed studs. Leave to dry and be awesome.
12. Plus Sign Pumpkin
This popular minimalist design has officially covered everything I've ever seen. But hey, I'm not complaining. This ridiculously easy pumpkin project can be made in just a few minutes, even if you're not a crafting pro. I have faith in you, lady!
What You'll Need:Acrylic or spray paint (optional), black vinyl electrical tape, scissors
What to Do:Cut strips of vinyl tape. Make sure the strips are all the same length. Adhere two strips at a time, creating a plus sign. Repeat until the pumpkin is covered.
13. Mummy Pumpkin
For a kitschy and simple project, make a mummy-inspired pumpkin. Kids will adore this DIY. Actually, who am I kidding... I'm totally into this, too.
What You'll Need:Hot glue gun or craft glue, gauze bandages or white ribbon, googly eyes
What to Do:Wrap the pumpkin in gauze bandages or white ribbon, hot gluing in place every so often. Don't forget to leave some space for the googly eyes.
14. Cat Pumpkin
It was only a matter of time before cat pumpkins became a thing. You can even make them to look like your real-life feline friends. If that doesn't say awesome cat lady, I don't know what does.
What You'll Need:Hot glue gun or craft glue, construction paper, buttons and/or rhinestones, pipe cleaners, paint, paint brush, scissors
What to Do:If necessary, paint the pumpkin and leave to dry completely. Create a face using buttons and/or rhinestones. Use the construction paper to create nose or eye shapes. Once you glue everything on, create a pipe cleaner tail. To create the curved end, simply bend the pipe cleaner. Glue to the back of the pumpkin, and admire your work of art.
15. Confetti Pumpkins
For another way to bling up your pumpkin, sparkle and shine with metallic confetti. It goes without saying that this is the ultimate party centerpiece project.
What You'll Need:Foam paint brush, decoupage (such as Mod Podge), metallic confetti
What to Do:Using the paint brush, add a layer of decoupage to one section of the pumpkin. Sprinkle on some metallic confetti. Shake off the excess, and leave to dry.
16. Letter Pumpkins
Claim your pumpkin with style with a DIY monogram. You can also use this project to create several pumpkins to spell out a word or phrase.
What You'll Need:Paint brush, acrylic paint, hot glue gun, rhinestones or buttons
What to Do:Paint the desired letter on the pumpkin. Once dry, glue rhinestones or buttons for extra embellishment.
17. Glitter Pumpkin
Yup, the bling isn't over yet. This glittering idea can add a magical touch to any autumn set-up. I love the way the glitter fades toward the middle of pumpkin; however, you can also go crazy and cover the entire thing with sparkle.
What You'll Need:Decoupage (such as Mod Podge), plastic cup, foam paint brush, glitter
What to Do:In the plastic cup, mix a dollop of decoupage with a generous helping of glitter. Apply to the pumpkin. The decoupage will dry clear, exposing the sparkly layer of glitter.
18. Dotted Pumpkins
For a simple yet cute pumpkin, try adding spots and dots. Try different color palettes to match your taste, party theme, or home. If you're worried about placement, mark dots with a pencil beforehand. That way, you can figure out a pattern before doing the real thing.
What You'll Need:Paint brush, paint
What to Do:Paint the entire pumpkin in the base color of your choice. Once dry, use the brush to create dots in a pattern of your choice.
Image: Studio DIY
