As someone who loves the look of long nails, but can't stand wearing falsies or growing my natural nails long, I was intrigued to find out about nail contouring. Once I'd read up on this curious new nail trend, I tried nail contouring IRL to see if it would make my nails look longer without the additional millimeters.
I know it probably sounds melodramatic to all you nail art babes, but long nails drive me crazy. I've never had acrylics and the longest I wore stick-on false nails was just one evening. However, I've always been slightly envious of all the glam gals out there, flaunting their fabulous falsies, and looking irresistibly on-trend and perfectly polished. Suffice to say, I just don't function as a normal human with long nails; using computers and phones, eating, and visiting the bathroom become arduous tasks that I frankly cannot be bothered to endure with tall talons.
When I discovered manicurist Jin Soon Choi's handiwork at the Vera Wang spring/summer 2017 show, I had to try it out for myself. Choi spoke to Cosmopolitan about the inspiration behind the design, "This is something I used to do when I was young," she continued, "When I was growing up, my friends and I wouldn't extend the color to the sides of our nails to make our nails look more elongated."
So I tested nail contouring to see if I could feign extra length without falsies. Here's what happened...
The Inspo
Of course, my inspiration was the sleek manicures the models at the Vera Wang spring/summer '17 show wore. According to Cosmopolitan, speaking with Choi, there's a method to nail contouring, "To create a longer-looking nail fast AF, all you do is use a clear base coat or lay down a lighter-colored coat of polish onto your nail, then sweep a deeper color down the middle. This is what gives you that contoured effect, just like how you'd use a highlighter above and below your cheekbones to make them look sharper."
Cosmopolitan reported that Choi, "...used a semi-matte topcoat, since it's not too matte or dull;" while Choi added that a regular topcoat would also suffice.
The Polish

I decided to really go for it and picked a Barry M Nail Paint in "Navy" to go with my Barry M "All In One Basecoat, Topcoat & Nail Hardener." As it was also fall at the time of writing — and a few days from Halloween — I thought this dark blue would be the perfect seasonal shade.
The Method

These are my natural nails and IMO, they're just on the brink of the length that I'd normally cut them.

So first off, I applied my base coat.


Then the navy blue polish came next — it was ridiculously easy to achieve this look.


Perhaps it was a placebo effect, but I felt like my nails looked longer already!


The right hand was much harder (I'm right-handed) and the finished look was a little shakier. It was at this point that I realized I should have used tape to mark my lines out.

When it comes to nails, patience is not my strong point and I messed my thumb nail up a little. I tried to fix it but made it worse, so I let it be. Sad times.

After this, I applied my topcoat and my nails were contoured. I felt like the Kim Kardashian of nails!
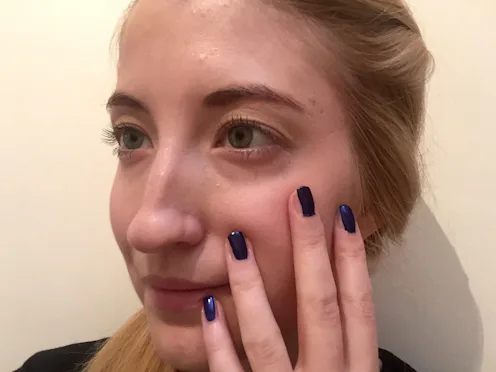
The Finished Look

Surprisingly, I actually think this method worked and it made my nails look longer, although I knew the truth. However, I was down with how imperfect my strokes were and every time I glanced down at my nails and spotted a shaky line of polish, I'd inwardly cringe a little.

Aside from a few mishaps, like melting my nail polish by accident on a hot teapot (see above), I do believe nail contouring works. Of course, like any contouring, it's all an illusion, but if you're after a fuss-free alternative to falsies, you're a nail-biter, or you're too impatient to grow your nails, this mani could be great for you.
I'd definitely give nail contouring a whirl again in the future, but I'll make sure to wait patiently between coats and use tape to create neater lines. So, if you're a fellow false nails hater, try this rad nail hack on for size to get elongated nails without all the hassle!
Images: Phoebe Waller
